
The Azure Information Protection Scanner is a program designed to detect, classify, and optionally protecting documents stored on File Shares and On-Premises SharePoint servers. The overview below is from the official documentation at https://docs.microsoft.com/en-us/information-protection/deploy-use/deploy-aip-scanner. This blog post is meant to assist customers and partners with deployment of the AIP Scanner. If there is ever a conflict between this blog and the official documentation, the official documentation is authoritative.
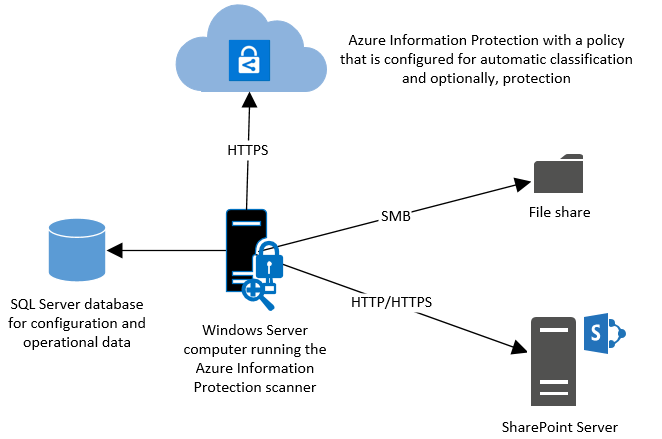
The AIP Scanner runs as a service on Windows Server and lets you discover, classify, and protect files on the following data stores:
- Local folders on the Windows Server computer that runs the scanner.
- UNC paths for network shares that use the Common Internet File System (CIFS) protocol.
- Sites and libraries for SharePoint Server 2010*, 2013, and 2016.
*SharePoint 2010 support is only available with a valid extended support contract for that product.
The scanner can inspect any files that Windows can index, by using iFilters that are installed on the computer. Then, to determine if the files need labeling, the scanner uses the Office 365 built-in data loss prevention (DLP) sensitivity information types and pattern detection, or Office 365 regex patterns. Because the scanner uses the Azure Information Protection client, it can classify and protect the same file types.
With an AIP Premium P1 license, you can run the scanner in discovery mode and use the information obtained in the reports to make more informed decisions based on your exposure to risk.
NOTE: The scanner does not discover and label in real time. It systematically crawls through files on data stores that you specify, and you can configure this cycle to run once, or repeatedly.
This blog post was written based on the public preview version of the AIP Scanner (1.36.18.0). Every effort will be made to update it when things change, but if you run into difficulty running any of the commands on a newer version, please use the official documentation to identify any changes.
***NOTE: This post shows only the features possible with an Azure Information Protection P1 license and does not cover the additional classification and protection features of the AIP scanner. If you have AIP Premium P2, please review the blog here for full details***
Prerequisites:
To install the AIP Scanner in a production environment, the following items are needed:
- A Windows Server 2012 R2 or 2016 Server to run the service
- Minimum 4 CPU and 4GB RAM physical or virtual
NOTE: TL;DR: More RAM is better.
The scanner will allocate RAM 2.5-3 times of size of all files being scanned in parallel. Thus, if you scan 40 files that are 20MB each at the same time, it should take about 20*2.5*40=2GB RAM. However, if you have one big 1GB file it can take 3GB of RAM just for that file. - Internet connectivity necessary for Azure Information Protection
- A SQL Server 2012+ local or remote instance (Any version from Express or better is supported)
- Sysadmin role needed to install scanner service (user running Install-AIPScanner, not the service account)
NOTE: If using SQL Server Express, the SQL Instance name is ServerName\SQLExpress - Service account created in On Premises AD and synchronized with Azure AD (I will call this account AIPScanner in this document)
- Service requires Log on locally right and Log on as a service right (the second will be given during scanner service install)
- Service account requires Read permissions to each repository for discovery and Read/Write permissions for classification/protection
- AzInfoProtection_PREVIEW_1.36.18.0.exe available on the Microsoft Download Center (The scanner bits are included with the AIP Client)
Installation:
NOTE: We have scripted the scanner installation process and it is now available at https://techcommunity.microsoft.com/t5/Azure-Information-Protection/Azure-Information-Protection-Scanner-Express-Installation/ba-p/265424. Although these steps are still valid, the scripted method is far less prone to mistakes and much faster for deployment.
A basic installation of the AIP Scanner service is simple and straightforward.
- Log onto the server where you will install the AIP Scanner service using an account that is a local administrator of the server and has permission to write to the SQL Server master database. (more restrictive scenarios are documented in the official documentation)
- Run AzInfoProtection_PREVIEW_1.36.18.0.exe on the server and step through the client install (this also drops the AIP Scanner bits)
- Next, Right-click on the Windows button in the lower left-hand corner and click on Command Prompt (Admin)

- Type PowerShell and hit Enter

- At the PowerShell prompt, type the following command and press Enter:
Install-AIPScanner - When prompted, provide the credentials for the scanner service account (YourDomain\AIPScanner) and password
- When prompted for SqlServerInstance, enter the name of your SQL Server and press Enter
You should see a success message like the one below NOTE: If you get any errors at this point, verify network connectivity and resolve any permissions issues with the SQL Database before proceeding!
 - Right-click on the Windows button in the lower left-hand corner and click on Run
- In the Run dialog, type services.msc and click OK

- In the Services console, double-click on the Azure Information Protection Scanner service
- On the Log On tab of the Azure Information Protection Scanner Service Properties, verify that Log on as: is set to the YourDomain\AIPScanner service account

Scanner Configuration:
After the install of the AIP Scanner binaries, you must authenticate with the AIP Scanner Service Account to get a token for use in automated discovery, classification, and protection.
Authentication Token:
- On the server where you installed the scanner, create a new text document on the desktop and name it something like Set-AIPAuthentication.txt
- In this document, paste the line of PowerShell code below and save
Set-AIPAuthentication -webAppId <ID of the “Web app / API” application> -webAppKey <key value generated in the “Web app / API” application> -nativeAppId <ID of the “Native” application> - Open Internet Explorer and browse to https://portal.azure.com
- At the Sign in to Microsoft Azure page, enter the your tenant global admin credentials
- In the Microsoft Azure portal, click on Azure Active Directory in the left-hand pane

- Under Manage, click on App registrations

- In the App registrations blade, click the + New application registration button
- In the Create blade, use the values shown below to create the registration

- Click the Create button to complete the app registration
- In the AIPOnBehalfOf blade, hover the mouse over the Application ID and click on the Click to copy icon when it appears

- Minimize (DO NOT CLOSE) Internet Explorer and other windows to show the desktop
- On the desktop, return to Set-AIPAuthentication.txt and replace <ID of the “Web app / API” application> with the copied Application ID value
and Save WARNING: Ensure there is only a single space after the Application ID before -webAppKey
 - Return to the browser and click on the Settings button

- In the Settings blade, under API ACCESS, click on Keys

- In the Keys blade, add a new key by typing AIPClient in the Key description field and your choice of duration (1 year, 2 years, or never expires)

- Select Save and copy the Value that is displayed
WARNING: Do not dismiss this screen until you have saved the value as you cannot retrieve it later
- Go back to the txt document and replace <key value generated in the “Web app / API” application> with the copied key value
and Save
WARNING: Ensure there is only a single space after the Application Key before -nativeAppId - In the Microsoft Azure portal, click on Azure Active Directory in the left-hand pane
- Under Manage, click on App registrations
- In the App registrations blade, click the + New application registration button

- In the Create blade, use the values shown below to create the registration

- Click the Create button to complete the app registration
- In the AIPClient blade, hover the mouse over the Application ID and click on the Click to copy icon when it appears
- Replace <ID of the “Native” application > in the Set-AIPAuthentication.txt document with the copied Application ID value and Save

- Return to the browser and in the AIPClient blade, click on Settings
- In the Settings blade, under API ACCESS, select Required permissions

- On the Required permissions blade, click Add, and then click Select an API

 NOTE: It may take a few moments for each of these blades to load
 - In the search box, type AIPO and click on AIPOnBehalfOf, and then click the Select button

- On the Enable Access blade, check the box next to AIPOnBehalfOf, click the Select button


- Click Done

- In the Required permissions blade, click Grant permissions
- In the popup window, click Yes

- Click on the Start menu and type PowerShell, right-click on the PowerShell program, and click Run as a different user.

- In the Run as different user dialog, insert the AIP Scanner Service credentials

- In the Scanner Service context PowerShell window, paste the completed command from Set-AIPAuthentication.txt and press Enter
- When prompted, enter the user AIPScanner@yourdomain.com and the password
NOTE: Replace yourdomain with the your tenant
- You will see the message below in the PowerShell window once complete

Configuring Repositories:
Repositories can be on-premises SharePoint 2010, 2013, or 2016 document libraries or lists and any accessible CIFS based share.
NOTE: In order to do discovery, the scanner service pulls the documents to the server, so having the scanner server located in the same LAN as your repositories is recommended. You can deploy as many servers as you like in your domain, so putting one at each major site is probably a good idea.
- To add a file share repository, open a PowerShell window and run the command below
Add-AIPScannerRepository -Path \\fileserver\documents - To add a SharePoint 2013/2016 document library run the command below
Add-AIPScannerRepository -Path http://sharepoint/documents - To verify that the repositories that are configured, run the command below
Get-AIPScannerRepository
Sensitive Data Discovery:
One of the most useful features of the AIP Scanner is the discovery of sensitive data across all of your configured repositories. You can do this by using Set-AIPScannerConfiguration with a switch called -DiscoverInformationTypes. When this switch is set to All, the scanner will discover files that contain any data in the list of all Office 365 DLP sensitive data types so configuration of conditions in labels are not required.
NOTE: Normally, custom data types based on string and regex values are also available, but these require AIP Premium P2 licensing.
The PowerShell command below will allow you to scan your repositories against all information types.
Set-AIPScannerConfiguration -DiscoverInformationTypes All
To start the discovery, use the PowerShell command below
Start-AIPScan
After running the scan, you can review the logs by opening the Event Viewer and clicking on
you can view the detailed logs at C:\users\<Scanner Service Account Profile>\appdata\local\Microsoft\MSIP\Scanner\Reports. There you will find the summary txt and detailed csv files.
Below is a screenshot showing the DetailedReport.csv file after a full discovery scan.

As you can see, it shows the file name and all of the sensitive information types that were identified in each file. This data can be reviewed manually, or more realistically, ingested into a SIEM for analysis and reporting.
Protection Options:
Although automated protection via the AIP scanner is more convenient, there are still options available with AIP P1 for classifying and/or protecting the sensitive data. These options are
- Manual Classification
- With Manual classification, a user must open each document containing sensitive information and classify it via the AIP toolbar.
- Manual or Bulk Classification via the AIP client Windows Explorer add-in
- Using the AIP client via the right-click context menu in Windows Explorer, you can classify and/or protect individual files or entire directories of files with a single label.
- Bulk Classification via the AIP PowerShell cmdlets
- Using the PowerShell cmdlets contained in the AzureInformationProtection PowerShell module (full details here) such as Set-AIPFileLabel, you can potentially script solutions for classifying and protecting the files that are identified to contain sensitive data in the DetailedReport.csv files produced by the AIP scanner.
You should now have a fully functional AIP Scanner instance. You can repeat this process on multiple servers as necessary and use the same Set-AIPAuthentication command for each of them. This is a simple setup for a basic AIP scanner server that can be used to discover a large amount of sensitive data easily. I highly recommend reading the official documentation on deploying the scanner as there are some less common caveats that I have left out and they cover performance tips and other additional information.
Thanks,
The Information Protection Customer Experience Team