This post has been republished via RSS; it originally appeared at: Microsoft Stream Archive articles.
Originally published by Adarsh Solanki, Program Manager, on Friday, July 15, 2016
Uploading videos to share with your organization is easy with Microsoft Stream. In this post, I am going to show how you can best use the upload controls to maximize the effectiveness of your videos.
If you aren’t familiar with uploading on Microsoft Stream, of you can read the documentation or watch the How To video here:
The importance of metadata
The end goal of uploading videos to Microsoft Stream is to share content with your colleagues. Without descriptive and expressive metadata, your video runs the risk of being undiscoverable by viewers, making it harder for your peers to view your videos.
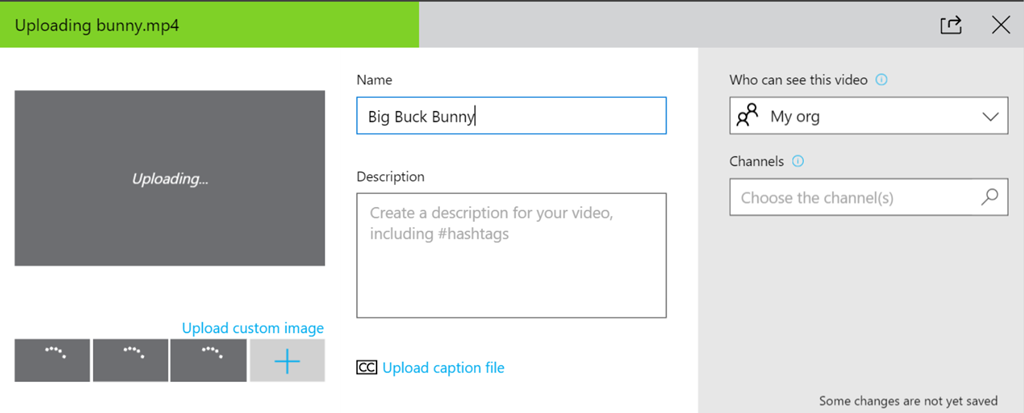
During uploads, you won’t be able to navigate away from the upload page or close the browser. This is the perfect time to begin updating the metadata of your video to enhance the viewing and discovery experience.

Name
While we do use your original file as a default “Name”, we recommend customizing the name to be more descriptive. Often times file names are too concise or cryptic to be useful in a portal experience.
E.g. “Big Buck Bunny”
Description
The Description field is where you can let your creativity flow, expanding on the nature and contents of your video in a long-form manner. Your description can contain hashtags by prefixing specific words with the # symbol – and these terms will be automatically transformed into hyperlinks on your player page and indexed for search! Hashtags are a powerful way to loosely tie together videos that may not belong strictly in the same channel.
E.g. “Big Buck Bunny is an open-source #animated #film created by the #Blender foundation”
Captions
Uploading a caption file is an important way to aid in the accessibility of your content. The presence of captions led to a 12% increase in video viewership, as discovered by internal research from Facebook. ( source )
In the future, we hope to enable options for users to automatically generate captions or to manually create/edit captions from within the Stream portal itself!
Privacy
The gray panel on the right is useful for controlling access to your video. By default we select “My Org” which allows any of your colleagues to view the video. If you need to protect access, choose “Custom” to define a specific list of people or groups from your Active Directory. “Only Me” is useful for keeping a video private until you are ready to release it.
Optionally add your video to one or more channels. Users who follow the Channel(s) will see your video on their Channel feed from the Homepage, making Channels a great tool for organization of content and scoped collaboration.
Thumbnail
The last step in optimizing your video metadata is by selecting a representative thumbnail. The thumbnail of a video is the face of your video in Microsoft Stream! Whether it be the search results page, a channel page, or the homepage itself, the first impression that viewers have of your video is the thumbnail you choose!
Stream will automatically generate 3 thumbnails for you to choose from, but if none of those fit your content, feel free to upload a custom image to best represent your content.
With this information, you are now ready to begin uploading videos in the most effective way possible. If you haven’t uploaded your first video yet, now’s your chance to give it a shot !
