
So you have purchased Azure Information Protection (or M365/EMS licenses that include it) and you want to know the best place to start. We recommend starting by discovering what types of sensitive information you are working with. This can be done easily using a combination of the AIP scanner and the new AIP Azure Log Analytics Data discovery dashboard.
This approach allows you to begin getting value out of your AIP purchase from day 1 and can help you
- Develop your AIP Taxonomy (labels and policies)
- Map sensitive information types to data classification levels
- Guide your employees in making active classification decisions based on the actual data you have in your network
So how exactly would you go about this? The AIP scanner allows you to scan your on premises data repositories against a predefined set of sensitive information types and custom types you build with keywords or regular expressions. Once the data is discovered, the AIP scanner can report all of this data up to Azure Log Analytics so you can begin visualizing your data risk (so you can develop a plan to mitigate it).

The steps for making all of this work are listed below:
- Configure on-premises prerequisites (Server, SQL, Service Account)
- Configure Azure prerequisites (ALA workspace, Cloud service account, Azure applications for service authentication)
- AIP scanner install and configuration
Now, this may seem like a lot of things, but don’t worry. I will walk you through the whole process so that it is as painless as possible.
On-Premises Prerequisites
- At least one Server (Physical or Virtual) capable of running the AIP scanner
- The official specifications are listed in the docs here but at least 4 cores and 4GB RAM is required (more is highly recommended) and at least 10GB of free storage space for temporary files (again, more = better)
- A SQL Server Instance to store configuration and scanned file list (Microsoft uses SQL Server Express Edition installed locally on each of our AIP scanners)
- An install account with sysadmin rights to the SQL instance and local admin rights on the Server
- An on premises user account to run the AIP scanner service (e.g. Contoso\AIPScanner)
- No special rights are needed for configuration, but this account will need read rights to all configured repositories to do discovery and read/write for labeling and protection
Azure Prerequisites
- Global Admin permissions for the tenant
- Synchronized or created cloud service account
- This is typically done using Azure AD Sync after the on-premises service account is created. If you need to create an account in the cloud, I have provided a PowerShell Script below that can create one.
- Configure Azure Applications necessary for AIP scanner authentication. This can be done using the steps provided here, but I have provided a script below that is far easier and less prone to accidental mistakes.
For both of the scripts below you will need to connect to Azure AD PowerShell (open an Administrative PowerShell prompt). This can be done using the commands below and providing tenant Global Admin credentials.
Install-Module AzureAD

Import-Module AzureAD

Connect-AzureAD
Create a Cloud Account (this is only necessary if you are NOT doing Azure AD Sync to synchronize your service account)
$PasswordProfile = New-Object -TypeName Microsoft.Open.AzureAD.Model.PasswordProfile
$PasswordProfile.ForceChangePasswordNextLogin = $false
$Password = Read-Host -assecurestring “Please enter password for cloud service account”
$Password = [System.Runtime.InteropServices.Marshal]::PtrToStringAuto([System.Runtime.InteropServices.Marshal]::SecureStringToBSTR($Password))
$PasswordProfile.Password = $Password


$Tenant = Read-Host “Please enter tenant name for UserPrincipalName (e.g. contoso.com)”
New-AzureADUser -AccountEnabled $True -DisplayName “AIP Scanner Cloud Service” -PasswordProfile $PasswordProfile -MailNickName “AIPScannerCloud” -UserPrincipalName “AIPScannerCloud@$Tenant”
Create Azure Applications for AIP Authentication (you only need to run these the first time you are setting up the AIP scanner. You can use the same command created at the end to authenticate multiple AIP scanner servers)
New-AzureADApplication -DisplayName AIPOnBehalfOf -ReplyUrls http://localhost
$WebApp = Get-AzureADApplication -Filter “DisplayName eq ‘AIPOnBehalfOf'”
New-AzureADServicePrincipal -AppId $WebApp.AppId
$WebAppKey = New-Guid
$Date = Get-Date
New-AzureADApplicationPasswordCredential -ObjectId $WebApp.ObjectID -startDate $Date -endDate $Date.AddYears(1) -Value $WebAppKey.Guid -CustomKeyIdentifier “AIPClient”$AIPServicePrincipal = Get-AzureADServicePrincipal -All $true | ? {$_.DisplayName -eq ‘AIPOnBehalfOf’}
$AIPPermissions = $AIPServicePrincipal | select -expand Oauth2Permissions
$Scope = New-Object -TypeName “Microsoft.Open.AzureAD.Model.ResourceAccess” -ArgumentList $AIPPermissions.Id,”Scope”
$Access = New-Object -TypeName “Microsoft.Open.AzureAD.Model.RequiredResourceAccess”
$Access.ResourceAppId = $WebApp.AppId
$Access.ResourceAccess = $ScopeNew-AzureADApplication -DisplayName AIPClient -ReplyURLs http://localhost -RequiredResourceAccess $Access -PublicClient $true
$NativeApp = Get-AzureADApplication -Filter “DisplayName eq ‘AIPClient'”
New-AzureADServicePrincipal -AppId $NativeApp.AppId“Set-AIPAuthentication -WebAppID ” + $WebApp.AppId + ” -WebAppKey ” + $WebAppKey.Guid + ” -NativeAppID ” + $NativeApp.AppId | Out-File ~\Desktop\Set-AIPAuthentication.txt
Start ~\Desktop\Set-AIPAuthentication.txt
NOTE: Keep the Set-AIPAuthentication.txt file open for use during AIP scanner configuration
Configuring AIP Azure Log Analytics
When you log into the AIP blade of the Azure Portal, you will see 4 new locations in the navigation. Under Dashboards, you now have the Usage report (preview) Activity log (preview), and Data discovery (preview), but we will get to those later. The one you are initially concerned with is the Configure analytics (preview) under the Manage section. Click on this and you should see a page like the one below.
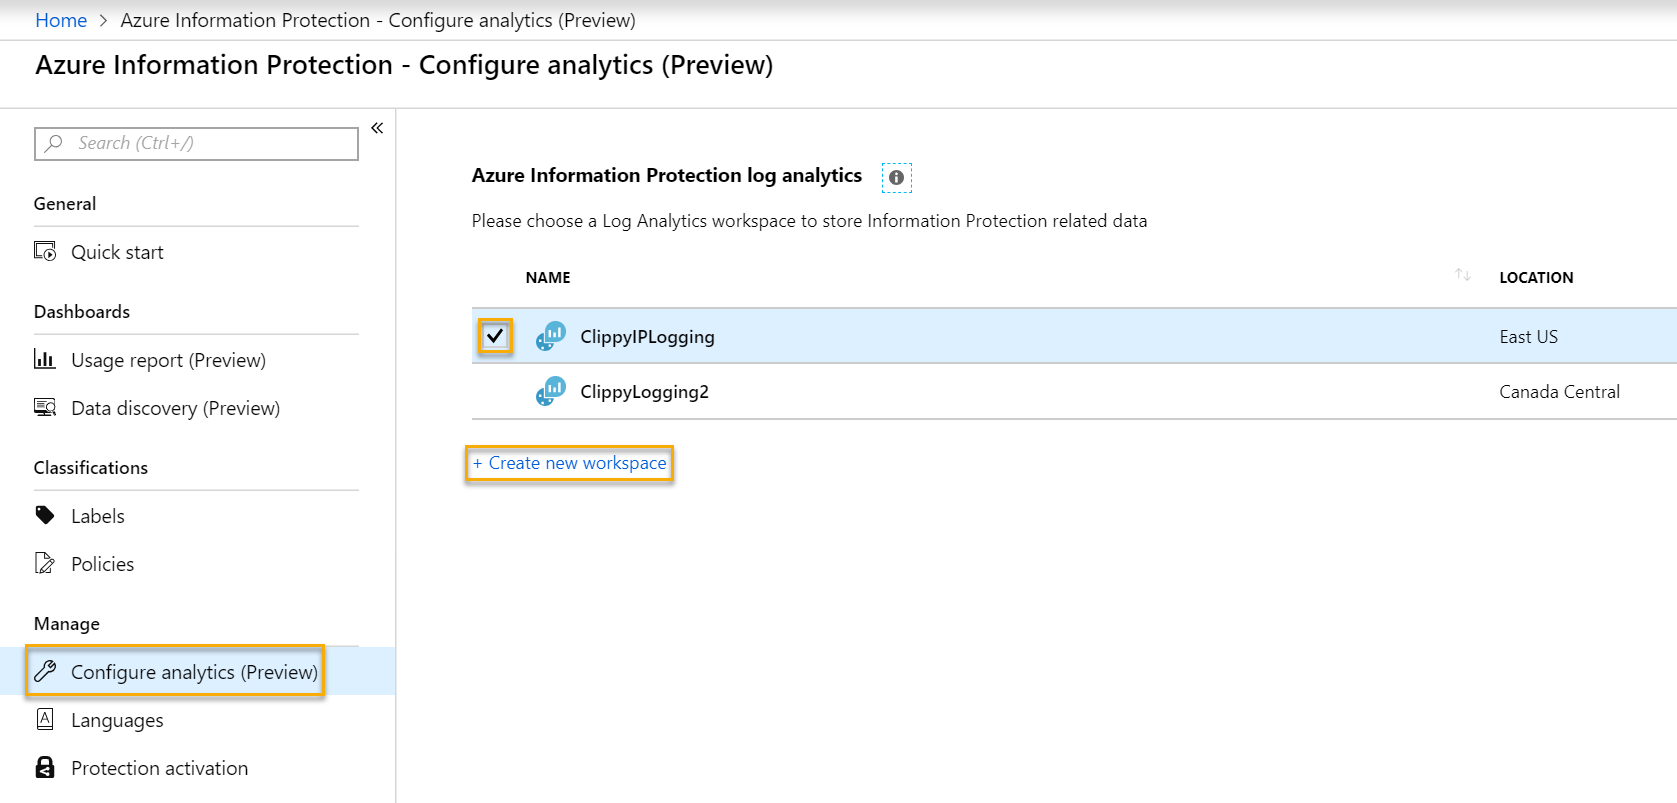
If you already have a configured ALA Workspace for this purpose, check the box next to it and press OK. Otherwise, click the + Create new workspace link.
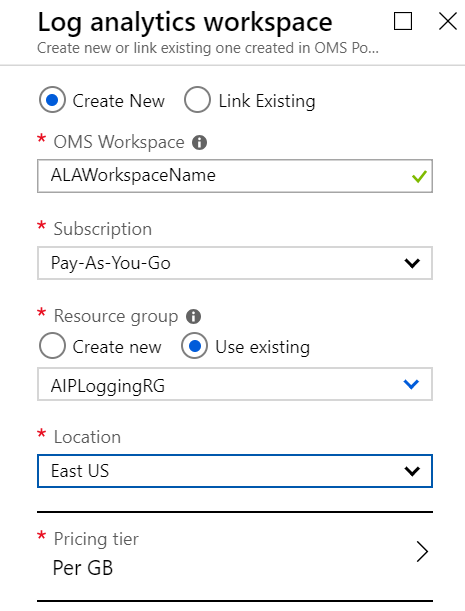
Fill in the items shown in the image below (the OMS Workspace must be unique across Azure), and press OK.
Finally, back in the Configure analytics (preview) blade, check the box next to the workspace and click OK.
Installing the AIP Client
Installing the AIP client binaries is very straight-forward. Navigate to https://aka.ms/AIPClient and click the Download button. When presented with the download options, check the box next to AzInfoProtection.exe and click the Next button. The download should start automatically. Once complete, double-click on the file and run through the quick setup on the prepared AIP scanner server.
After the binaries are installed, run the command below to install the AIP scanner. When prompted, enter the credentials for the AIP scanner service account (e.g. Contoso\AIPScanner). It will ask you for the SQL Server instance name (if you are using SQL Express remember to use ServerName\SQLExpress as the instance name).
NOTE: At this time, a different SQL instance is needed for each AIP Scanner instance.
Install-AIPScanner
Now that you have the AIP scanner installed, you can run the Set-AIPAuthentication command to get the auth token. Open a PowerShell prompt as the AIP scanner service account and run the command from Set-AIPAuthentication.txt created earlier. As mentioned previously, save this command for use on future instances of the AIP scanner as the same command can be used on multiple servers.
WARNING: Make sure you run this in the context of the AIP scanner service account (run PowerShell as a different user, or log in as the service account to run the command) or the AIP scanner will not function.
Finally, run the command below to initialize the service with the new token.
Restart-Service AIPScanner
The scanner should be fully functional at this point and you can run the commands below to verify the state (should be idle) and see the default configuration.
Get-AIPScannerStatus
Get-AIPScannerConfiguration
Next, you can configure the repositories you want to scan. I recommend configuring these with the -SetDefaultLabel property set to Off and -PreserveFileDetails property set to On. That way, when/if you set a default label in your global policy, your scanner will not start to classify items inappropriately. The second switch prevents the last modified date from being changed on files when they are labeled. More details on repository options can be found in the official documentation.
Add-AIPScannerRepository -Path \\Fileserver\Documents -SetDefaultLabel Off -PreserveFileDetails On

Add-AIPScannerRepository -Path https://SharePointServer/Documents -SetDefaultLabel Off -PreserveFileDetails On
Next, we want to set the scanner configuration to discover data that contains any of the default sensitive information types and any custom ones you may define in the portal. I have also included the switch to disable enforcement even though this is the default.
Set-AIPScannerConfiguration -Enforce Off -DiscoverInformationTypes All
The last thing we need to do is actually run the scanner. This can be done using the command below.
Start-AIPScan
At this point, you can wait for the scan to finish and review the logs at C:\users\Scanner Service Account Profile\appdata\local\Microsoft\MSIP\Scanner\Reports. There you will find the summary txt and detailed csv files.
After a few minutes you will also begin seeing data start flowing into your Data discovery (preview) dashboard in the azure portal. Since you are only doing discovery, you will not see any labeled or protected files (unless you have been using AIP before running the scanner), but you will see the identified files and the sensitive data types found in the configured repositories.

Armed with this information, you can begin creating automatic conditions that the scanner can use to label and (optionally) protect these files. If you are not ready to use automatic conditions for all of your users, you can create a scoped policy and labels specific to the AIP scanner. Additional details on creating scoped labels and policies can be found here. Once you have configured these conditions, you can run the commands below to enforce the labeling of files based on only your defined conditions.
Set-AIPScannerConfiguration -Enforce On -DiscoverInformationTypes PolicyOnly

Start-AIPScan
The result will be similar to the image shown below with labeled and protected files and the distribution graph showing in the Data discovery (preview dashboard.

As an additional bonus, you can use the mappings you have created to configure recommendations for your users that will drive active participation in accurately classifying and protecting sensitive data as it is being created.
Please let us know in the comments if you have any questions on this approach. If you are interested in how Microsoft uses the AIP scanner, please see the MSIT showcase at https://aka.ms/ScannerShowcase.
Thanks,
The Information Protection Customer Experience Engineering Team