
This post has been republished via RSS; it originally appeared at: Ask The Performance Team articles.
First published on TECHNET on Mar 04, 2015Hello AskPerf Readers! Dhiraj here from the Windows Performance team to talk about deploying RDS using Windows PowerShell on Windows Server 2012 R2.
As you know, PowerShell has been around for quite a few years now (November 2006 to be exact). Over the past 8 years, we have seen PowerShell become an integral part of Windows. One such example is deploying RDS within your environment. In this blog, we are going to walk you through setting this up. With that, let’s get rolling!
Before we begin though, we need to import the RDS module using the Import-Module cmdlet:
Import-Module RemoteDesktop

We will use the New-SessionDeployment cmdlet to begin with the installation. Below is the syntax for this cmdlet:
New-SessionDeployment [-ConnectionBroker] <string> [-WebAccessServer] <string> [-SessionHost] <string[]>
Note If you are installing the Session Host on the Connection Broker, then you need to run this cmdlet on a remote server, as running it on the connection Broker will give you the following error:

The Session Host role needs a reboot after the install, and we received the above error as PowerShell cannot resume the deployment after a reboot. However, this will work in the GUI if you do the same process.
In this deployment, we will use 3 servers for the deployment:
- RDCBWA.spike.com – RD Connection Broker, RD Web Access, and RD Session Host
- RDSH01.spike.com – Second RD Session Host
- DC01.spike.com – RD license server
We will need to add RDSH01 and DC01 to All Servers pool on RDCBWA before we start the deployment.

Now we run the below cmdlet on RDSH01 to install RD Connection Broker, RD Web Access and RD Session Host on RDCBWA:
New-SessionDeployment –ConnectionBroker RDCBWA.spike.com –WebAccessServer RDCBWA.spike.com –SessionHost RDCBWA.spike.com
During the install, we’ll see the following progress meters:
1. Validation begins:

2. Deployment begins:

3. Connection Broker is installed:

4. RD Web Access role is installed:

5. RD Session Host role is installed:

6. After all roles are installed, the RDCBWA.spike.com server is restarted:

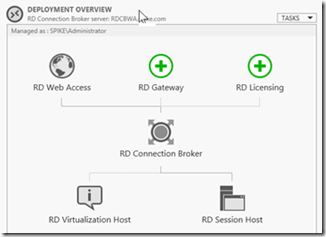
Once the PowerShell setup finishes, we now go to RDCBWA.spike.com and verify the installation. As you can see from the screenshot below, everything except the RD Gateway and Licensing server have been installed. We will now add another session host and a Licensing server.

First, let’s add the second RD Session Host server to our deployment. We will use the Add-RDServer cmdlet and run it on the Connection Broker this time.
Add-RDServer -Server RDSH01.spike.com -Role RDS-RD-SERVER -ConnectionBroker RDCBWA.spike.com
When you run the above command, you will see the following progress:


RDSH01.spike.com is now rebooted:

We can now verify the addition of the second Session Host server in Server Manager:

We are now ready to add our Before proceeding, let’s configure RD Licensing server.for our deployment. To install RD licensing role, we use the below cmdlet:
Add-RDServer -Server DC01.spike.com -Role RDS-LICENSING -ConnectionBroker RDCBWA.spike.com
You will now see the below progress messages:


We now need to activate our License server and install CALs via the Licensing Manager GUI on the License server. I have activated the License Server and installed PerUser CALs.
Let’s configure our deployment for licensing. We use the below cmdlet for this:
Set-RDLicenseConfiguration -LicenseServer DC01.spike.com -Mode PerUser -ConnectionBroker RDCBWA.spike.com
Running the above cmdlet requires confirmation:

Select yes and continue.
When finished, it will return to the next line:

To confirm that licensing is configured, run the following cmdlet:
Get-RDLicenseConfiguration

We can now confirm everything in Server manager:


We are halfway done here and have completed the installation of our roles. We now need to configure RDS to make Desktop Sessions and RemoteApps available to users.
This takes us to the next step: creating a new collection using PowerShell.
We will create two collections here consisting each of the RDSH servers, with one for Desktop Sessions and the other for RemoteApps.
To create a new collection, we use the below cmdlet:
New-RDSessionCollection –CollectionName SessionCollection –SessionHost RDCBWA.spike.com –CollectionDescription “This Collection is for Desktop Sessions” –ConnectionBroker RDCBWA.spike.com
This also shows a progress bar and summary when it finishes:


We can verify this set up in Server Manager. As this collection is for Desktop Sessions, nothing else needs to be done.

Let’s go ahead with creating the second collection for RemoteApps:
New-RDSessionCollection –CollectionName RemoteAppCollection –SessionHost RDCBWA.spike.com –CollectionDescription “This Collection is for RemoteApps” –ConnectionBroker RDCBWA.spike.com
When it completes, we see the summary and collection in Server Manager:


As we will use this collection for publishing RemoteApps, Let’s go ahead with adding RemoteApp’s to it:
New-RDRemoteapp -Alias Wordpad -DisplayName WordPad -FilePath "C:\Program Files\Windows NT\Accessories\wordpad.exe" -ShowInWebAccess 1 -CollectionName "RemoteAppCollection" -ConnectionBroker RDCBWA.spike.com
Summary progress below:


Server Manager shows the RemoteApp added:

And with that, you are done! Users can now access the Desktop Session and Remote App Collections.

Windows Server 2012 R2 comes with enormous amount of PowerShell cmdlets. In this article we’ve only seen a few of them. We may dive deeper into the power of PowerShell for managing RDS for Server 2012 R2 in future posts.
If you are interested in setting up a VDI deployment using PowerShell, please check the link below:
Setting up a new Remote Desktop Services deployment using Windows PowerShell
-Dhiraj