
This post has been republished via RSS; it originally appeared at: Ask The Performance Team articles.
First published on TECHNET on Oct 31, 2012Welcome back! It’s Day 10, and part 2 of our posts on RDS. Today we are going to discuss Virtual Machine-based desktop deployment, focusing on creating a pooled collection. There are two primary types of RDS deployments in Windows Server 2012:
- Virtual machine-based desktop deployment (Virtual Desktop Infrastructure (VDI)
- Session-based desktop deployment (Classic Remote Desktop Services and Remote Applications)
There are two prerequisites for using the new "Remote Desktop Services installation" type of role installation in Windows Server 2012:
- All RDS Servers must be joined to the same Active Directory Domain.
- Before you can create a VDI collection, the template (gold image) Virtual Machine must be sys-prepped.
Required Roles for all RDS deployments:
- The RD Connection Broker and RDWeb are both mandatory roles.
- Virtual Machine based desktop deployment requires the following roles: RD Connection Broker, RD Web Access, RD Virtualization Host, and Hyper-V Server.
- Session based desktop deployment requires the following roles: RD Connection Broker, RD Web Access, and RD Session Host.
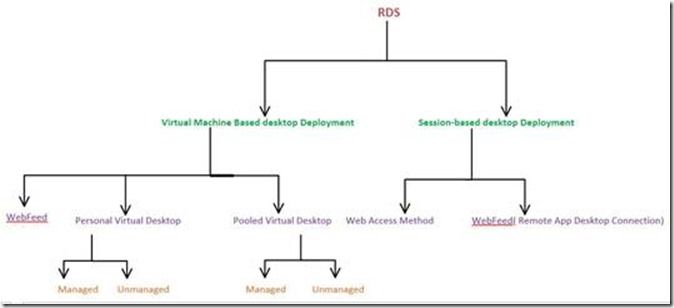
Flow Chart of RDS
Today’s focus is the installation and configuration of RDS:
Virtual Machine Based Desktop Deployment
Our objective is to walk through the different steps that are required to complete a successful implementation of the Virtual Machine Based Desktop Deployment or Virtual Desktop Infrastructure (VDI) deployment.
We need to decide how we want to deploy the necessary management components of the deployment. One of the areas that we receive numerous calls in CTS, is concerning “What roles can be deployed on a single component of the RDS management servers?” The recommendation has been to deploy the components on their own dedicated servers.
But, we need to address the following questions:
- Is this a test deployment?
- Is this a Pre-Production Pilot?
- Troubleshooting?
In the case of question 1, the necessity for deploying all roles on their own dedicated server is not as important. The idea is that this is an experimental set of servers to help with gaining a better understanding of the components and how they all work together and how different the systems are to manage.
In the case of question 2, we are looking to potentially move this system into production and need to consider the scalability of the solution. Deploying multiple roles on individual servers can potentially impact the scalability of the different components. You may want to add additional RD Web Servers to create a highly available RD Web interface. Having this role on a single server lends itself to being able to configure multiple RD Web servers in a web farm. Ideally having a server dedicated to each component will allow the ability to scale out much more rapidly and efficiently.
In the case of question 3, having different components on their own dedicated servers allows for better isolation and troubleshooting of that individual component.
We will be deploying a test based scenario and will install all the necessary roles on a single RDS server.
So let’s get right to it by exploring how to deploy a Virtual Machine Based Desktop Deployment.
1. Open Server Manager (ideally from the Server you want to host the Session Broker role), Click on Add Roles and Features , Select Remote Desktop Services Installation and Click Next

2. Select Deployment Type of Standard deployment

3. Select Virtual machine-based desktop Deployment and Click Next

4. Click Next on the Review of role Services screen

5. Specify which server to act as the RD Connection Broker Server and Click Next

6. Specify which server to act as the RD Web Access Server and Click Next
(In our example, we’re elected to host the RD Web Access role on the same host as the Session Broker role.)

7. Specify the RD Virtualization Host and Click Next
In our example we’re using the same host for all 3 roles. The Hyper-V role will be installed if it isn’t already.

8. Confirm Selection and check mark on Restart Destination Server automatically if Required , Click Deploy

After completion of this process, you have successfully installed the RD Connection Broker , RD Web Access , RD Virtualization Host.
Virtual Machine-based desktop Deployment is of two types:
- Personal Virtual Desktop Collection – Administrators manually assign virtual desktops to the users.
- Pooled Virtual Desktop Collection - Administrators deploy virtual desktops and users are randomly assigned virtual desktops. At log off virtual desktops are generally rolled back (rollback is optional).
Creating a Pooled Virtual Desktop Collection
There are two types of Pooled Virtual desktop Collections:
- Pooled Managed The Virtual desktop machine is created using the Sysprep Template of a virtual machine. We can recreate the virtual desktops from this image at will.
- Pooled Unmanaged We can add the existing virtual machine to this virtual desktop collection from Hyper V pool.
With either option, the administrator can configure the pool to store the user profiles on User Profile disks separate from the machines.
Pooled - Managed Virtual desktop Collection
1. Open Server Manager , Click Remote Desktop Services and Select Overview

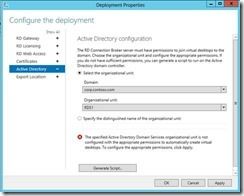
2. In Deployment Overview Section, Click Tasks and Select Edit Deployment properties .

3. Expand Active Directory and Select the Organization Unit if you would like to add the Virtual desktops to the domain , Click Apply
4. Select Collections tile
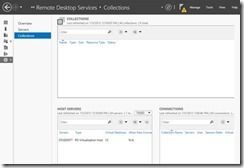
5. In Collection Section, Click Tasks and Select Create Virtual Desktop Collection , Click Next

6. Type the Name of the Collection and Click Next

7. Select the Pooled Virtual desktop collection and Click Next

8. Specify the Virtual Desktop Template which you must have already configured in Hyper V (making sure to have syspreped the virtual machine after installing the software required by users) and Click Next.
Note If you do not have an image then it can be easily created using the following command:
%windir%\system32\sysprep\sysprep.exe /generalize /oobe /shutdown /mode:vm
See the Windows 2012 RDS guides for more information on how to SYSPREP a template VM.

9. Click Next

10. Specify the unattended installation settings and Select the OU

11. Specify the Users and Groups and Specify the Prefix and Suffix for the Virtual Desktop

12. Specify Virtual Desktop allocation and Click Next

13. Specify Virtual desktop storage and Click Next

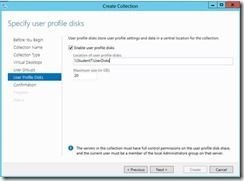
14. Specify User Profile disk if you want with the UNC Path and Click Next

15. Confirm Selections and Click Create

16. View Progress and Click Close

17. In Collection Section , Right Click VDI ( Collection Name) and Select Task Status details

This completes the Virtual Desktop Managed Pool deployment.
Pooled - Unmanaged Virtual desktop Collection
1. In Collection Section, Click Tasks and Select Create Virtual Desktop Collection , Click Next

2. Type the Name of the Collection and Click Next

20. Select the Pooled Virtual desktop collection and Uncheck Automatically create and manage virtual desktops , Click Next

21. Specifying the Existing Virtual Desktops and Click Next

22. Specify the Users and Groups and Click Next

23. Specify User Profile disk if you want with the UNC Path and Click Next
24. Confirm Selection and Click Create

25. View Progress

Whew…that was a lot of info (and screenshots)! With that, this concludes todays post. Tomorrow we will continue our RDS series of posts and look at Personal Desktop VDI deployments.
-AskPerf blog Team