
First published on MSDN on Jul 20, 2017
The default routes assigned to the Point-to-Site connection are inherited from the VNET’s routes. Additional routes may be needed to correctly route requests, bound for the VNET or on-premises, down the Point-to-Site tunnel. Below are three options to add routes the web app’s Point-to-Site configuration. The method of “Using the Azure Portal” is the recommended way to configure routes. The other two options are just as effective but are more prone to user error. This walkthrough assumes the following:
· You have configured a Point-to-Site connection on your web app
· The routes you are adding were not inherited from the VNET
Using the Azure Portal
Note: This will temporarily bring down the P2S connection disrupting any other apps that currently using the connection temporarily
1. Navigate to the Azure Portal
2. Select the web app
3. In the overview blade click on the App Service Plan

4. Select the Network option from this menu

5. Select Click here to manage
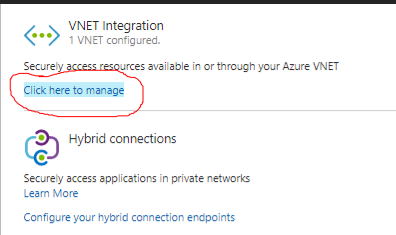
6. Select the VNET that the Point two site connection is connected to

7. At the very bottom of this list you can add in your additional routes.
8. Finally click save and the routes should be added. If you experience issues with the routing not working try syncing the network using the Sync Network option
Note: This will temporarily bring down the P2S connection disrupting any other apps that currently using the connection temporarily
Using resources.azure.com
Note: This will temporarily bring down the P2S connection disrupting any other apps that currently using the connection temporarily
1. Navigate to resource.azure.com
2. Navigate down to the route attribute
Subscription -> resourceGroup -> providers -> Microsoft.web -> serverfarms -> virtualNetworkConnections -> routes

From the top menu change the mode to read/write and then press the create button:
Give your resource a name similar to this “10.0.0.0-8“
Remove the JSON code and replace it with the following (make sure to replace the text in red with your values):
{


“id”: “/subscriptions/your subscription id/resourceGroups/your resource group/providers/Microsoft.Web/serverFarms/your App Service Plan/virtualNetworkConnections/vnet name/routes/the name you used in step 3”,
“name”: “name you specified in step 4”,
“type”: “Microsoft.Web/serverfarms/virtualNetworkConnections/routes”,
“location”: “West Europe (or the location of your choice)”,
“properties”: {
“name”: “name specified in step 4”,
“startAddress”: “start ip address”,
“endAddress”: ” end ip address “,
“routeType”: “DEFAULT”,
“denyRoute”: false
}
}
Here’s an example of the json object:
{
“id”: “/subscriptions/xxxx/resourceGroups/ ResourceGroup/providers/Microsoft.Web/serverFarms/ ASP/virtualNetworkConnections/ webappVNET/routes/10.0.0.0-8”,
“name”: “10.0.0.0-8”,
“type”: “Microsoft.Web/serverfarms/virtualNetworkConnections/routes”,
“location”: “South Central US”,
“properties”: {
“name”: “10.0.0.0-8”,
“startAddress”: “10.0.0.0”,
“endAddress”: “10.255.255.255”,
“routeType”: “INHERITED”,
“denyRoute”: false
}
}
Press on the green PUT button
The items can be edited and deleted by selecting the Edit button on the newly created resource or by selecting the Actions(POST,DELETE). The page will still need to be in Read/Write mode to modify the resources.

Using PowerShell
Note: This will temporarily bring down the P2S connection disrupting any other apps that currently using the connection temporarily
Prerequisite: Having the
Azure PowerShell Module
installed
1. Follow steps 1 and 2 from the “Using resources.azure.com” section above
2. Select the PowerShell option and copy the #CREATE routes section of the PowerShell Commands
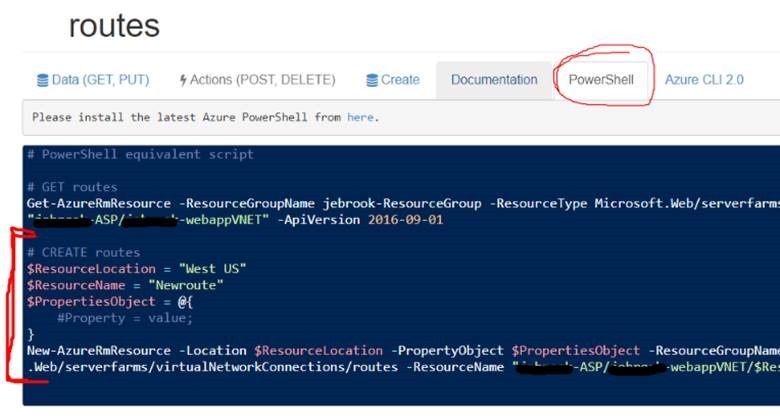
3. Open the PowerShell ISE and copy the commands. Remember before running the commands you must first login with your Azure Account using Login-AzureRmAccount
4. The properties section should be similar to the example below. Make sure to use ‘=’ instead of ‘:’ to set the values:
$PropertiesObject = @{
name = “192.168.0.0”;
startAddress = “192.168.0.0”;
endAddress = “192.168.255.255”;
routeType = “STATIC”;
denyRoute = “false”
}

5. You can use the command from resources.azure.com to list the existing routes.

Credit to my colleague Khaled Zayed for assistance with the resources.azure.com method. Let me know if this was helpful or if you have any questions in the comments below.
References:
https://docs.microsoft.com/en-us/azure/app-service-web/web-sites-integrate-with-vnet