
This post has been republished via RSS; it originally appeared at: Skype for Business Blog articles.
First published on TECHNET on Apr 16, 2016IMPORTANT NOTE - Microsoft has announced End of Support for Third party PBX system that used Exchange UM online. Please check for details before investing further into this set up https://blogs.technet.microsoft.com/exchange/2017/07/18/discontinuation-of-support-for-session-border-controllers-in-exchange-online-unified-messaging/
The Purpose of this Post is to provide some guidance to customers who use a PBX/IP-PBX based phone system and wish to Integrate it with Microsoft O365 Exchange UM Online for Voice mail.
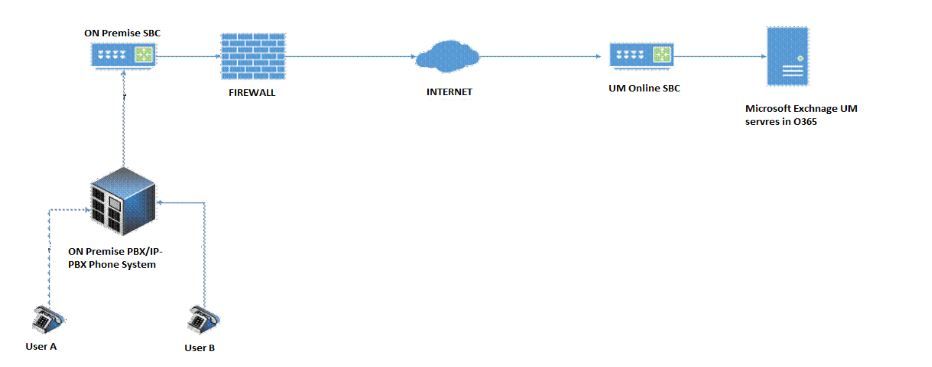
Below is a High level Architecture of UM Online looks like for a Customer with a Single Site Integrated with O365 for UM through an ON Premise SBC
Call Flow for Voice Mail - How does it work
- User A uses his PBX phone to call User B on his PBX phone
- User B does not answer the phone
- Call then goes back to the PBX/Phone System and the Phone system has to decide what to do with this call.
- The Phone system should be configured to send this call to the On Premise SBC (Session Border Controller). SO the call will now be sent to SBC
- The SBC should be configured to send the call to the Forwarding Address that is obtained from the UM IP Gateway field in the O365 Portal
- The SBC will First Encrypt the call using the Certificate that is installed on the SBC and will then send the call to the Forwarding address (UM Online SBC)
- The UM online SBC will receive the call and it will deduce the Exchange Tenant information from the Forwarding address and will send the call to the correct Exchange servers in the Back End
- When the Exchange Servers receive the call they will use the information within the call and find out the extension of the user who did not answer the call.
- Exchange will then try to locate if a Valid UM enabled user exists with that extension and if there is then exchange will take the Voice Mail.
In Order to successfully Integrate your On Premise PBX/IP PBX phone system to work with Exchange UM online you have to perform the following actions;
A. Purchase Pre Requisite Hardware and Certificates that are Mandatory for the Configuration
B. Configure UM settings on the O365 Portal
C. Configure your On Premise Phone system to send Voice Mail calls your On Premise SBC
D. Configure your On Premise SBC to forward these Voice Mail calls to O365 Exchange UM online.
The Section below lists the details on each of the above
A. Purchase Pre Requisite Hardware and Certificates that are Mandatory for the Configuration
Purchase a Supported Session Border Controller (SBC)
O365 Exchange UM online has ONLY been tested and Supported to work with specific Session Border Controllers. If you want to Integrate your On Premise PBX/IP-PBX with O365 Exchange UM online then you will have to route your Voice Mail calls From your On Premise PBX/IP-PBX to O365 through a Supported Session Border Controller.

The Table Above lists the Different SBC Devices that are Supported and Tested to work with O365 Exchange UM Online. A more accurate/updated list can be found here - https://technet.microsoft.com/en-us/library/jj673565(v=exchg.150).aspx
For More Information on Supported Devices and how to choose which one is right for you please refer guidelines listed here - https://technet.microsoft.com/en-us/library/jj673565(v=exchg.150).aspx
Do NOT install a Firewall in Front of the SBC
SBCs are designed to sit on the network edge, they also function as a firewall. If you set up an SBC behind your organization’s firewall, it can cause configuration problems and is unsupported for connecting to Office 365 as Per Microsoft Documentation.
This is Documented here - https://technet.microsoft.com/en-us/library/jj673565(v=exchg.150).aspx
Obtain a Public Certificate for The External FQDN of your SBC
Any Traffic Between your On Premise SBC and O365 UM online has to be Encrypted. For this reason you have to Purchase and Install a Public Certificate on your On Premise SBC.
Before Purchasing a Public Certificate for Your SBC you may first have to assign a unique FQDN to the Public/External Interface of your SBC. Example mysbc.mydomain.com
You need to Ensure that this FQDN can be resolved Publicly using a Public DNS server to a correct IP address.
The Subject Name and the Subject Alternative name on the Public Certificate should have the EXACT EXTERNAL FQDN of your On Premise SBC. The Subject name is Case-Sensitive hence it is important to make sure that SN and SAN entered on the Certificate Matches exactly with the External FQDN of your SBC. This is the FQDN that you will Enter on the O365 Portal under IP gateway Tab. (This is discussed further Under B. Configure UM settings on the O365 Portal)
There are Only Certain CA's that are supported with O365. Below is a List of CA's that are Supported with O365.
- AddTrust External CA Root
- DigiCert Assured ID Root CA
- DigiCert Global Root CA
- DigiCert High Assurance EV Root CA
- Entrust Root Certification Authority - G2
- Entrust Root Certification Authority
- Entrust.net Certification Authority (2048)
- Entrust.net Secure Server Certification Authority
- GeoTrust Global CA 2
- GeoTrust Global CA
- GeoTrust Primary Certification Authority - G2
- GeoTrust Primary Certification Authority - G3
- GeoTrust Primary Certification Authority
- GeoTrust Universal CA 2
- GeoTrust Universal CA
- Go Daddy Class 2 Certification Authority
- Go Daddy Root Certificate Authority - G2
- GTE CyberTrust Global Root
- Network Solutions Certificate Authority
- RSA Security 2048 V3
- thawte Primary Root CA - G2
- thawte Primary Root CA - G3
- thawte Primary Root CA
- VeriSign Class 1 Public Primary Certification Authority
- VeriSign Class 3 Public Primary Certification Authority - G2
- VeriSign Class 3 Public Primary Certification Authority - G2
- VeriSign Class 3 Public Primary Certification Authority - G3
- VeriSign Class 3 Public Primary Certification Authority - G4
- VeriSign Class 3 Public Primary Certification Authority - G5
- VeriSign Class 3 Public Primary Certification Authority
- VeriSign Class 4 Public Primary Certification Authority - G2
- VeriSign Class 4 Public Primary Certification Authority - G2
- VeriSign Class 4 Public Primary Certification Authority - G3
- VeriSign Universal Root Certification Authority
For a More accurate List and Other details related to Certificates for O365 UM online Refer https://msdn.microsoft.com/en-us/library/gg702672(v=exchsrvcs.149).aspx (This list is currently being updated to reflect all the above certificates)
B. Configure UM settings on the O365 Portal
A O365 account with Enterprise E3 or E4 plan, Educational A3 or A4 Plan, or Government E3 Plan , or a la cart Exchange Online Plan 2 Is Required.
For Users to have Voice Mail in the cloud you have to do the following on the O365 Portal
Step 1 - Create a UM Dial Plan
To create a UM dial Plan
Login to the O365 Portal
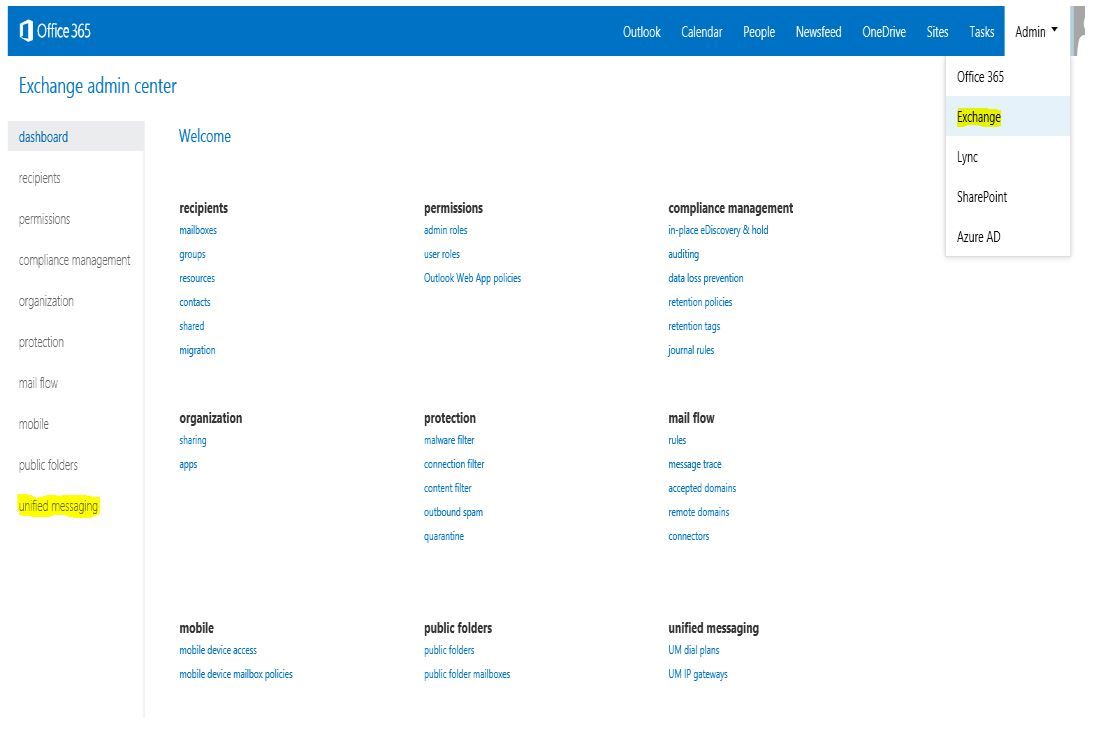
On the Top right Hand corner click the drop down box where it says Admin
Select Exchange from the List
Then on the following Page select Unified Messaging at the bottom left Hand Corner
On the resulting page click on UM dial plans Tab at the top
Click the "+" Sign to create a New Dial plan
The New UM dial plan window now opens
On this window enter the details of the Dial Plan
Name - You can enter any name you want, some special Characters like " / \ [ ] : ; | = , + * ? < > are not allowed.
Extension Length - Enter the number of Digits you use for extension number for your users ON Premise
Dial Plan Type - Telephone Extension and E.164 are the only supported Dial plan types for Integrating UM online with PBX/IP PBX.
VoIP Security Mode - Unsecured and cannot be changed
Audio Language - English (depends on your preference)
Country/Region Code - "1" for United States
Click Save
Your Dial Plan is now Created.

Every time you create a New UM Dial Plan a default Mailbox policy is created Automatically that is associated with this dial Plan.
Take a Note of what mailbox policy is Associated with your Dial plan. You can use the below steps to check what Mailbox policy is associated with your dial Plan.
How to check what Mailbox policy is associated with your dial Plan.
Login to the O365 Portal
On the Top right Hand corner click the drop down box where it says Admin
Select Exchange from the List
Then on the following Page select Unified Messaging at the bottom left Hand Corner
On the resulting page Double click on UM dial plan you created
You will be able to see what Mailbox Policy is associated with your UM Dial Plan as shown in the below screen shot,

You can find more detailed explanation on Each of the above properties and UM Dial Plans here - http://technet.microsoft.com/en-us/library/bb123819(v=exchg.150).aspx
Step 2 - Create a UM IP gateway
A UM IP gateway on the O365 Portal represents your On Premise SBC (basically it is the Public/External FQDN of your on premise SBC). You have to create an IP gateway in O365 to tell exchange Online that THIS device (On Premise SBC) will send Voice Mail calls to exchange online.
Below are the steps to create a UM IP Gateway
Login to the O365 Portal
On the Top right Hand corner click the drop down box where it says Admin
Select Exchange from the List
Then on the following Page select Unified Messaging at the bottom left Hand Corner

On the resulting Page
Click UM IP Gateway
Click the "+" sign
A new window named "New UM IP Gateway opens up" on this window Enter the following details
Name - You can provide any name you like for reference purpose
Address - You need to enter the External/Public FQDN of your On Premise SBC
Click Browse

On the resulting Page you have to select the Dial plan that you created in Step 1 (create a UM dial plan) previously in this article.

On the resulting Screen you will now see the UM Dial plan value populated.
Click save.

Once you click save you will now see a UM IP gateway created under the UM IP gateway Tab on the O365 portal.

You have Now Successfully Created a UM IP gateway
For More details refer http://technet.microsoft.com/en-us/library/bb123890(v=exchg.150).aspx
Step 3 - Obtain Forwarding address from the O365 Portal
Once you create the IP gateway you will get A FORWARDING ADDRESS from the O365 portal.
This FORWARDING ADDRESS is actually the Public FQDN of the Microsoft UM Online SBC
You have to configure YOUR On premise SBC to send the calls to this Forwarding address that you get from the O365 portal for Voice Mail to work.
To Obtain the Forwarding address follow the below steps on the O365 Portal
On the O365 Portal, Go to Exchange Admin Center --> Unified Messaging --> UM IP Gateway
Select the UM IP gateway you created in Step 2
Click Edit
The Resulting Window will have the Forwarding Address Displayed.
Note Down this Forwarding address. As mentioned earlier, You have to configure YOUR On premise SBC to send the calls to this Forwarding address that you get from the O365 portal for Voice Mail to work.
See Screen shot below for reference

Your Step 3 is now complete.
Step 4 - Enable O365 Users for Unified messaging
Follow the Below steps to enable a User for UM online on the O365 Portal;
Login to the O365 Portal
Got to the Exchange Admin Center
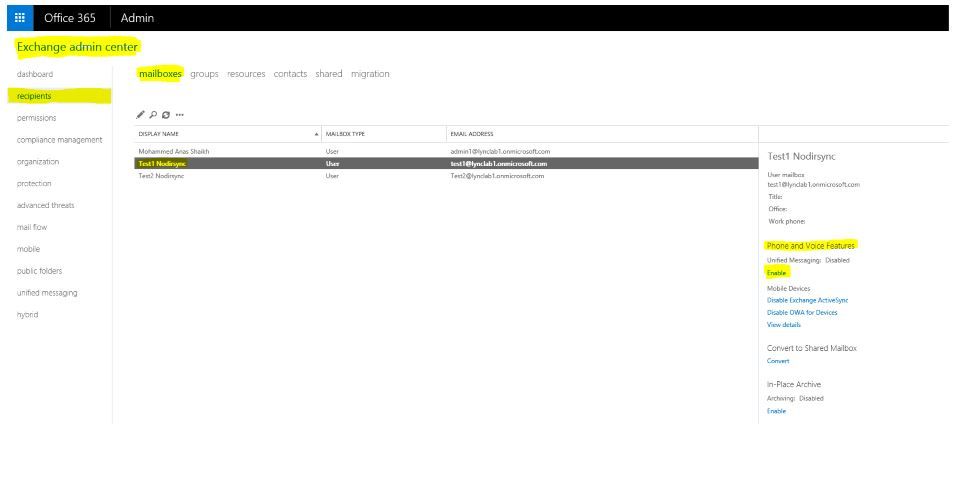
On the Left Select Recipients
Search the user you want to enable for Unified Messaging
ON the Extreme right hand side Click on Enable under PHONE AND VOICE FEATURES --> Unified Messaging as shown below,
On the resulting Page Click BROWSE
Select the UM Mailbox policy from the List that you want to use for your User
Click OK
Refer Screen shot below for reference

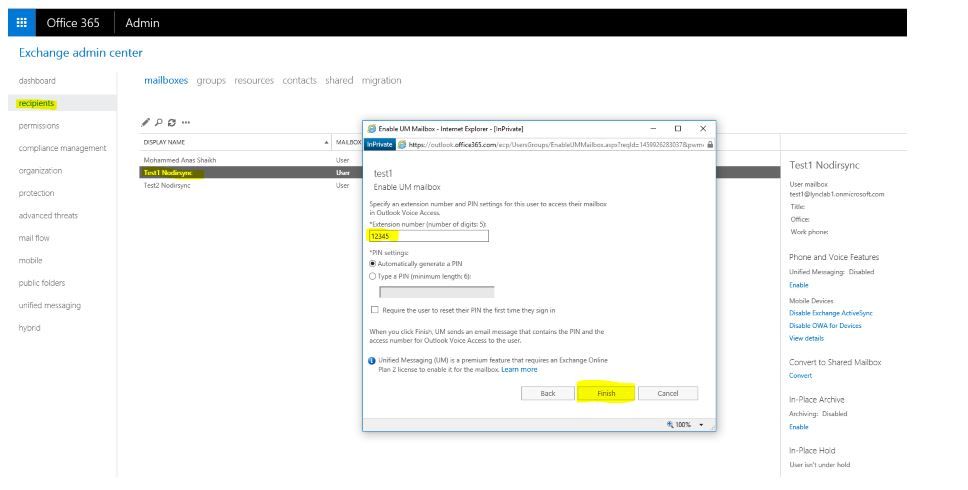
This will take you back to the Enable UM Mailbox Page, Click Next here
On the resulting page, Enter an extension for the user (his extension should be the same as what he uses On his On Premise phone system, The extension and it has to be Unique for every user)
Click Finish
Your User is now Enabled for UM in O365.
NOTE: In this scenario we Enabled the user for UM on the O365 Portal itself. This was because I created My user directly on the O365 portal and My user was previously NOT enabled for UM. If you are in a scenario where you are Migrating your User from Exchange On Premise to Exchange Online and if the User is already enabled for UM in your On Premise environment then to Enable him for UM in O365 you have two options.
Option 1: You can disable UM for the User on the ON Premise Exchange server and then Move his mailbox to O365 and then Enable him again For UM on the O365 Portal following the same instructions as described above.
Option 2: If you Do not wish to Disable and Re-enable the user for UM and would instead like him to stay UM Enabled while you are moving the users Mailbox then to do this you have to create the same Dial plan and Mailbox policies as you use on the ON Premise Exchange UM set up in O365 and then you can move the User with his UM settings to O365. The procedure for this is described very well here - https://msdn.microsoft.com/en-us/library/hh552484(v=exchsrvcs.149).aspx This way his UM extension and Pin will remain the same.
You still will need to provide a Unique Subscriber Access number to your O365 Dial plan if you want your users to be able to call and Check their Voice mails from PSTN or use OVA.
When the User is moved to O365 they will receive an automated email indicating they are enabled for UM and this email will contain the new SA number they can now use for OVA.
C. Configure your On Premise Phone system to send Voice Mail calls your On Premise SBC
When a User A in your Company Calls User B and if User B does not answer the Phone, It is then the responsibility of your Phone system to decide what to do with this call.
You will have to configure your Phone system to forward this call to your On Premise SBC.
You may have to Refer Documentation provided by your Phone system Vendor in order to configure your phone system to achieve that
Please refer the below articles for more details
http://technet.microsoft.com/en-us/library/jj673558(v=exchg.150).aspx
http://technet.microsoft.com/en-us/library/ee364753(v=exchg.150).aspx
http://technet.microsoft.com/en-us/library/ee681657(v=exchg.150).aspx
D. Configure your On Premise SBC to forward these Voice Mail calls to O365 Exchange UM online.
Once you have configured your Phone system/PBX to send Voice mail calls to your On Premise SBC. You then have to configure your SBC to send calls to UM online .
You have to configure your On Premise SBC to Send Voice Mail Calls to the FORWARDING ADDRESS of Microsoft UM online SBC that you obtained in Step 3 (Step 3 - Obtain Forwarding address from the O365 Portal) of this article above (Below is the list of Supported SBC’s with UM online and the corresponding links to their configuration documents)
http://technet.microsoft.com/en-us/library/jj673565(v=exchg.150).aspx
You also have to configure a Certificate for the new On premise SBC to encrypt the traffic between the SBC and UM online which travels over the Internet. The details around this were covered earlier in this article (Under the section - Obtain a Public Certificate for The External FQDN of your SBC) Below is a link that lists the Third Party Public CA’s that are supported for UM online.
http://msdn.microsoft.com/en-us/library/gg702672(v=exchsrvcs.149).aspx
Once you have completed Steps A, B, C and D you have successfully Integrated your On Premise PBX/IP-PBX to work with Microsoft O365 Exchange UM Online.
NOTE: Using EXPRESS ROUTE IS NOT SUPPORTED WITH UM ONLINE.
This is mentioned in the articles below
The Article https://support.office.com/en-us/article/Azure-ExpressRoute-for-Office-365-6d2534a2-c19c-4a99-be5e-33a0cee5d3bd lists all services supported with EXPRESS ROUTE

Although its listed that “Exchange Online” Is supported with Express route the article also has a NOTE: which states “ 1 Each of these applications have internet connectivity requirements not supported over ExpressRoute, see the Office 365 endpoints article for more information.”
If you then refer the Office 365 endpoints Article here - https://support.office.com/en-us/article/Office-365-URLs-and-IP-address-ranges-8548a211-3fe7-47cb-abb1-355ea5aa88a2?ui=en-US&rs=en-US&ad=US#bkmk_exo , it clearly states that Express Route is NOT Supported for Unified messaging ☹

Further more if we read the same article it also lists all the Exchange Online IP addresses that are routable through Express Route and the UM Online SBC IP addresses are NOT listed in the Supported List.
