
This post has been republished via RSS; it originally appeared at: Skype for Business Blog articles.
First published on TECHNET on Mar 29, 2016Integrate LYNC/SFB Server on premise with O365 Exchange UM online
Author: Mohammed Anas Shaikh
Before we get into this, we need to have a basic understanding of what's happening with voicemail. Below is a Brief Description of what happens in the background when a call is being routed to Exchange UM online for voicemail.
How Does it Work - Call Flow for a Voice mail call
- LYNC User A calls LYNC User B
- User B does not answer the phone
- Call then goes back to the LYNC FE server
- LYNC FE server Now has to decide what to do with the call
- The FE server Checks User B’s Hosted Voicemail Attribute to see if HostedVoicemail is set to $TRUE
- If it is, then it checks the Hosted Voice Mail policy that is applied to the user and finds where to send the call.
- The Hosted VM Policy should point to the customers Tenant in O365 and exap.um.outlook.com
- Once it finds that the call needs to go to Exchange Um Online (Exap.um.outlook.com) then it generates a new Invite and sends the call to the Edge server.
- The Job of FE server is done at this point
- Now the edge server receives this call
- Edge server checks the CSHostingProvider to see if a Hosting Provider has been created for "Exap.um.outlook.com" to find out if it should send the call out to O365
- The CShostingProvider points to exap.um.outlook.com and hence edge creates an INVITE and sends it out to exap.um.outlook.com
- Once Edge sends the INVITE it reaches the Microsoft access edge proxies which relay this to the Exchange online UM servers in O365
- The exchange Online UM server verifies the tenant, checks Dial Plan, Then Checks the "Callee" Info from the Invite and validates if the "Callee" user has been enabled for VM in O365 and if he is then it accepts the VM
The Procedure to Configure this is Described Below:
Step 1 – Check Pre Requisites
A Working Edge server is a Requirement for LYNC on Premise to work successfully with Exchange UM Online. Make sure you have a working LYNC Edge server. In order to confirm that your edge server is configured correctly make sure you can do the following:
- Have a User sign into LYNC remotely through the edge
- Have a Internal user establish an IM session with a federated user (If you have Open federation then they should be able to add users from other organizations who have open federation. If you do not have Open federation you have to add someone’s Domain to your allowed list and then try and see if you can establish IM sessions with this domain.
- Make sure internal users can Successfully make and receive LYNC calls to federated users and remotely connected users.
The Call flow of FE/Edge sending the call to exchange Um is similar to the call flow of a LYNC call between internal and external or internal and federated users. If that itself isn’t working it for sure will cause problems with UM online and VM.
"One You have verified all the Above Your Step 1 is Complete."
Step 2 - Configure UM settings on the O365 Portal
A O365 account with Enterprise E3 or E4 plan, Educational A3 or A4 Plan, or Government E3 Plan , or a la cart Exchange Online Plan 2 Is Required.
There are Two Important settings that you have to configure on the O365 Portal related to Unified Messaging
- Create a UM Dial Plan
- Enable Users for Unified Messaging
Below are Instructions on how to accomplish that.
1. Create a UM Dial Plan
To create a UM dial Plan
Login to the O365 Portal as an Administrator
On the Top right Hand corner click the drop down box where it says Admin
Select Exchange from the List
Then on the following Page select Unified Messaging at the bottom left Hand Corner
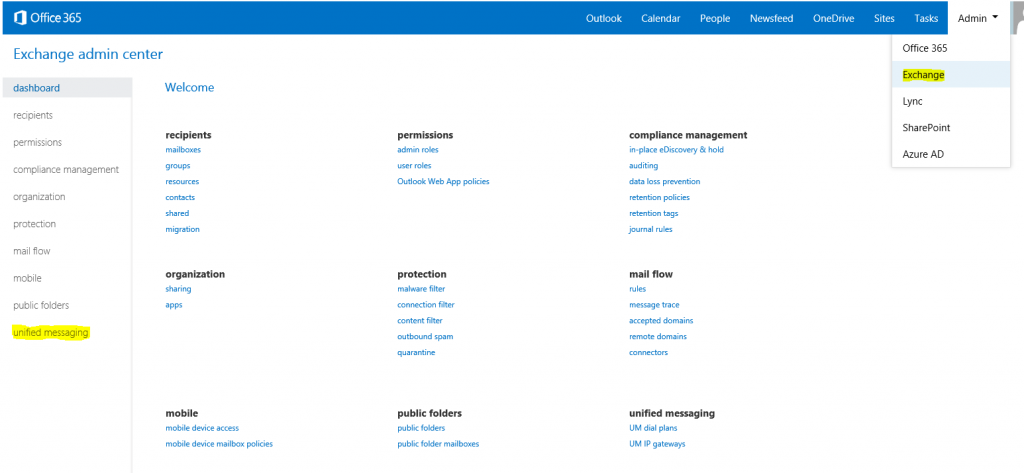
On the resulting page click on UM dial plans Tab at the top
Click the "+" Sign to create a New Dial plan
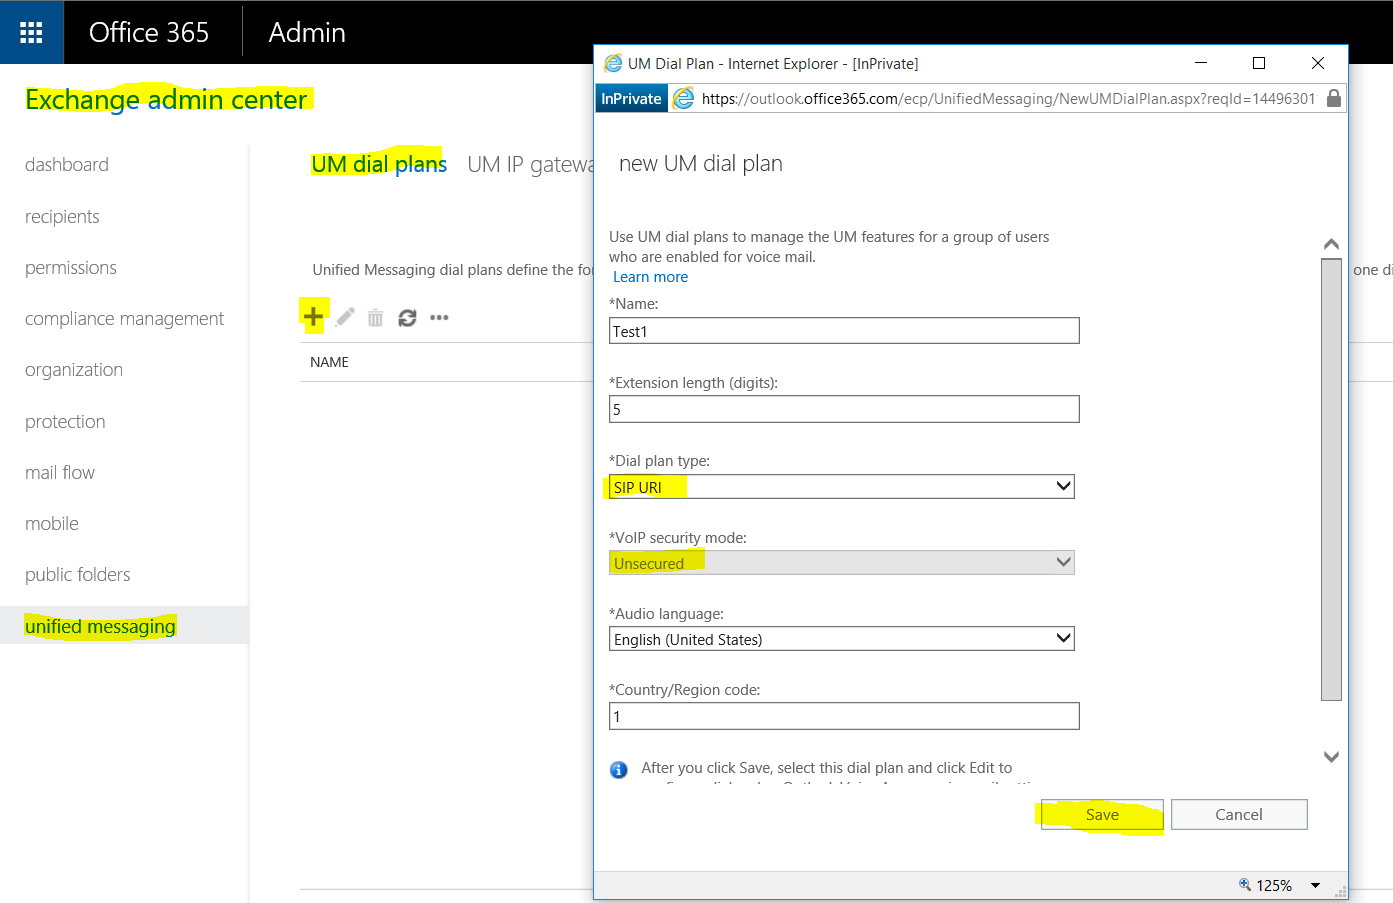
The New UM dial plan window now opens
On this window enter the details of the Dial Plan
Name - You can enter any name you want, some special Characters like " / \ [ ] : ; | = , + * ? < > are not allowed.
Extension Length - Enter the number of Digits you use for extension number for your users ON Premise
Dial Plan Type – SIP URI is the only supported Dial plan type for Integrating UM online with Lync/SFB.
VoIP Security Mode -Unsecured (default) should NOT be changed. (This is the Only supported VoIP security Mode for integrating UM online with Lync/SFB at present)
Audio Language - English (depends on your preference)
Country/Region Code - "1" for United States
Click Save
Your Dial Plan is now Created.
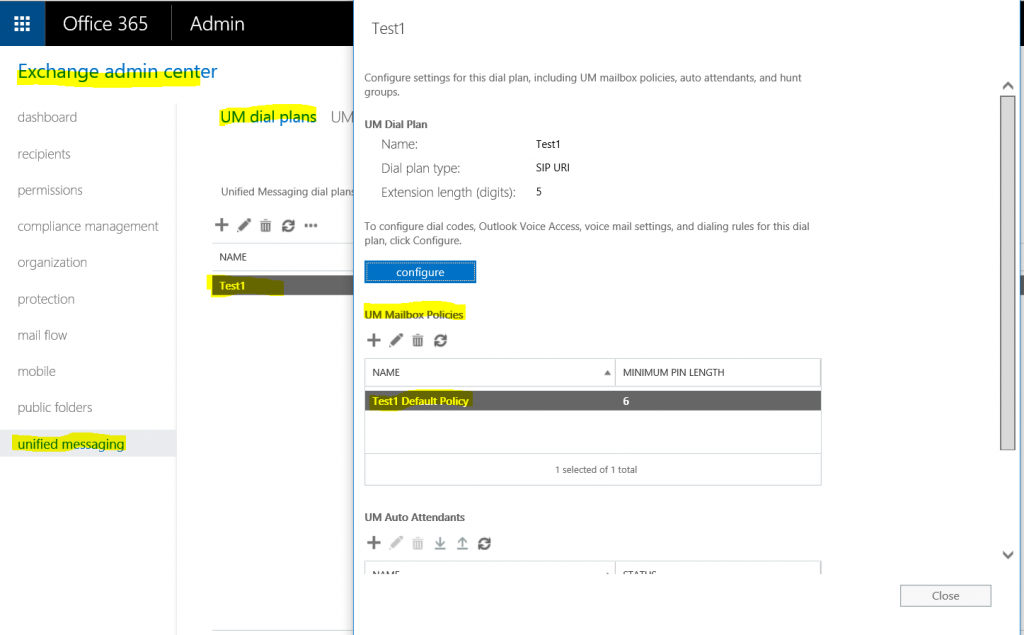
Every time you create a New UM Dial Plan a default Mailbox policy is created Automatically that is associated with this dial Plan.
Take a Note of what mailbox policy is Associated with your Dial plan. You can use the below steps to check what Mailbox policy is associated with your dial Plan.
How to check what Mailbox policy is associated with your dial Plan.
Login to the O365 Portal
On the Top right Hand corner click the drop down box where it says Admin
Select Exchange from the List
Then on the following Page select Unified Messaging at the bottom left Hand Corner
On the resulting page Double click on UM dial plan you created
You will be able to see what Mailbox Policy is associated with your UM Dial Plan as shown in the below screen shot:
You can find more detailed explanation on Each of the above properties and UM Dial Plans here - http://technet.microsoft.com/en-us/library/bb123819(v=exchg.150).aspx
2. Enable your Users for Unified messaging
Follow the Below steps to enable a User for UM online on the O365 Portal;
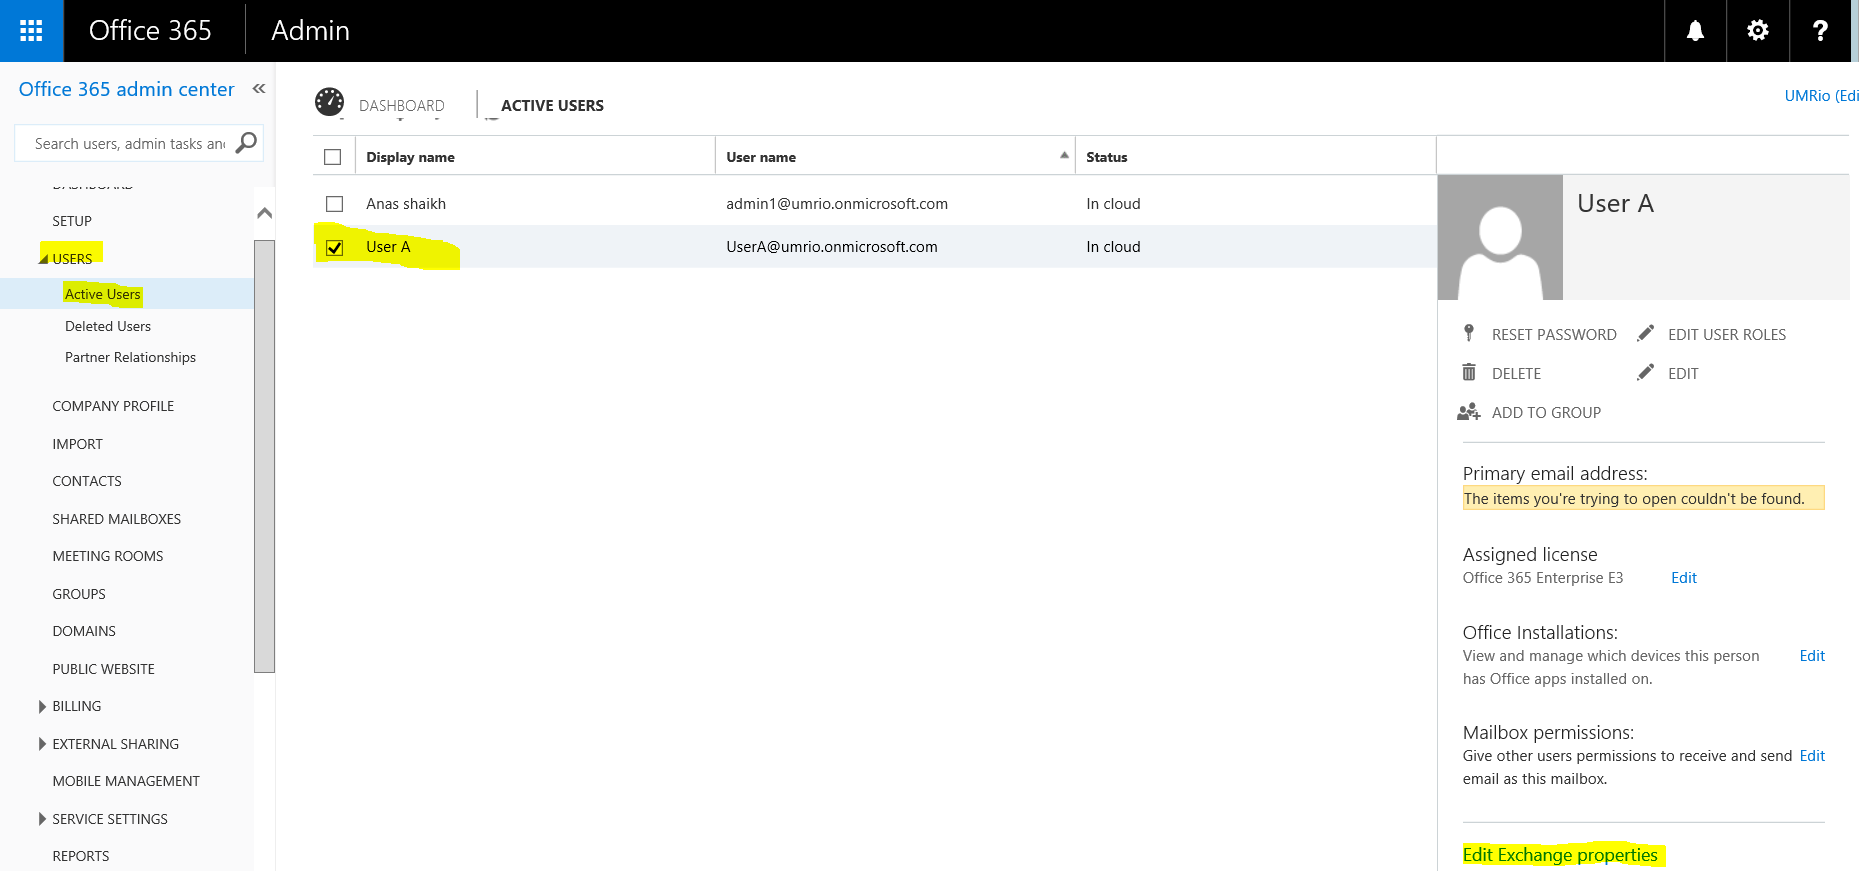
Login to the O365 Portal
On the Top right Hand corner click the drop down box where it says Admin
Select Exchange from the List
Then on the following Page select Active users under the Users Section.
Select your User (in this case User A)
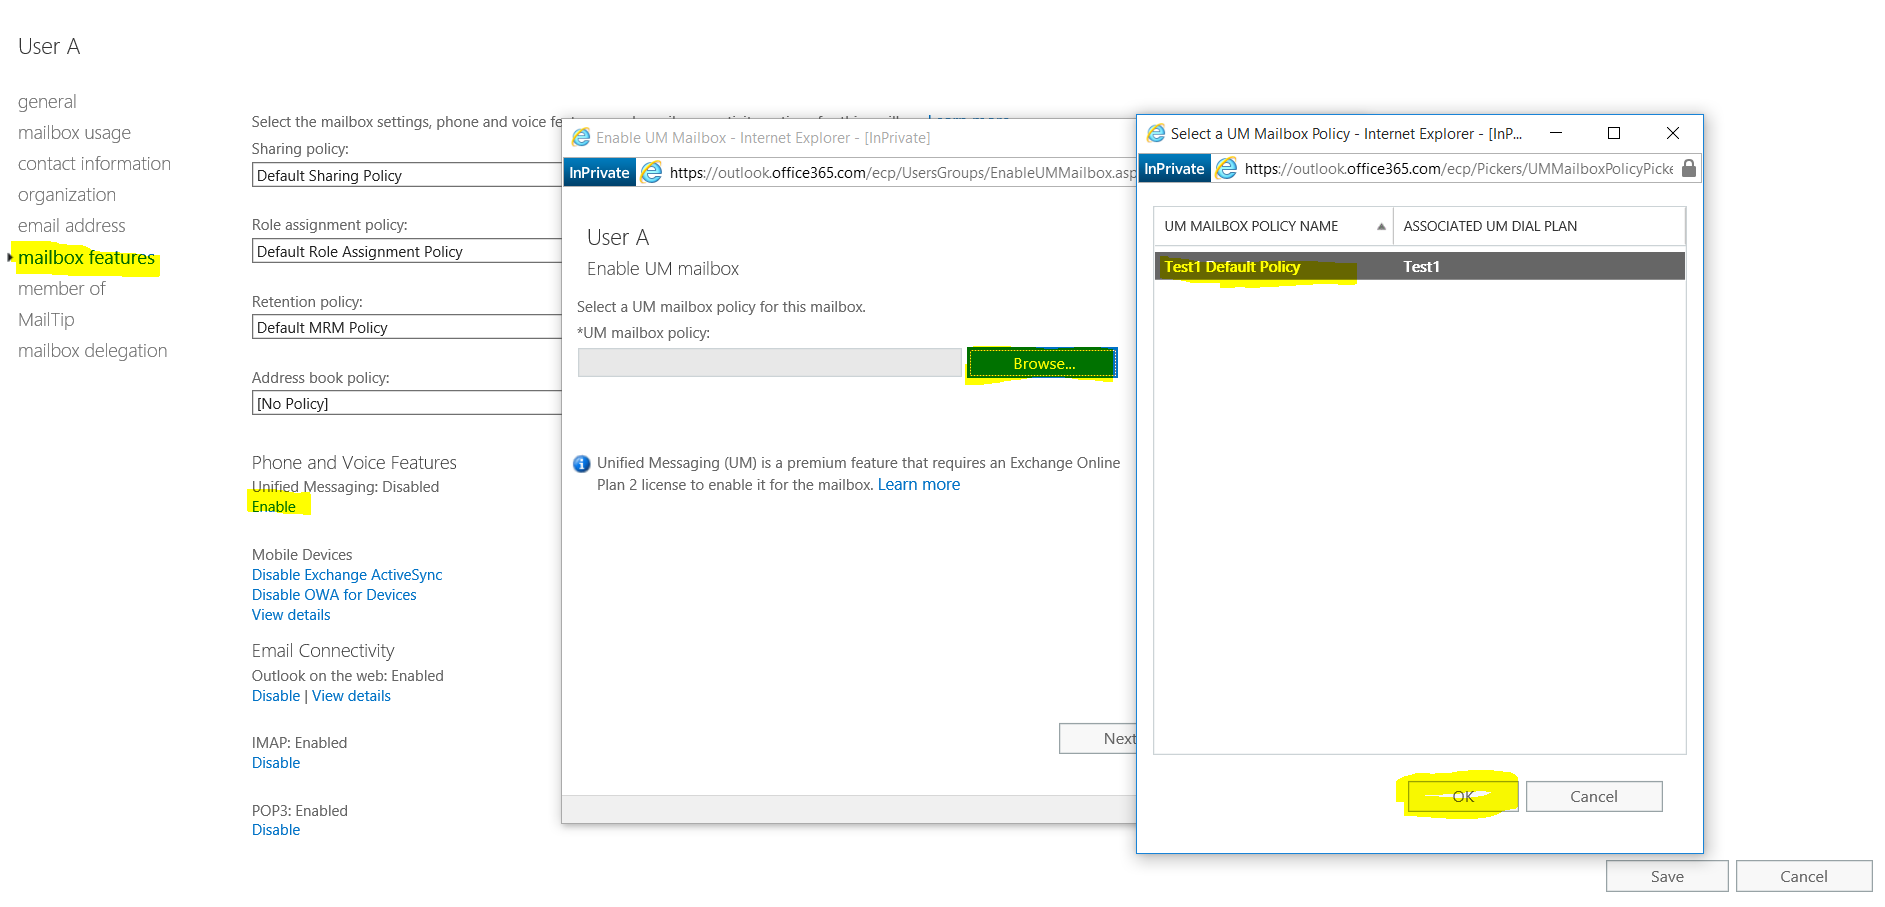
ON the Extreme right hand side Select/click EDIT EXCHANGE PROPERTIES as shown below:
On the resulting Page Click on Mailbox features on the Left
Click on Enable under PHONE AND VOICE FEATURES --> Unified Messaging
On the resulting Page Click BROWSE
Select the UM Mailbox policy from the List that you want to use for User A
Click OK
Refer Screen shot below for reference
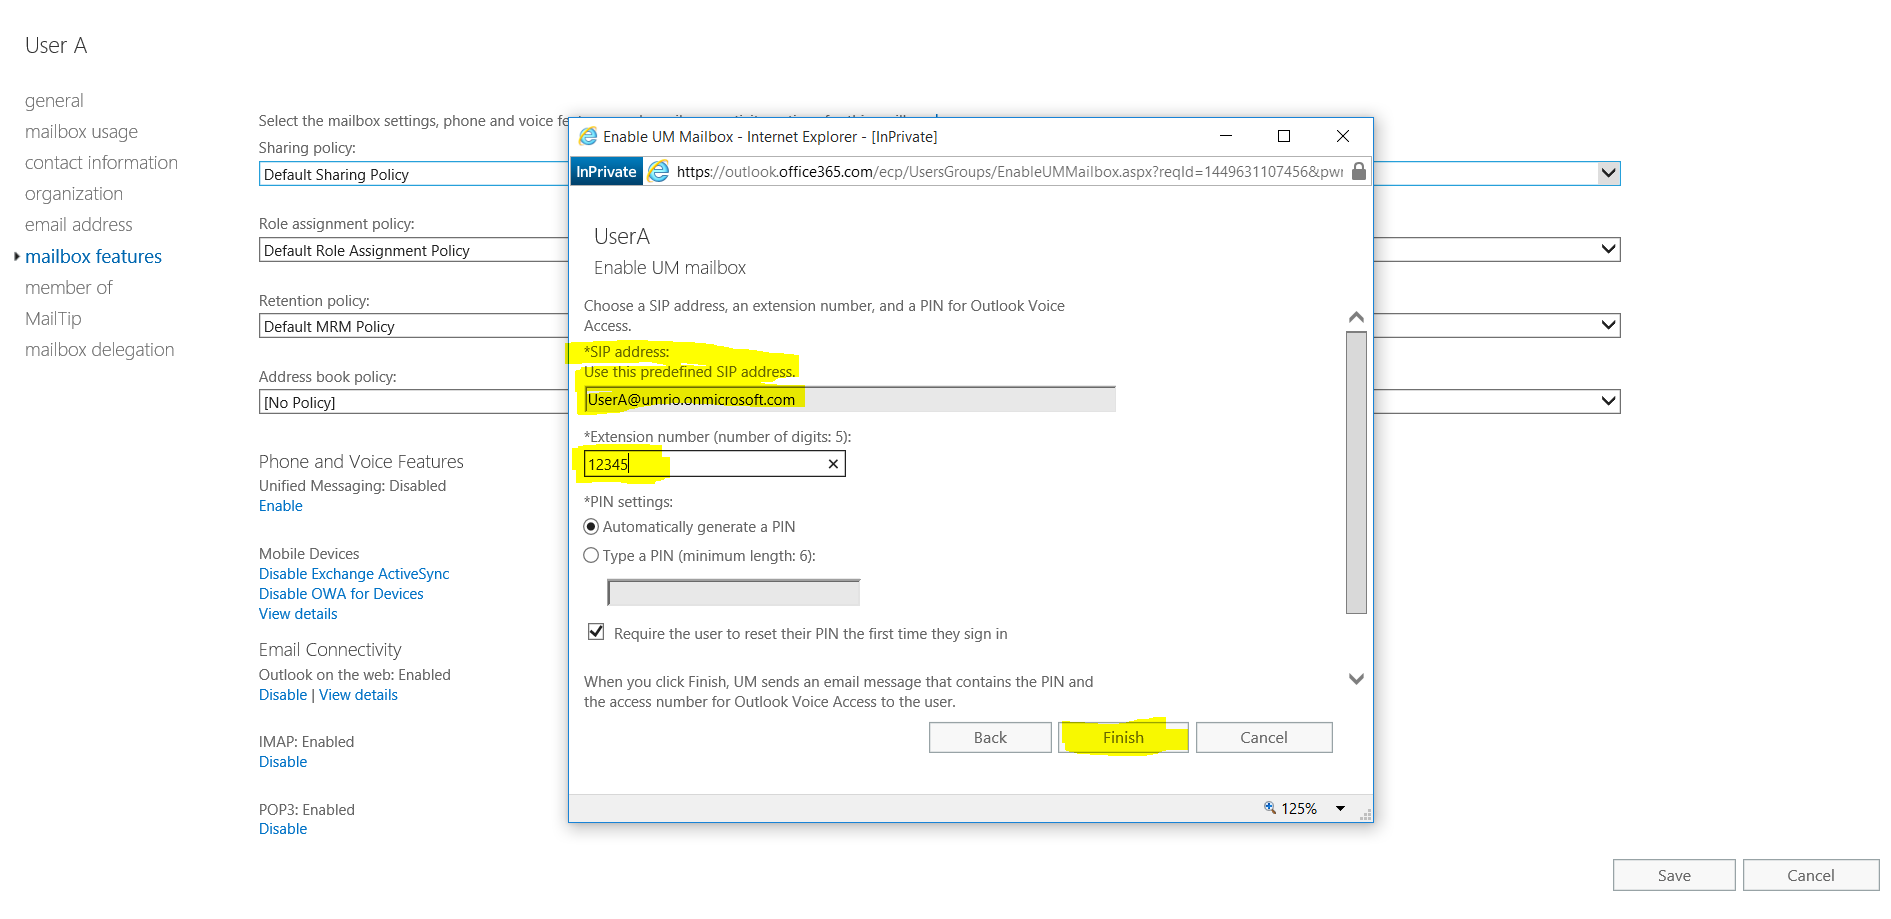
This will take you back to the Enable UM Mailbox Page
Click Next here
On the resulting page Verify the Sip address of the User and make sure its correctly populated. (the sip address of the user should be EXACTLY SAME as the SIP URI that he uses to login to LYNC Client)
Enter an extension for the user (his extension should be the same as what he uses On Premise, If they don’t use extensions On Premise they still have to enter an extension here, they will have to give the user an extension and it has to be Unique for every user)
Click Finish
On the resulting Page Click Save
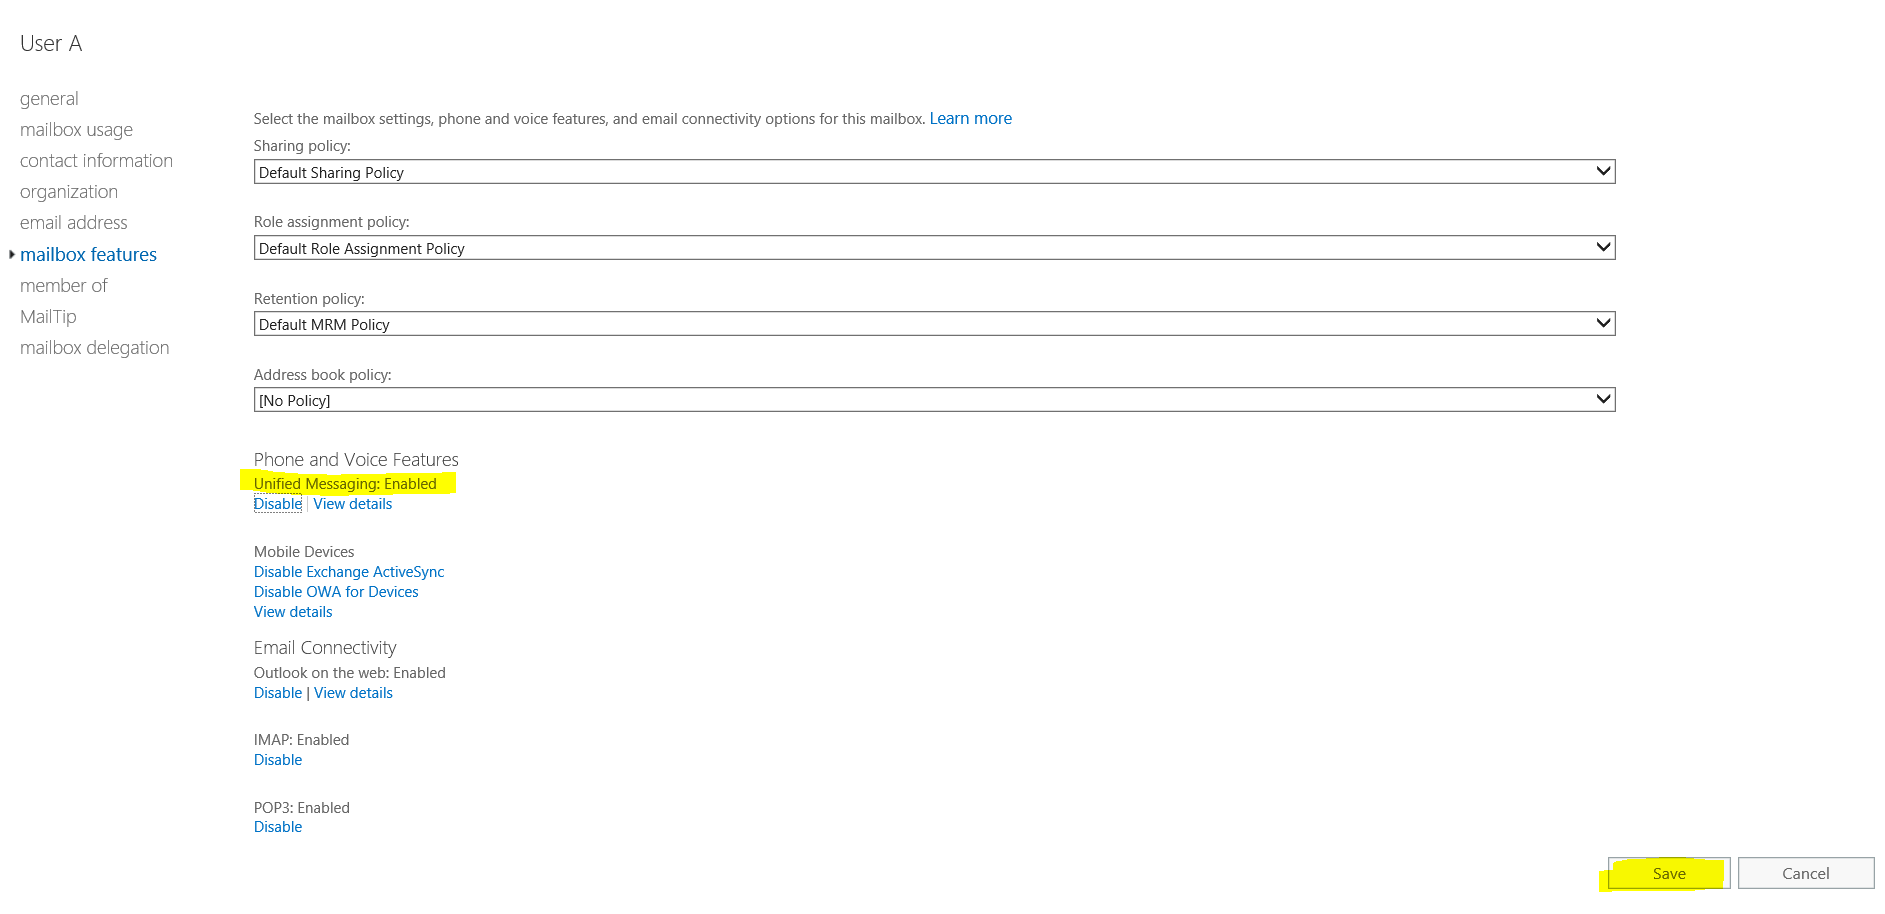
Your User is now Enabled for UM in O365.
NOTE: In this scenario we Enabled the user for UM on the O365 Portal itself. This was because I created My user directly on the O365 portal and My user was previously NOT enabled for UM. If you are in a scenario where you are Migrating your User from Exchange On Premise to Exchange Online and if the User is already enabled for UM in your On Premise environment then to Enable him for UM in O365 you have two options.
Option 1: You can disable UM for the User on the ON Premise Exchange server and then Move his mailbox to O365 and then Enable him again For UM on the O365 Portal following the same instructions as described above.
Option 2: If you Do not wish to Disable and Re-enable the user for UM and would instead like him to stay UM Enabled while you are moving the users Mailbox then to do this you have to create the same Dial plan and Mailbox policies as you use on the ON Premise Exchange UM set up in O365 and then you can move the User with his UM settings to O365, this way his UM extension and Pin will remain the same. The procedure for this is described very well here - https://msdn.microsoft.com/en-us/library/hh552484(v=exchsrvcs.149).aspx
You still will need to provide a Unique Subscriber Access number to your O365 Dial plan if you want your users to be able to call and Check their Voice mails from PSTN or use OVA.
When the User is moved to O365 they will receive an automated email indicating they are enabled for UM and this email will contain the new SA number they can now use for OVA.
"Once You have completed all the above steps and you reach this section of the Article your Step 2 is Complete. That means everything that you were required to do configuration wise on the O365 Portal has now been completed. We can now move towards steps 3 where we configure the On Premise LYNC servers to make sure they work with Exchange UM online."
Step 3 - Configure the FE server on Premise
Pre-requisite
Hosted Voice Mail is ONLY supported for users who are Enabled for Enterprise Voice. In order to ensure all Voice Mail features for Users work accurately you need to ensure they are enabled for EV on Premise.
Overview
Here are the configurations you have to perform on Premise
Create Hosting provider for Edge
A Hosting provider is Required in order for the Edge Server to forward Voice Mail calls to O365.
You Can Create a Hosting Provider by Running the Following Command.
New-CsHostingProvider -Identity UMonline-Enabled $True -EnabledSharedAddressSpace $True -HostsOCSUsers $False -ProxyFQDN "exap.um.outlook.com" -IsLocal $False -VerificationLevel UseSourceVerification
The Proxy FQDN Field should always be pointing to Exap.um.outlook.com for every customer. The Enabled and EnabledSharedAddressSpace parameters should always be set to TRUE for every customer.
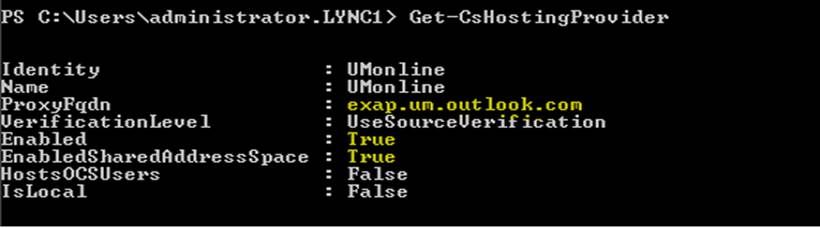
To Ensure that a Hosting Provider was created successfully, run the following command from Lync PowerShell "Get-CsHostingProvider"
Below is a Screen shot of a Successful output of this command from a working Lab environment. Compare your Output with the screen shot below and Ensure all required Fields are populated correctly.
Enable Users for Hosted Voice Mail.
You have to Enable your Users for Hosted Voice Mail in order for Voice Mail to work. To do this you can run the following Command from the LYNC power Shell.
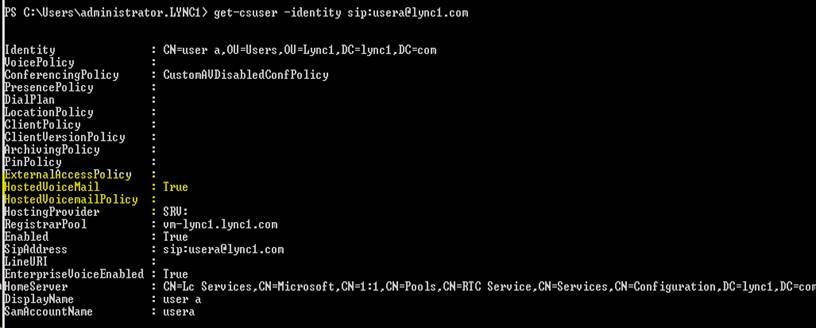
Set-CsUser -Identity sip:Usera@lync1.com -HostedVoiceMail $True
For More Details Refer Article - https://technet.microsoft.com/en-us/library/gg413062.aspx
To ensure that the User was enabled for Hosted Voice Mail successfully run the following command from Lync PowerShell "Get-CsUser -Identity sip:Usera@lync1.com " . Below is a Screen shot of a Successful output of this command from a working Lab environment. Compare your Output with the screen shot below and Ensure that the HostedVoiceMail attribute is set to TRUE
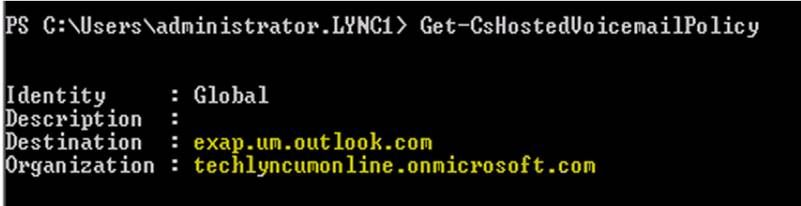
Create Hosted Voice Mail Policy
In order for LYNC FE server to send Voice Mail calls to O365 you have to create Hosted Voice Mail Policy.
Hosted Voice Mail Policies can be Created at Global (Exists in every Organization By Default, you can't create a New one you can Only Modify an Existing One) Site or User Level.
You can use the Below command to Create/Modify a Hosted Voice Mail Policy at Global Level.
Set-CshostedVoiceMailPolicy -Identity Global -Description Global Hosted VM Policy for All Users -Destination exap.um.outlook.com -Organization techlyncumonline.onmicrosoft.com
For More Details Refer Article - https://technet.microsoft.com/en-us/library/gg398332.aspx
To Ensure that a Global Hosted Voice Mail Policy was created successfully, run the following command from Lync PowerShell "Get-CsHostedVoiceMailPolicy"
Below is a Screen shot of a Successful output of this command from a working Lab environment. Compare your Output with the screen shot below and Ensure all required Fields are populated correctly.
This Hosted Voice mail Policy then needs to be applied to all your Users.
If you have created Hosted Voice Mail policy at Global Level then this Policy by default will apply to ALL users who have been enabled for Hosted Voice Mail and you DO NOT have to specifically assign this policy to any user.
In this case if you Run the command "Get-CsUser -Identity sip:Usera@lync1.com " from LYNC PowerShell you will Notice that the HostedVoicemail attribute is set to True but the HostedVoiceMailPolicy Attribute is "Blank". If you are using a Global Hosted Voice Mail policy then this attribute will always be "Blank". This just means that the FE server will use the Global Hosted Voice Mail policy settings for this User.
If you create a Site Level Hosted Voice Mail policy than that Policy will apply to All users in that site by Default.
If you create a User Level Hosted Voice Mail Policy then IT WONT apply to any users by Default, You have to Manually Assign the Policy to your Users.
Please Refer the following Articles for more information on how to Create and Apply Site/User Level Hosted Voice Mail Policies.
https://technet.microsoft.com/en-us/library/gg398332.aspx
The Destination Field in the Hosted Voice Mail Policy should always be pointing to Exap.um.outlook.com for every customer. The Organization field should point to either the Default O365 Tenant of the customer which would be something like customerdomain.onmicrosoft.com or the Vanity domain of the customer which maybe just customerdomain.com.
Important: The domain name that has been entered in the organization Field HAS to be an Authoritative/accepted exchange domain in O365 . You can check If the domain entered by the customer is an authoritative domain or not by checking the O365 portal or by connecting to Exchange online PowerShell and running the command Get-acceptedDomain
Please refer the following KB to find out how to do that in more detail
http://technet.microsoft.com/en-us/library/jj945194(v=exchg.150).aspx
http://technet.microsoft.com/en-us/library/jj984289(v=exchg.150).aspx
Create SA and AA contact Objects
(this step is required only if you want your users to be able to call and check their VM using their Cell phone or PSTN, And if you want to use Auto Attendant feature. For initial Voice mail roll out this is NOT Mandatory)
Since Creating SA and AA contact Objects is Not Necessary for Voice Mail calls to work I am not including details on how to create these Contact objects. Please refer the following KB to find out how to do that in more detail
https://technet.microsoft.com/en-us/library/gg412765.aspx
Once You have done all of the Above Your Step 3 Is Complete and the On Premise LYNC Environment should Now be Configured Completely to Work with O365 for Unified Messaging. AT This Point Calls to Voice mail for User Mailboxes Hosted in O365 Exchange Should Start Working. If they aren't you can proceed further to the below section of this document for more useful information.
If you have done all of the Above and if Still Voice Mail for users hosted in O365 does not work then you can follow the Instructions further below in Step 4 and Step 5 in this Article to Troubleshoot further. I have Listed Below some Known Reasons why calls to Voice Mail would Normally Fail even if all the Necessary configurations have been completed Successfully.
Step 4: Verify the following configurations on the LYNC on Premise side
- The Internal Interface of the edge server should not have a default gateway. You should have a Persistent route on the internal edge network interface for every Client Subnet you have in your Environment/Network.
- The External Interface of the edge server should use a Public DNS server in an Ideal scenario. If You are Using an Internal/Private DNS server on the External Interface Switch to an External/Public DNS server and Flush the DNS Cache. If you have a Security Requirement that Prevents you from using an External/Public DNS server then you will have to create the _sipfederationtls._tcp.domain.com SRV record on your Internal/Private DNS server pointing to the external FQDN of your Access edge pool. If you don't do this you may see errors like - ms-diagnostics: 1008;reason="Unable to resolve DNS SRV record"; ";responsecode="504"; In Event logs or in Sip Stack logs on the Edge Server.
- Check if you can do an NSLOOKUP and resolve _sipfederationtls._tcp.domain.com SRV federation record from the edge server itself. If you can't this may be a reason why calls are failing.
- Ensure UDP 3478 and TCP 443 are open Inbound on the External AV Edge FQDN.
- Check if you have configured any static routes, if you have a static route then this will cause issues with UM online if the Matched URI of the static route is same as the Sip Domain/Users Sip URI. So if you have a static route and the Matched URI of the static route is same as the Sip Domain/Users Sip URI you need to remove the static route otherwise UM will NEVER work. You can check if you have a Static route or not by running the command "Get-CsStaticRoutingConfiguration" from the LYNC PowerShell. If they do not have a static route the output of this command should be Blank as shown below:

If removing the static Route resolves the issue and you insists that you need a Static route then you have to change the URL of the service that you are using the static route for. You cannot use the same SIP domain you have in LYNC for any other service like video conferencing which requires a static route. If you want to use both a third party video conferencing service and UM online then the Conference URL’s of the video conferencing service should not be the same as their default SIP domain.
For example: If the SIP domain is contoso.com then the Third party conference system URL should not be Contoso.com it can however be set as XXX.contoso.com.
- Make sure CMS Replication status is good between FE and Edge, If Replication between FE and Edge is Not working the Edge server may not know about the Hosting Provider and may not even send the Call to O365. You can check this by running the following command from the LYNC PowerShell
Get-CsManagementStoreReplicationStatus

Once you have Verified/Corrected all the above Check if the issue is now resolved if Not Continue forward;
Note: At this point, If you have done all the above you can be confident that all the configuration that is required to ensure LYNC/SFB ON premise works with O365 Exchange UM online has been done correctly. If Voice mail still isn't working we will now have to collect Logs to find out the cause/solution.
Step 5: Collect Traces to further Troubleshoot
If you have verified and confirmed steps 1 to 4 and the issue still persists than collect traces to further troubleshoot.
Collect Traces for the following components on all the FE and Edge servers while reproducing the issue
FE Server à Sip Stack, S4, Inbound Routing, Outbound Routing, ExUM Routing
Edge Server à Sip Stack, S4, Network Traces using Wireshark or Network Monitor.
User A and user B Client Side UCCAPI logs
Important: When reproducing the problem while collecting traces always reproduce the problem using users signed in internally directly through the FE and not from users connecting remotely. For Example if you are troubleshooting an issue where User A calls User B and when B does not answer the call the call does not roll over to VM; Then while collecting traces make sure both Users A and B are logged in to LYNC internally to the Fe server and not External through Edge.
In the logs look for the INVITE that goes from FE to Edge and from Edge to Exap.um.outlook.com. Follow this call ID and see where the error occurs. If the Errors that you see in Ms-Diagnostic reflect something like "A Call Failed to Establish due to Media Connectivity Failure" Then this means that Network issues are preventing Calls from Working. Ideally If this is the reason You should see failure when trying to make audio calls or Perform Application Sharing with Federated Partners as well. The Most Common Reason for this issue per My experience is Incorrect NAT rule on the Firewall. If you are Using Nat on the External AV edge Interface then you have to ensure any traffic that leaves the External AV edge FQDN is Nat-ted correctly on the Firewall. So the Firewall when it sends these Packets out to O365 it should keep the Source address of outgoing Packets same as the External Nat-ted FQDN of the AV Edge Server.
I would Strongly recommend collecting Network Traces on the External Interface of the Firewall to confirm this.
You should also ensure that UDP 3478 and TCP 443 are open Inbound on the External AV Edge FQDN.
THE END