
This post has been republished via RSS; it originally appeared at: Core Infrastructure and Security Blog articles.
First published on TECHNET on Dec 18, 2018
Hello everyone, Ty McPherson here, along with some fellow engineers Andreas Pacius and Edwin Gaitan, and we wanted to put together and share some information to help you setup Remote Server Administration Tools with Windows 10 1809.
Starting with Windows 10 v1809 the Remote Server Administration Tools (RSAT) is now a Feature on Demand (FoD). Features can be installed at any time and the requested packages are obtained through Windows Update. However, some of you are not connected to the internet to retrieve these packages, but still need the RSAT features enabled. The below steps will allow you to install some or all of the RSAT features. There are a couple options available to you, so please read through them so you can determine the best course of action to meet your needs.
The first step in all cases is that you need to obtain the FoD media from your Volume License Servicing Center (VLSC). Login and do a search for Features on Demand , ensuring you select the same edition that you want to RSAT enabled on.

Figure 1 - VLSC Search for Features on Demand
Download Disk 1 of the latest release
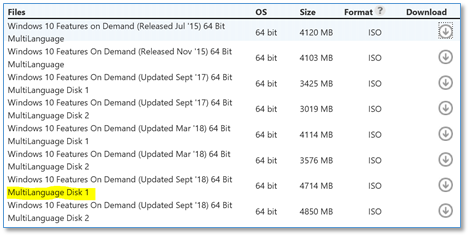
Figure 2 - Download Disk 1 of the latest release
Before we install the RSAT let's examine what's available we'll use Get-WindowsCapability. Run the following command:
Get-WindowsCapability -online | ? Name -like Rsat* | FT
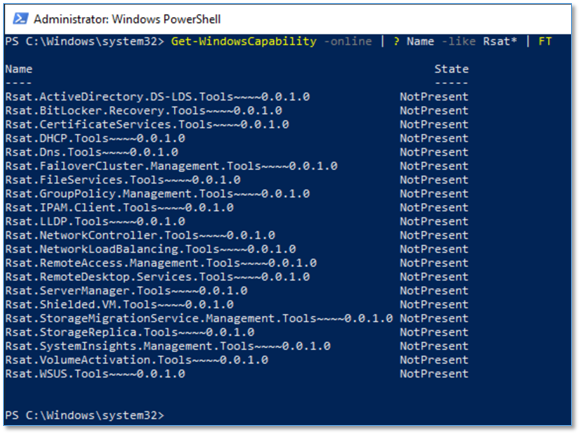
Figure 3 - Check RSAT FoD Status
Here are your choices, some a great for single quick installations, while others can help make available the FoD resources for the Enterprise.
Option 1:
You can copy the files from the .iso media to a local directory and move to a network share and make it available to the administrative staff.
#Specify ISO Source location $FoD_Source = "$env:USERPROFILE\Downloads\1809_FoD_Disk1.iso" #Mount ISO Mount-DiskImage -ImagePath "$FoD_Source" $path = (Get-DiskImage "$FoD_Source" | Get-Volume).DriveLetter #Language desired $lang = "en-US" #RSAT folder $dest = New-Item -ItemType Directory -Path "$env:SystemDrive\temp\RSAT_1809_$lang" -force #get RSAT files Get-ChildItem ($path+":\") -name -recurse -include *~amd64~~.cab,*~wow64~~.cab,*~amd64~$lang~.cab,*~wow64~$lang~.cab #get metadata copy-item ($path+":\metadata") -Destination $dest.FullName -Recurse copy-item ($path +":\"+"FoDMetadata_Client.cab") -Destination $dest.FullName -Force -Container #Dismount ISO Dismount-DiskImage -ImagePath "$FOD_Source" |
Use the following PowerShell to install RSAT from the FoD source that was placed on a network share from Option 1.
Note: The network share/resource needs to have permissions that allow computer objects to READ, as well as the user invoking the PowerShell. This is due to the Windows Module Installer running as NT Authority\SYSTEM, and will need access to the READ the source.
#Specify ISO Source location $FoD_Source = "C:\Temp\RSAT_1809_en-US" #Grab the available RSAT Features $RSAT_FoD = Get-WindowsCapability -Online | Where-Object Name -like 'RSAT*' #Install RSAT Tools Foreach ($RSAT_FoD_Item in $RSAT_FoD) { Add-WindowsCapability -Online -Name $RSAT_FoD_Item.name -Source $FoD_Source -LimitAccess } |
Option 2:
Alternatively, you could mount the .ISO and specify the drive as the source. Using a local drive letter as the -source parameter specified when executing the Add-WindowsCapability PowerShell.
If installing from a mounted ISO the below is an example PowerShell script
#Specify ISO Source location $FoD_Source = "$env:USERPROFILE\Downloads\1809_FoD_Disk1.iso" # #Mount ISO Mount-DiskImage -ImagePath "$FoD_Source" $FoD_Drive = (Get-DiskImage "$FoD_Source" | Get-Volume).DriveLetter #Grab the available RSAT Features $RSAT_FoD = Get-WindowsCapability -Online | Where-Object Name -like 'RSAT*' #Install RSAT Tools Foreach ($RSAT_FoD_Item in $RSAT_FoD) { Add-WindowsCapability -Online -Name $RSAT_FoD_Item.name -Source ($FoD_Drive+":") -LimitAccess } #Dismount ISO Dismount-DiskImage -ImagePath "$FoD_Source" |
After the installation we'll use Get-WindowsCapability again to check the status of the RSAT features after the installation.
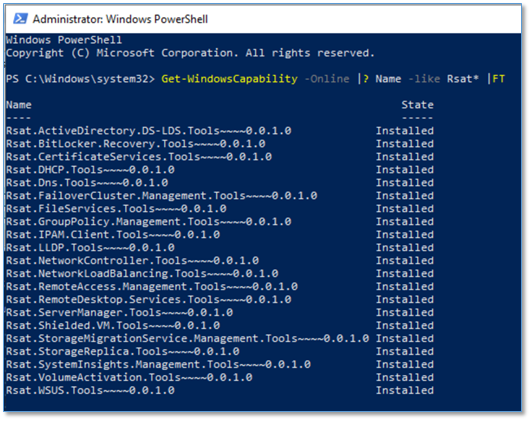
Figure 4 - Ensure RSAT features installed
Thank you for taking some time to read this and learning about the changes with RSAT in Windows 10 1809. We hope that this will help you as you transition to this recent build of Windows 10.
Good Luck!
Disclaimer
The sample scripts are not supported under any Microsoft standard support program or service. The sample scripts are provided AS IS without warranty of any kind. Microsoft further disclaims all implied warranties including, without limitation, any implied warranties of merchantability or of fitness for a particular purpose. The entire risk arising out of the use or performance of the sample scripts and documentation remains with you. In no event shall Microsoft, its authors, or anyone else involved in the creation, production, or delivery of the scripts be liable for any damages whatsoever (including, without limitation, damages for loss of business profits, business interruption, loss of business information, or other pecuniary loss) arising out of the use of or inability to use the sample scripts or documentation, even if Microsoft has been advised of the possibility of such damages.