This post has been republished via RSS; it originally appeared at: New blog articles in Microsoft Tech Community.
Ingesting Office 365 Alerts with Graph Security API
During recent Azure Sentinel workshops some customers have asked for the possibility to ingest Office 365 alerts into Azure Sentinel. While Azure Sentinel has Office 365 Connector, this connector ingests Exchange mailbox audit logs and SharePoint audit logs and as such it doesn’t include Office 365 alerts.
With Office 365 alerts administrators can be alerted about anomalous or malicious activity in their Office 365 environment, for example malware campaign detection or suspicious email forwarding. To learn more about Office 365 alerts you can refer to Alerts in the Office 365 Security & Compliance Center. Administrators can also define their custom alerts in Office 365 Security & Compliance Center.
While Office 365 alerts connector may be be released in future, in the meantime we can leverage Graph Security API to ingest Office 365 alerts into Azure Sentinel. Also, as this approach is based on Graph Security API, you can use it to get alerts from other Microsoft Security Products that support Graph Security API and don't have Azure Sentinel alerts connectors released yet.
1. Using Microsoft Graph Security API to read Office 365 Alerts
As with most Microsoft security products, you can access Office 365 alerts through Microsoft Graph Security API. This API provides restful access to Microsoft security alerts. To further understand possible queries via Graph Security API you can review sample queries in github repository.
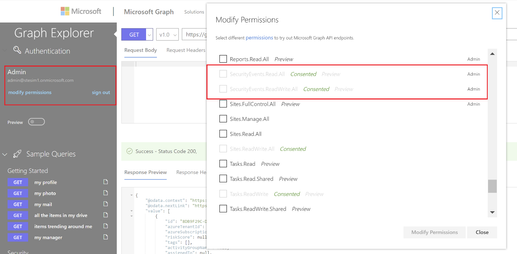
To test out Graph queries we will use Microsoft Graph API Explorer. Before running security alerts queries, please ensure you have at least minimum permission in the API Explorer to read security alerts. You should have SecurityEvents.ReadAll as minimum. To check/add your permissions click on modify permissions link on left side of Graph Explorer.
Once we have the right permission, we need to form a query to retrieve Office 365 alerts. Let’s start with initial query for all alerts:
/security/alerts
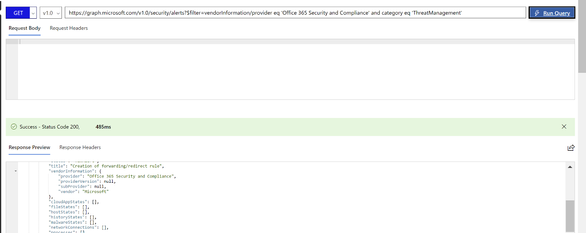
As we are interested to retrieve only Office 365 alert, we will apply following filter that we put into Graph Explorer:
/security/alerts?$filter=vendorInformation/provider eq 'Office 365 Security and Compliance' and category eq 'ThreatManagement'
In the Response section please note createdDateTime field, this is the datetime of alert creation in Office 365. We will use this field later to retrieve only new alerts.
.
2. Ingesting alerts
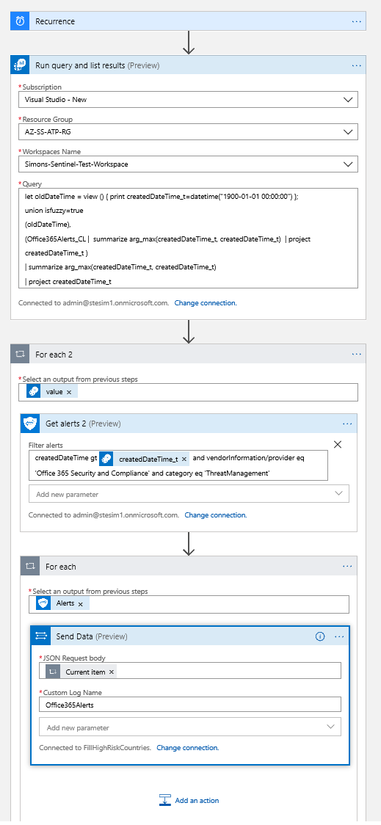
Once we have the list of Office 365 alerts through Graph Security API, we need to find a way how to ingest these alerts into Azure Sentinel. We will leverage Azure Sentinel Playbook for that. As we can’t ingest directly into SecurityAlerts table, we will ingest alerts into custom logs table. Our playbook will be running at scheduled interval (e.g. every 5 mins). Alerts will be stored in Office365Alerts_CL custom log table.
In the playbook logic we will first check for the creation time of the most recent alert in the Office365Alerts_CL table and then retrieve new alerts since that time. If the table is empty or it doesn't exist, we will retrieve all alerts from Office 365 (this is the initialization phase).
Now, let’s have a look at each step in more details.
3. Creating Azure Sentinel Playbook
You can create new playbook in your Azure Sentinel environment, in the Playbooks section.
Once the playbook is created, add Recurrence function from the list of available functions and set recurrence to your defined time, e.g. every 5 mins:
4. Retrieving the most recent Office 365 alert
Now we need to find datetime of the most recent Office 365 alert in Office365Alerts_CL table. While Azure Sentinel automatically populates TimeGenerated column, this is not what we are looking for. Rather, we are looking what is the time of most recent alert when it was generated in Office 365. As mentioned earlier, this information is populated by Office 365 when new alert is created and is stored in createdDateTime field. If there are no alerts in Office365Alerts_CL table or table doesn’t exist, we will retrieve all Office365 alerts and initialize the table.
Now, we will put together corresponding KQL Query. First, we need to check, if Office365Alerts_CL already exists. As there’s no built-in function in KQL to check for table existence, we will use union and isfuzzy=true operator. If isfuzzy is set to true, the set of union sources is reduced to the set of table references that exist and are accessible at the time. If at least one such table is found, it will produce warning, but query will still execute. The default value is false, meaning that any query against non-existing table will yield an error.
1. We will be doing union with new oldDateTime variable that will contain only one record, which is historical date (set to 1st of January 1900). We don’t expect to have any alerts generated before this date.
This is how we define the oldDateTime variable:
2. After we define the variable, we can execute the union function. We will be joining oldDateTime with Office365Alerts_CL table. As we need only timestamp of last alert, we will use arg_max function to get the most recent createdDateTime_t value (as mentioned earlier, this is the datetime of the most recent Office 365 alert.).
To get the datetime of the most recent alert we will run following query:
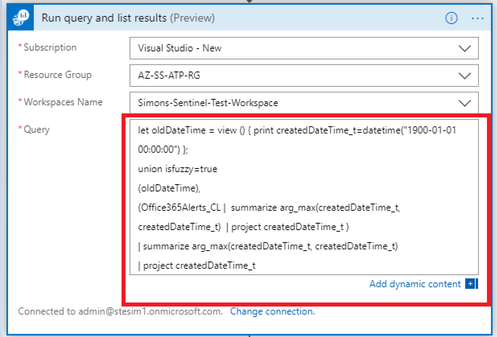
And this is how the final query looks like – note we added one more arg_max function that compares oldDateTime we defined earlier (Step 1) and the most recent alert in Office 365Alerts_CL table. If there are no alerts in Office365Alerts_CL table it will just return oldDateTime.
5. Execute Query in the Playbook
To execute previous query in Playbook against Sentinel Log Analytics workspace, we will add Azure Log Analytics Action into the playbook:
Now, we can add our query into Azure Log Analytics action:
6. Using Get alerts Action
Once we have the filter expression, we can run Graph API query to get the list of Office 365 Alerts. Azure Sentinel Playbook comes with Microsoft Graph Security action (currently in preview) that allows to easily run Graph Security API queries.
First, let’s add Microsoft Graph Security API action into our Playbook:
And now we will look for GetAlerts function:
Next, enable filtering on Get alerts action:
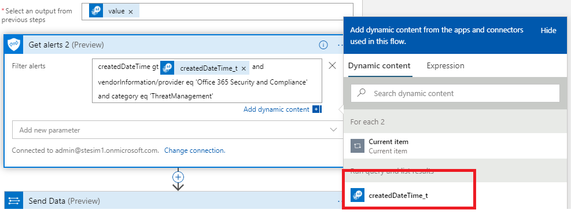
Now, add the Graph Security API query to retrieve the list of Office 365 Alerts that we have created in Step 1 and include datetime filter as below. Please, don’t forget to add space into “Filter alerts” box after adding createdDateTime_t variable from the list of dynamic variables.
This is the final Graph Security API query:
And now added into Playbook action:
7. Ingest Office 365 alerts into Azure Sentinel
As a final step, we will ingest Office 365 alerts that we retrieved in previous step into Office365Alerts_CL table. We will do so by adding Azure Log Analytics Send Data action into our playbook.
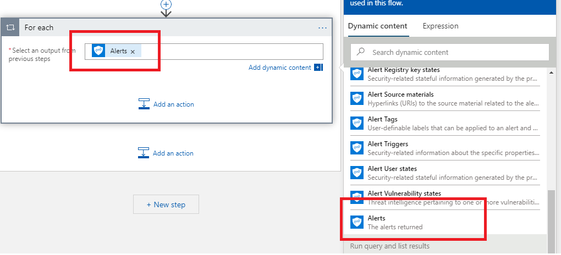
Before doing so, we first add For each action that will iterate through all Office 365 Alerts received through Graph Security API in the previous step
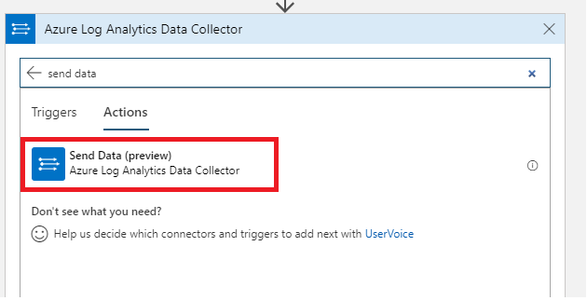
Now we add Send Data action from Azure Log Analytics Data Collector
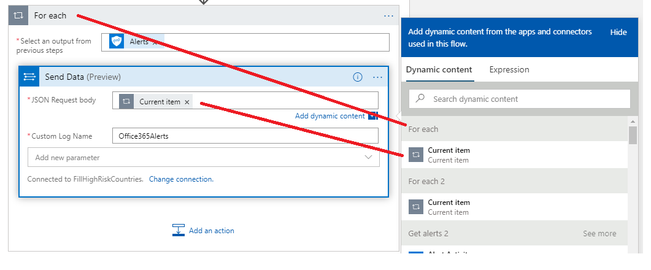
And now we can ingest alerts into source log table which is Office365Alerts – note that you will have two CurrentItem items – please ensure you select the one that is associated to the Alerts iteration.
8. Summary
To test the playbook, we can execute it by clicking on Run Trigger and selecting Recurrence in Playbook page
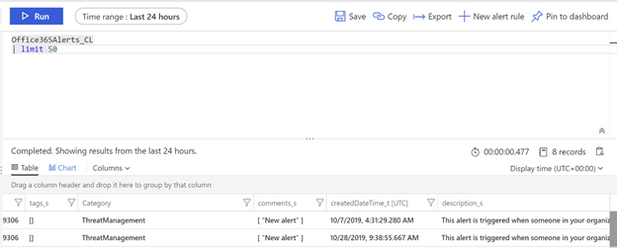
Once the playbook execution is completed, we can check for alerts by running query in Azure Sentinel Logs:
And we are done. In this article we have demonstrated how to use Graph Security API to ingest Office 365 Alerts into custom table in Azure Sentinel. We have built Azure Sentinel playbook and leveraged new Graph Security API action to retrieve Office 365 alerts and ingest them into Azure Sentinel Custom Logs table. As a next step we can for example translate these alerts into Sentinel incidents through custom alert rules.
For your reference, this is the final playbook:

