This post has been republished via RSS; it originally appeared at: Healthcare and Life Sciences Blog articles.
Why the Health Bot Service?
The Health Box Service is an AI-powered, extensible, secure and compliant healthcare experience. Microsoft now has a specific template pre-built for COVID-19. It takes inbound requests, asks about the patient’s symptoms, and assists in getting people access to trusted and relevant healthcare services and information based on the CDC recommendation.
We will take you step-by-step through the following, so that you can deploy the health bot with ease:
- Deployment Approach
- Configuration
- Design and Coding
- Creating a WebChat Channel
- Embedding WebChat in a Web Page
Deployment Approach
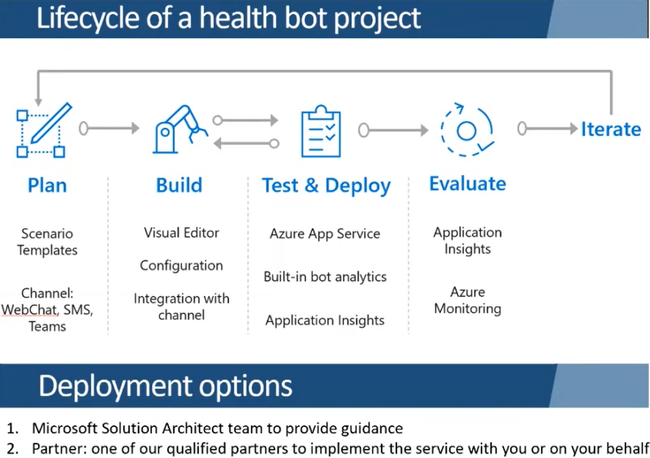
It’s very important to deploy the bot in a phased approach, where you plan to use scenario templates first and then customize and iterate over time. Below is a diagram of the life cycle best practices.
Configuration
- Search For “Microsoft Healthcare Bot Service” in the Azure Marketplace.
- Enter Details and Click “Subscribe”.
3. You will get an email from Azure Marketplace with a config link that will redirect you to the Health Bot Service. Once configuration is done, you will see this home page. Click "Open scenarios template catalog” in blue.
4. Select “COVID-19 Response” from the pre-built templates.
5. Specify the Name and click “Import Template”.
6. Once you import the scenario, it will appear in the “Manage” tab under “Scenarios” on the left-hand toolbar. Click on the name of the template to take you to the visual designer.
Design and Coding
The relevant code is in Javascript, so if you are familiar more with the code, you can click the “Code” tab on the bottom left.
Click back to the “Designer” tab. It’s Visio-style, but has capabilities like programming. At the top, you can see the range of scenario elements. You have the ability to insert prompts (represented in green), if/else decision (represented in yellow), or add statements to print out messages (represented in blue). There are many different types of scenario elements, and more details that Microsoft documents here so that you can customize further.
If you click “Run” at the top, it will only run the current scenario in a debug mode.
Below is how it looks after the run, asking you a set of questions on the right.
As you answer the series of questions in the chat on the right, you can see that it’s corresponding with the logic on the left hand side. For example, if you click on the “Symptoms” prompt, it’s highlighted in green on the left and reflected in the chat on the right.
After the questions are answered, the bot classifies patients based on the logic. In this example, if you’re classified as a high-risk patient, the bot reads, “We would like to talk with you as soon as possible.” You can have different end results, like a link to virtually schedule an appointment, a connection to a virtual agent, or a link to a virtual physician visit. All of these endpoints can be customized.
For customizing further, including integrations with QnA Maker and FHIR API, see the resource appendix at the end of this article.
Creating the WebChat Channel
1. Go back to the Health Bot Service, select "Integrations" and click "Secrets".
2. Webchat_secret allows you to connect the bot to a web page, just like Azure Bot framework. The webchat channel is enabled by default. Copy the webchat_secret and the app_secret.
Check out more details here on embedding your health bot into your app via webchat. Go to github repository link. Click “Deploy to Azure”. Provide subscription and resource group details to deploy this into. This deploys an app service that will host the healthcare bot.
- Go back to your Azure portal and click on the Resource group that you created/chose in last step.
- It will create two things: the app service and the associated app service plan.
- If you click on the app service, go to “Configuration” on the left-hand side. Provide the app_secret and the webchat_secret here, by clicking “Add new application setting” and adding the values directly.
- Now that the configuration is done, we need to run the code. Scroll down to Development Tools, and then “App Service Editor”.
- Click “Go”.
- Modify the public/index.js file. Specify if you want to trigger a scenario on startup. If you want the bot to open upon page load, you have to add the highlighted “trigger” code below. If you don’t, it will be a blank chat box.
- Once that’s done, we are ready! Click “Run” on the left.
10. You will get this Azure website.
Embedding a WebChat into a Web Page
- This Azure website now has to be embedded into a web page. See the sample website below.
2. Open visual studio for the code. Embed an iFrame as a tag. The source is the app service that is hosting the health bot. Front-end developers can then play around with this code.
3. If you click the COVID-19 info button, you want the webchat to pop up like this to start the triggered scenario. Now you know how to get the health bot on the web page!
Resources for Customizing Further
For adding an FAQ list, leverage Azure AI's Cognitive Service called QnA Maker
- Use QnA Maker to extend your health bot capabilities
Health Bot data connections can be used integrate with systems that support FHIR. Here are links from technical documentation to help you with FHIR integration:
- Add FHIR data connections to health bot scenarios
- Deploy Azure API for FHIR
- Get access token using Azure CLI
Thanks for reading and let us know how else we can help!
Nikita Pitliya, Microsoft Cloud Solutions Architect
Sam Brown, Microsoft Teams Technical Specialist


