This post has been republished via RSS; it originally appeared at: Microsoft Tech Community - Latest Blogs - .
Introduction:
In part 1, we saw how to use MEM portal to view and recover Bitlocker recovery keys for ConfigMgr clients that are tenant attached. In part 2 of this blog, we will see how to migrate Bitlocker keys to Intune as well as view and recover keys using MEM portal for ConfigMgr clients that are co-managed.
Options:
There are 2 ways to manage Bitlocker keys in MEM portal for devices that are currently managed by ConfigMgr.
- ConfigMgr Tenant attach
- ConfigMgr co-management
In this blog we will discuss ConfigMgr co-management option.
Option 2: ConfigMgr co-management
Assumptions & pre-requisites:
- You are running the latest version of ConfigMgr current branch.
- The test devices are running on the latest version of ConfigMgr client.
- ConfigMgr co-management configuration is already completed.
Administrator’s experience:
Here is the device that is a ConfigMgr client (Desktop-Bitlckr).
Step 1: Deploy ConfigMgr Bitlocker policy to the device.
Once the device gets encrypted, the information shows up in ConfigMgr database.
This device is not currently “Co-managed.” Before we add this device into “Co-management,” create a Bitlocker policy in Intune matching the encryption algorithm of Bitlocker policy in ConfigMgr.
There are 3 ways you can build encryption policies in Intune
- Endpoint Security > Disk Encryption
- Configuration Profiles > Endpoint Protection > Windows Encryption
- Settings Catalog
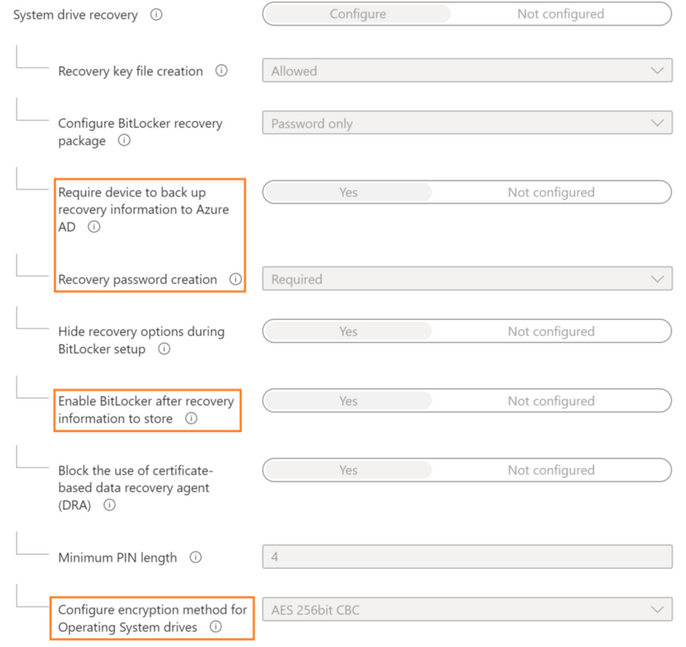
Step 2: I built an Intune Bitlocker policy using Endpoint Security blade. Note the configuration for highlighted settings. See below reference guide for details.
Reference guide: https://docs.microsoft.com/en-us/mem/intune/protect/endpoint-security-disk-encryption-profile-settings#bitlocker
Note the “Configure encryption method for Operating Systems drives” setting with encryption algorithm matching with ConfigMgr encryption algorithm.
Deploy Intune Bitlocker policy to a device group into which the ConfigMgr co-managed device will be either added manually or dynamically.
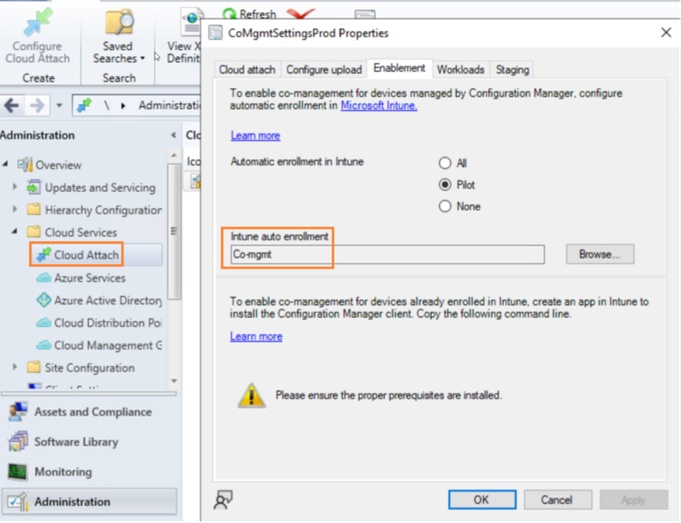
Step 3: Add the ConfigMgr client into “Co-management” group in ConfigMgr console, so that device gets enrolled into Intune.
The device gets auto enrolled into Intune and shows up in MEM portal.
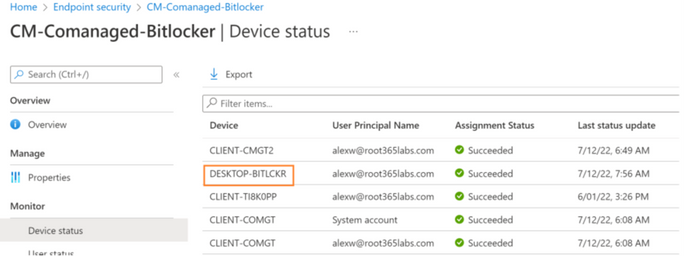
Step 4: Add the device into the device group that you created in step 2. Wait for the policy to be applied on the device. The easiest way to check the policy status is checking under the Device Status page of the policy, as shown below.
After the Intune Bitlocker policy gets applied, Bitlocker key is escrowed into Azure AD & Intune.
Validation:
The default encryption report under Reports > Encryption Report shows if the device is encrypted or not. It does not show if the key is escrowed.
We can validate if the key was escrowed into Azure AD and Intune in 2 ways,
- Manually in Azure AD portal & Intune portal
- Programmatically using Graph API
Step 5: Here we will see how we can check the status for several hundred devices programmatically using Graph API,
1. If you haven’t installed the module, Install PowerShell module for Graph
Install-module Microsoft.Graph
Reference: https://docs.microsoft.com/en-us/powershell/microsoftgraph/get-started?view=graph-powershell-1.0
2. Run the script to create 2 csv files
1st file gives list of all Windows devices with their device IDs (IntuneDevices.csv)
2nd file gives list of Windows devices that have saved their Bitlocker recovery key in Azure AD along with their device IDs (AadBackedUpDevices.csv)
Connect-MgGraph -Scopes "Device.Read.All", "Directory.ReadWrite.All", "BitlockerKey.ReadBasic.All", "BitlockerKey.Read.All"
Get-MgDevice | Where-Object {$_.OperatingSystem -like "Windows*"} | export-CSV c:\temp\IntuneDevices.csv -Force
Get-MgInformationProtectionBitlockerRecoveryKey | Where-Object {$_.volumetype -eq "1"} | Sort-Object -Property deviceid -unique | export-csv c:\temp\AadBackedUpDevices.csv -Force
3. Then I used a simple excel v-lookup to compare the 2 reports and check if my test device key escrow was successful or not.
You can be creative in building your own scripting solution to combine the outputs into one or even better build PowerBI report to view recovery key escrow data.
4. I took “DeviceID”, “DisplayName” column from report 1 and took the “Deviceid” column from report 2. Ran a v-lookup against two “DeviceID” columns to see which devices did not escrow the key.
5. As you can see my test device “Desktop-Bitlckr” is not in the list of devices under column D. Which means the key escrow has not been completed. The screenshot also has reference to the VLOOKUP formula I used.
Remediation:
When you happen to see devices that have not escrowed their key, we will have to trigger an action on the MEM portal either manually such as Key rotation or AAD Key backup in order for these devices to populate its key on the MEM portal. I prefer doing an AAD key backup action using a PowerShell script.
Reference to the script: https://github.com/mardahl/PSBucket/blob/master/Invoke-EscrowBitlockerToAAD.ps1#L56
You have 3 options to deploy the script:
- GPO
- ConfigMgr script
- Intune PowerShell script
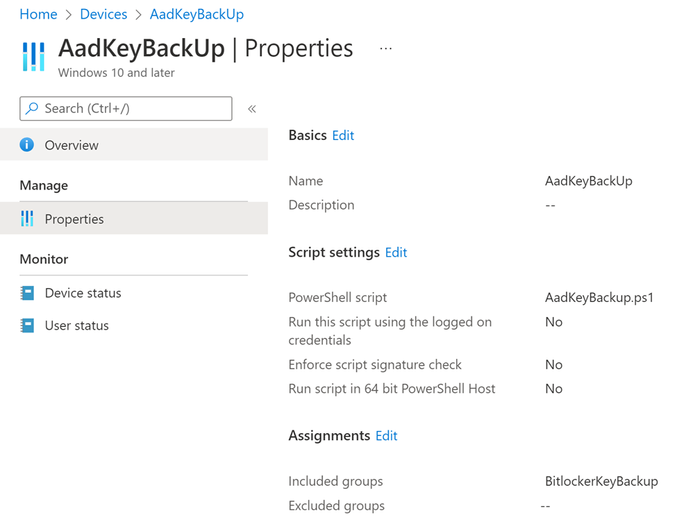
Step 6: Since we are talking about modern management, I decided to use Intune to deploy the script in a modern way.
Reference guide: https://docs.microsoft.com/en-us/mem/intune/apps/intune-management-extension
1. Save the script on your device
2. Create a script by going to MEM portal > Devices > Scripts > Add script
3. Deploy it to the device group that contains devices that have not completed recovery key escrow.
After the script succeeds on the device, you can see the recovery key backed up on AAD and MEM portal.
Hope this post was informative!!!
Script disclaimer: The sample scripts are not supported under any Microsoft standard support program or service. The sample scripts are provided AS IS without warranty of any kind. Microsoft further disclaims all implied warranties including, without limitation, any implied warranties of merchantability or of fitness for a particular purpose. The entire risk arising out of the use or performance of the sample scripts and documentation remains with you. In no event shall Microsoft, its authors, or anyone else involved in the creation, production, or delivery of the scripts be liable for any damages whatsoever (including, without limitation, damages for loss of business profits, business interruption, loss of business information, or other pecuniary loss) arising out of the use of or inability to use the sample scripts or documentation, even if Microsoft has been advised of the possibility of such damages.


