This post has been republished via RSS; it originally appeared at: New blog articles in Microsoft Community Hub.
This blog will guide how to export the App Service Certificate from Azure Portal and set up a password for the certificate in Windows and export it with password by using PowerShell.
When we create App Service Certificate (Add and manage TLS/SSL certificates - Azure App Service | Microsoft Learn) in Azure Portal, sometime we are not using it in the App Service but use it for Azure VM or on-prem VM. Moreover, we will use it in some Azure resources (such as upload the certificate to Azure Application Gateway).
However, after you export the App Service Certificate from Azure Portal, when you are going to upload it to Azure Application Gateway or use it in the Azure VM or on-prem VM, you would find out sometimes it would need the "password". But you don't know what the password is for the certificate. This is because when we export App Service Certificate, it is without password by default so we need to set it up manually by ourselves.
In this article, we will show you how to export the App Service Certificate and set up the password for certificate in Windows:
Export the App Service Certificate in Azure Portal and set up the password in Windows
- Go to your App Service Certificate and click "Export Certificate" -> "Open Key Vault Secret"
- Click the current version of certificate
- Click "Download as a certificate"
- Right click on the download .pfx certificate and click "Install PFX"
- Select "Current User"
- Make sure that select the correct .pfx file
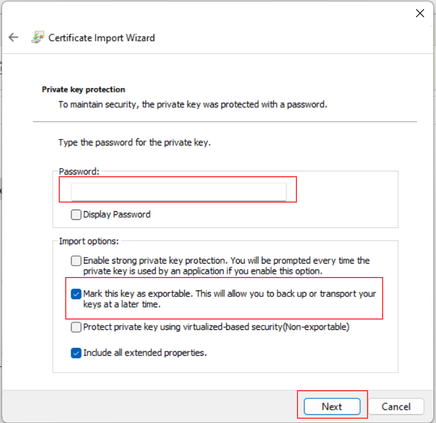
- Keep the password empty and check the "Mark this key as exportable. This will allow you to backup or transport your keys at a latter time" checkbox
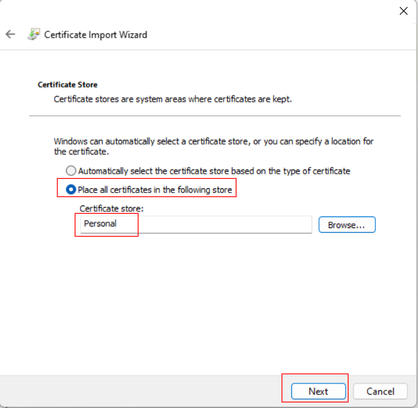
- Select "Place all certificates in the following store" and Choose "Personal" for Certicate store
- Click "Finish"
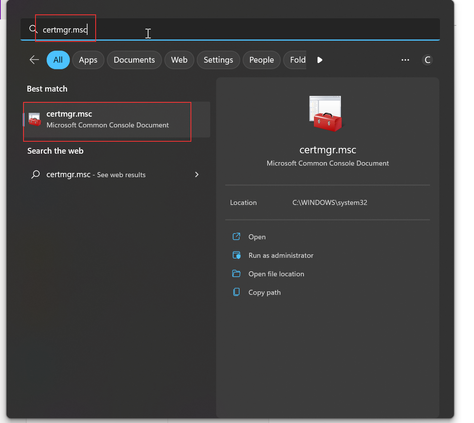
- Open Certificate Manager by searching "certmgr.msc" in Windows
- Select "Certificates - Current User" -> "Personal" -> "Certificate". Then right click on the target certificate and select "All Tasks" -> "Exports…"
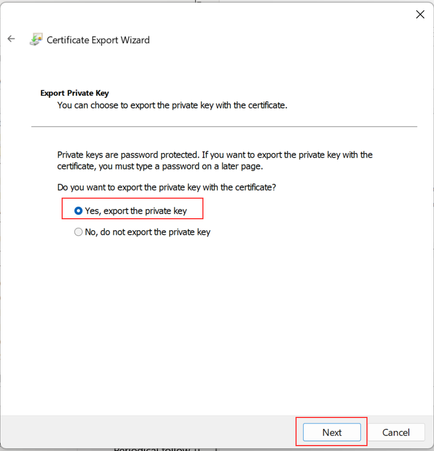
- Choose "Yes, export the private key"
- Choose "Personal Information Exchange - PKCS #12 (.PFX)" and make sure check the "Include all certificates in the certification path if possible" and "Enable certificate privacy"
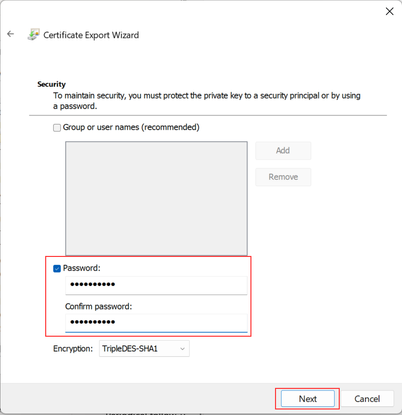
- Select the "Password" and enter the password
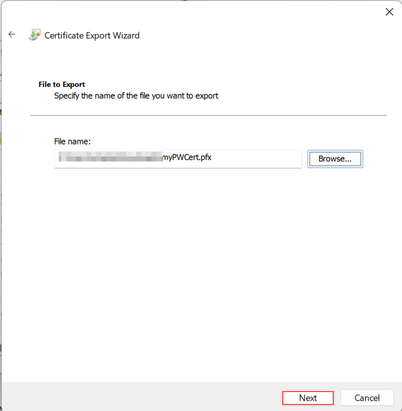
- Give a filename to save this certificate
- Click "Finish"
Export the App Service Certificate with the password by PowerShell
You could also use the PowerShell simply to export it by following script:
Congratulation, after these steps, now you will get a certificate with password! At last, would like add a kind reminder below:
Hope this article is helpful for you, thank you for reading :)
Reference:


