
This post has been republished via RSS; it originally appeared at: Planner Blog articles.
First published on MSDN on Jun 06, 2016***Update 4/7/2017 - for the new AzureAD v2 Preview commands to achieve this - see https://blogs.msdn.microsoft.com/brismith/2017/04/07/planner-group-control-new-powershell-commands/ ***
Today sees the start of General Availability of Microsoft Planner , known during the First Release preview as Office 365 Planner. It may take a few weeks until it is fully rolled out so please be patient if you are not seeing Planner yet. Based on some of the questions we have already seen in preview we have an FAQ document , but wanted to give a little more detail in this blog post and also some examples of the things I expect you might need to know.
*** 6/8/2016 - Once you have read this I did follow up with a few more details in a new blog here . - which now includes new information added 10/7/2016***
Firstly if you have been in First Release thanks for trying out Planner – but you will now see that Planner, rather than being a top level license that you needed to assign, is now part of your Office 365 plan (such as E3, E5 etc.) and is listed under that license – and is enabled by default.
In my screenshot below I have both the First Release (300,000) and the E3 licenses assigned (and mine still shows Office365 Planner – it will be changing to Microsoft Planner shortly).

The KB article to automate the license assignment using PowerShell has been updated and now includes a section for handling the plan level licenses – see the foot of https://support.microsoft.com/en-us/kb/3108269 and note specifically that the ‘DisabledPlans’ parameter if you need to remove licenses for Planner is “PROJECTWORKMANAGEMENT”. One question that comes up is how do I know what new features might be coming so that I can add the addition DisabledPlans to my PowerShell commands used for user and license management? I found an interesting approach to this which sets the plans you do want and then uses PowerShell to work out which ones aren’t in your list – see http://mattmcnabb.github.io/Office-365-Licensing_4 for more details. I’m certainly not trying to discourage you from using Planner – but do appreciate that with large organizations you do sometimes need to plan how you want things used before jumping in.
If you haven’t used Planner during the First Release Preview then you can find the product details here and also great information for admins to guide you on your journey with Planner – which also includes useful links for end users - and the announcement blog post at https://blogs.office.com/2016/06/06/microsoft-planner-ready-for-showtime/ . A direct link to the admin FAQ here .
Planner makes use of Office 365 Groups – so each plan is a group – and when you create a plan it creates a group. The Group then supports the collaboration features by providing storage for attachments and also a mailbox for group discussions. Planner will give you the best experience if you also have your e-mail in Office 365 (Exchange Online) – but you can still use Planner even if you have on-premises Exchange. A couple of the features you will miss will be the ability to comment and also makes plans favorites within OWA – but you can still do this in Planner itself.
Regarding Groups we have had some feedback from First Release customers that they wish to have more central control of group creation – and prefer that not everyone can create groups. It is possible to do this and we have some new PowerShell capabilities to support this. The article at https://msdn.microsoft.com/en-us/library/jj151815.aspx (thanks Jürgen!) will help you – but basically you can disable group creation for everyone – then create an AD group containing the individuals who you allow to create groups – then set this group as the ‘allowed list’ via PowerShell. These are the steps I used when I tested this.
First you will need the latest Public Preview Azure AD PowerShell stuff – available at the time of writing from this link - http://connect.microsoft.com/site1164/Downloads/DownloadDetails.aspx?DownloadID=59185 .
You will also need to have created an AD Group in Azure and added users who you need to create groups. Azure AD can be found in the Office 365 Admin portal – under Admin. If you haven’t used it before it takes a couple of minutes to set up. You can navigate to your Active Directly domain (it takes you out of the new UI and back to the ‘Classic’ UI at this point then click Groups and you can add a new AD group (we are not talking Office 365 groups at this point…) using ADD GROUP at the foot of the page. The type should be Office 365. Once created then add your users and note the Object ID by going to Properties (You will need this later). Here is what mine looks like – and I called it cancreategroups:

Now in the Microsoft Azure Active Directly Module for PowerShell we can use the following commands to set the group creation to disabled and the group holding our list of allowed users:
Connect-MsolService
$template = Get-MsolSettingTemplate –TemplateId 62375ab9-6b52-47ed-826b-58e47e0e304b
$setting = $template.CreateSettingsObject()
$setting["EnableGroupCreation"] = "false"
$setting["GroupCreationAllowedGroupId"] = "7edd1d0b-557d-43e6-b583-4f3e0198c167"
New-MsolSettings –SettingsObject $setting
Walking you through these, the first line will prompt for credentials to connect you to your service. The second line will get you a reference to the Group.Unified template – the GUID is constant I think – but you can always run Get-MsolAllSettingTemplate to see if this is correct in your case. We are then making the actual settings – EnableGroupCreation to False and setting the GUID of our AD group noted above as the GroupCreationAllowedGroupId. Finally we are applying our setting object. You can refer to the PDF at the same download location as the Azure AD PowerShell for more details – and you may need to edit an existing Settings object rather than creating a new one like I have. One way to check your settings is to use the Graph Explorer https://graph.microsoft.io/en-us/ – just click the Try the API, sign in, enter a URL of https://graph.microsoft.com/beta/settings (after choosing the beta ‘version’) and your should see something like this:

You could use the same API to make the settings rather than using PowerShell, but I don’t have the examples to hand yet.
And no need to add certain admins to the group as certain roles in Office 365 will still be able to create Office 365 Groups regardless of the settings above:
- Company Administrator
- User Account Administrator
- Mailbox Administrator
- Partner Tier1 Support
- Partner Tier2 Support
- Directory Writers
We would welcome feedback on the exclusion of these roles from the group control rules.
After setting up the settings above then logging in as a user not in the ‘allowed’ group then when I then tried to create a Group I got this message:
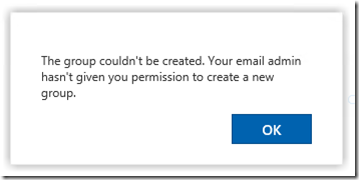
When I tried to create a Plan – it was slightly less informative – giving the message:

We have a different error message in the pipeline – but if you users do report this it may well be that group creation is blocked for that user and it will not work even if they do wait.
A couple of other points for now – and the first relates to different behaviors depending on the location of your mailbox (and if you don’t know then ask your administrator. If you don’t have your mailbox in Exchange Online then you will not be able to interact with Comments nor add favorite plans from within Outlook Web App or Outlook – but working within Planner should work fine. *** Adding KB - https://support.microsoft.com/en-us/kb/3169632 - thanks Bill! ***
Final point – and we have had a few reports of an apparent difference in behavior of the ‘Attach’ link on the Task pane depending on how you navigate to the pane. If you go via the Planner hub and drill down to a task then the Attach link is active:

If however I navigate via My tasks the Attach link is not active.

This is expected behavior as the context of the Plan gives access to the Group storage for attachments – whereas in the context just of the task this isn’t the case. It feels a little odd – but there are some very valid reasons why we do this.