This post has been republished via RSS; it originally appeared at: Premier Field Engineering articles.
Hi, my name is Taj Mohammed, I am a PFE working in the US primarily with SCCM. As a result of a recent engagement I thought I would document and share the process required to properly create/register Applications in the Azure Portal. Then import them successfully in SCCM.
Background
SCCM requires someone with Global Admin privileges to Sign In from SCCM Console to automatically register Web/Server and Client/Native Apps with appropriate permissions to onboard AAD. This is a pre-requisite for an ARM based setup of CMG. Although, using Global Admin privileges to Sign In is an easy and quick way to register the Apps quite often SCCM admins have limited access to their AAD tenants. To achieve application registration SCCM also provides an import option without the need for Global Admin Access.
Note: All the steps in Azure Portal need to be performed by a Global Admin. SCCM Steps will be performed by SCCM admin except step 5.1 where someone with Owner role or a Co-administrator assigned need to Sign in to see the Subscription.
The blog consists of 5 major sections as detailed below.
1. Note tenant details
2. Registering Server/Web App
3. Registering Client/Native App
4. Importing Server/Web and Client/Native Apps
5. Installing CMG
6. Additional Requirements to complete the setup
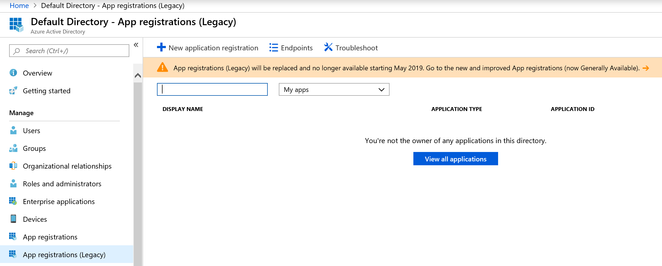
We will be using the new and improved App registrations node to register the Apps as App registrations (Legacy) will be gone anytime soon.
Common errors:
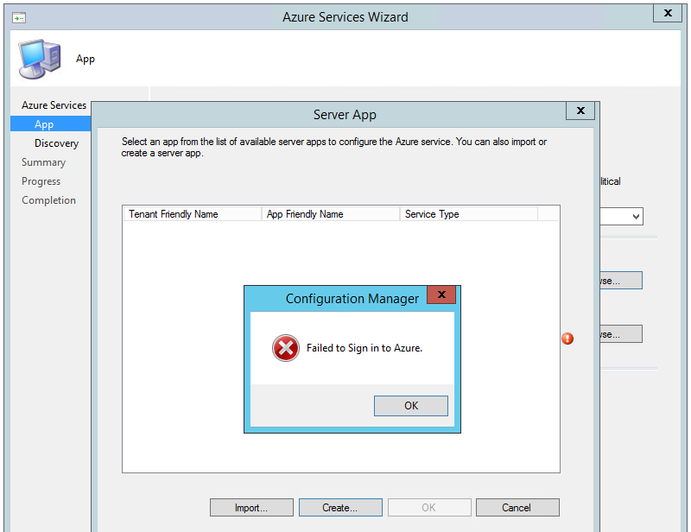
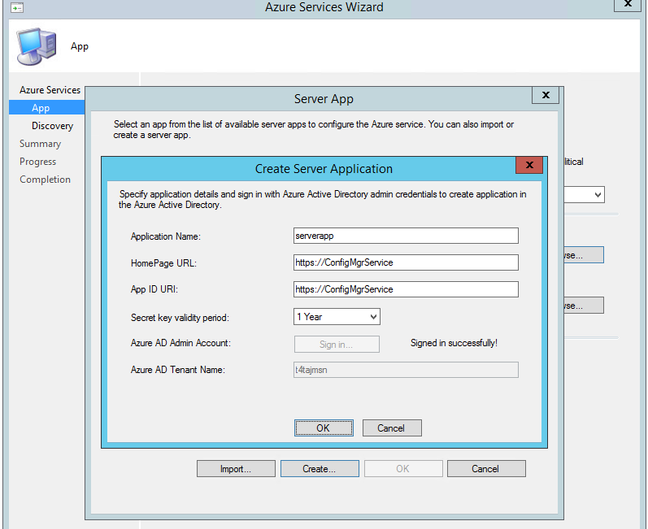
Errors displayed when the Sign In User account is not a Global Admin.
Error: "Failed to Sign in to Azure"
Cause: Account used to Sign-In is not a Global Admin. The App still gets created without proper configuration in Azure.
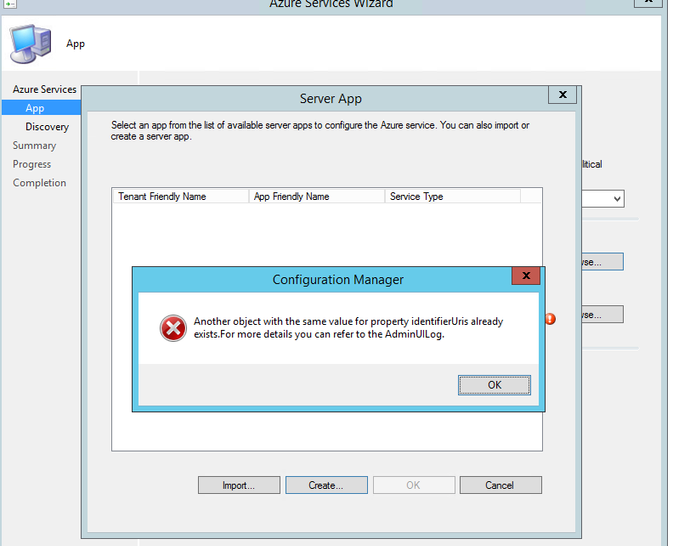
Error: "Another object with the same value for property identifierUris already exists. For more details you can refer to the AdminUILog"
Cause: This usually happens if you are attempting to Sign-in again after getting the above ("Failed to Sign in to Azure") error. This is really saying App already exists in Azure.
Delete the App from Azure Portal and try again using an account with Global Admin rights.
If Signing-in as a Global Admin is not an option and you want to use the Import method, follow the below steps.
1. Note tenant details
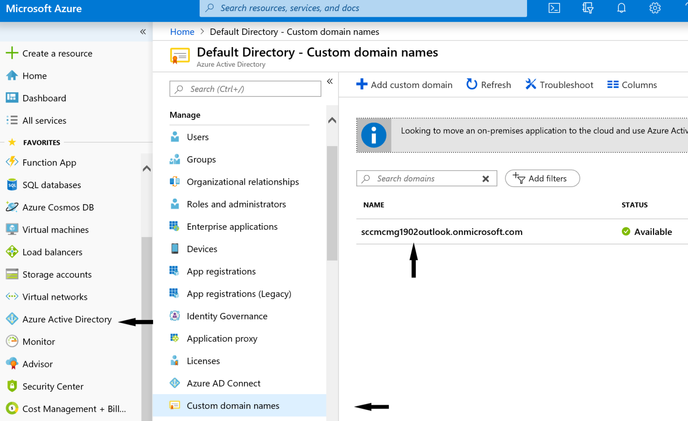
1.1 Before we begin, let's make a note of Azure AD Tenant Name and Tenant ID.
AAD Tenant Name: sccmcmg1902outlook.onmicrosoft.com (Trial account used for this demo)
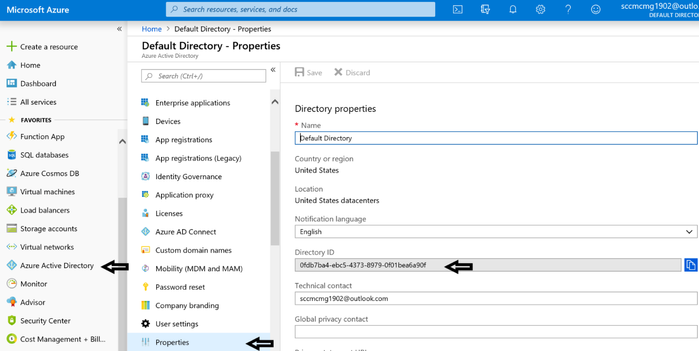
1.2 Get Tenant ID. Azure Active Directory -> Properties -> Directory ID (Tenant ID)
Azure AD Tenant ID: 0fdb7ba4-ebc5-4373-8979-0f01bea6a90f
2. Registering Server/Web App
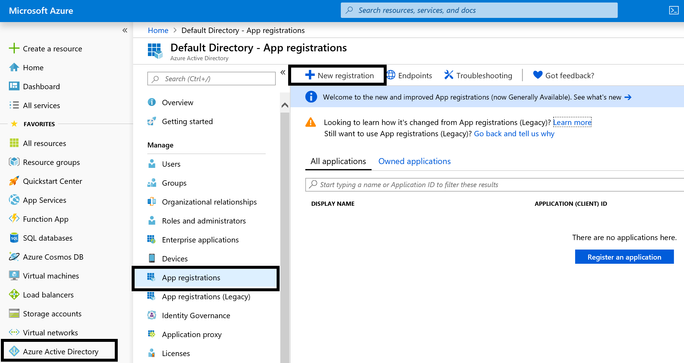
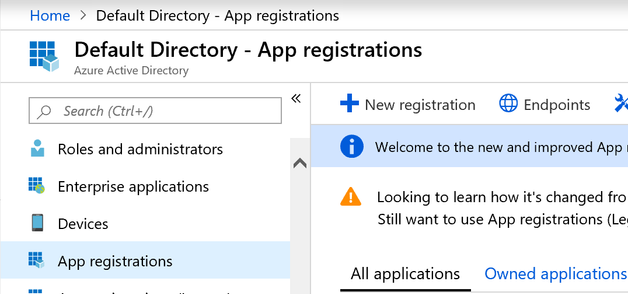
2.1 New Registration: Azure Active Directory -> App registrations -> Click on New registration to create a new App.
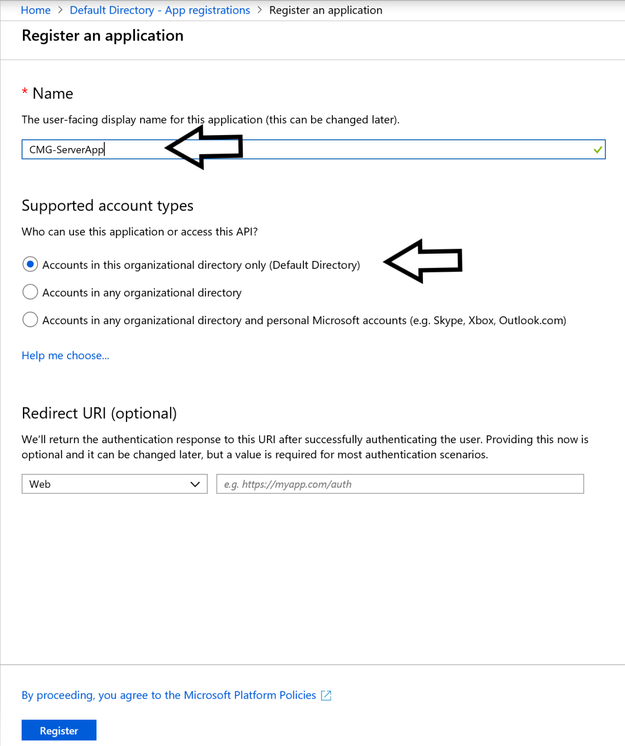
2.2 Fill in the App Name.
Name: There is no guideline to use a specific name. Using CMG-ServerApp.
Supported account types: Leave it to default "Accounts in this organizational directory only (Default Directory)".
Redirect URI: Leave it blank.
Click on Register to create the App.
2.3 Make a note of newly registered App Name and App ID as we would need this information when we import it later in SCCM.
App Name: CMG-ServerApp
Application (client) ID: 5df94352-894e-4ee6-9219-df787ba6e578

2.4 Authentication: Go to newly registered App properties. Under Authentication, we will leave all the settings to default except checking the ID tokens box at the bottom.
Tip: If you are new to Azure Portal, it is easy to get lost so always look at the path at the top as shown with an arrow to confirm where you are in the Portal.
2.5 Certificates and secrets: Click on New client secret. Any description can be used for the secret. Expiry has to be 1 or 2 years. "Never" is not supported with SCCM.
2.6 Once you click Add, immediately make a note of Secret String Value and expiry date. If you move away from this screen, you won't be able to retrieve the same Secret again and you may have to generate a new Secret. We will be using this Secret String when importing the App.
Expires (Secret Key Expiry): 6/29/2020
Value (Secret Key):

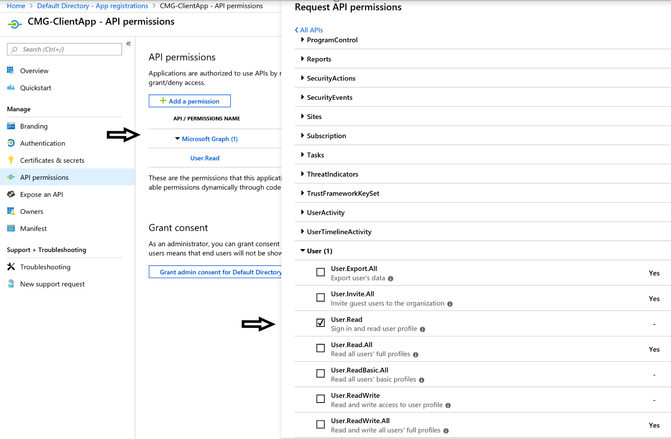
2.7 API Permissions: Modify Default Microsoft Graph API Permissions from User.Read to Directory.Read.All.
Click on Microsoft Graph (1) to enumerate list of API permissions. Select Application permissions and under Directory, select Directory.Read.All as shown and deselect User.Read under User.

2.8 To successfully apply the permissions, click on Grant admin consent for Default Directory. Example below of the modified permissions.
Note: If these permissions are not granted correctly, AAD User Discovery will not work in SCCM.
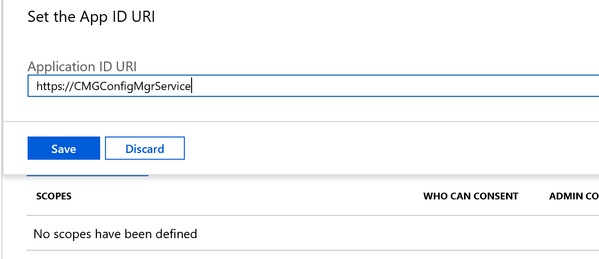
2.9 Expose an API: We will be setting Application ID URI and going to Add a scope here.
There is no specific guideline related to what name must be used here. App ID URI just needs to be unique within the tenant and we will be using this when importing the App. Make a note of App ID URI.
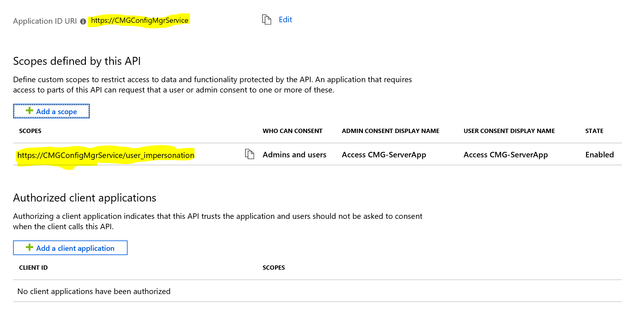
Scope name: user_impersonation
Who can consent?: Admins and users
Have some meaningful text under the remaining mandatory fields. Once done, click on Add scope to create the scope.
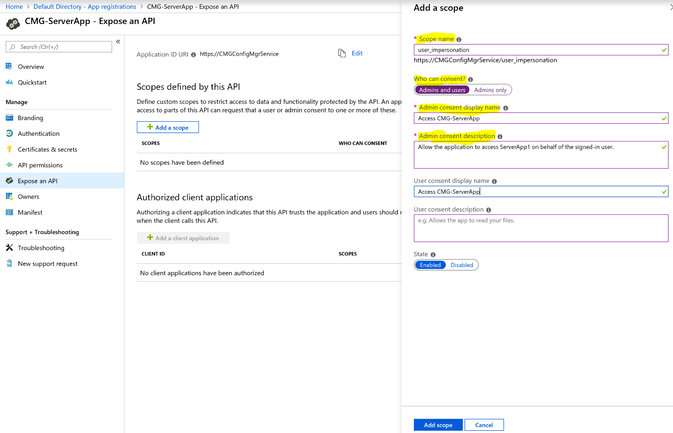
Once created, this is how Expose an API page would look like.
App ID URI in this case is https://CMGConfigMgrService.
This completes Server/Web App registrations steps.
3. Registering Client/Native App
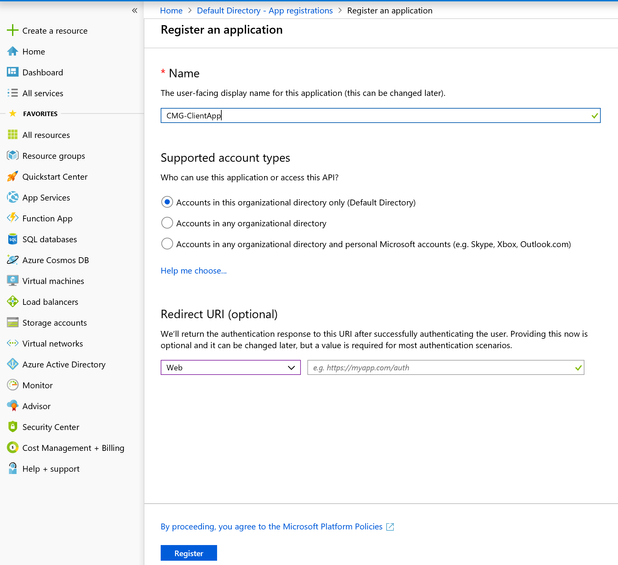
3.1 Just as we registered Server App, go to App registrations -> New registration to register a new Client/Native App.
3.2 Make a note of newly created Client App's Application ID from here as we need it in our next step.
Application ID (Client ID:( 1a9e80cb-bda2-46e7-8dfb-d72c9e5c61e4
Display name (Application Name:( CMG-ClientApp
3.3 Authentication: This is an important step. We are going to add a REDIRECT URI here using the following syntax.
ms-appx-web://Microsoft.AAD.BrokerPlugin/Client App's Application ID
ms-appx-web://Microsoft.AAD.BrokerPlugin/1a9e80cb-bda2-46e7-8dfb-d72c9e5c61e4 (This will be the REDIRECT URI. Copy the exact string with your Client Application ID)
Change the Type to Public client (mobile & desktops) and check ID tokens option under "Implicit grant". After making these changes, click Save.
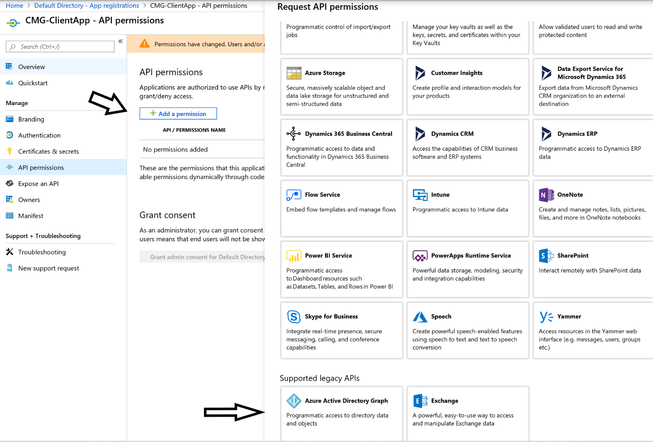
3.4 API permissions: Remove the default Microsoft Graph User.Read permission shown in the screen below. To remove, uncheck User.Read.
3.5 Click on Add a permission and select Azure Active Directory Graph from the list of Microsoft APIs.
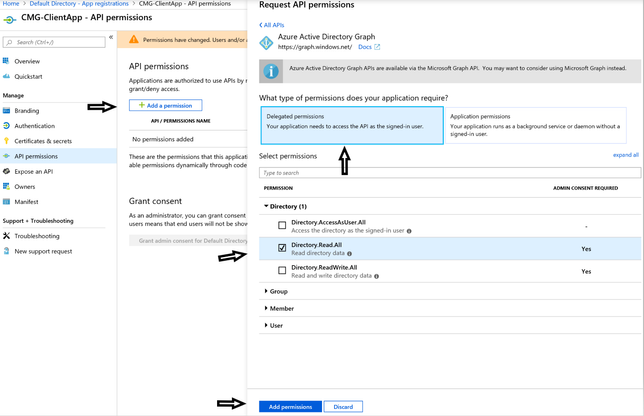
When prompted with:
What type of permissions does your application require?
Select Delegated Permissions.
Under the list of permissions, select Directory and then Directory.Read.All. When done, click on Add permissions.
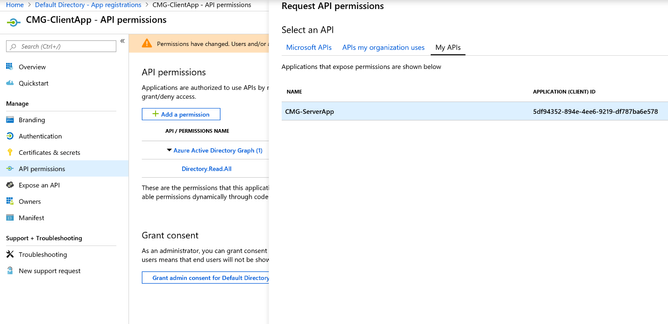
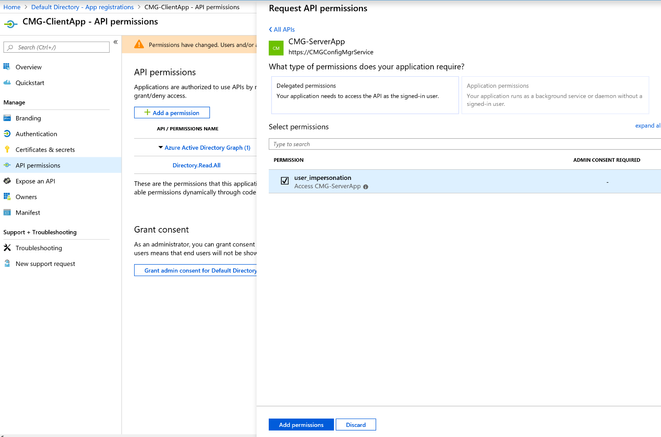
We need to add one more permission here. Adding access to Server/Web App we created earlier. Click on Add a permission again, select My APIs and select CMG-ServerApp we created earlier.
Make sure user_impersonation is selected and click Add permissions to save the permissions.
To complete the permission assignment, grant consent by clicking on Grant admin context for Default Directory.
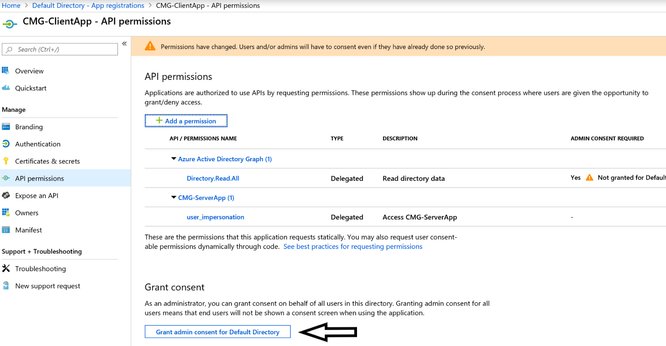
Note: This completes all the needed changes in Azure Portal. Role of Global Admin ends here.
4. Importing Server/Web and Client/Native Apps
4.1 Importing Server/Web App
Perform these steps at the top of the hierarchy, CAS or Primary (if there is no CAS) server using an SCCM Admin account.
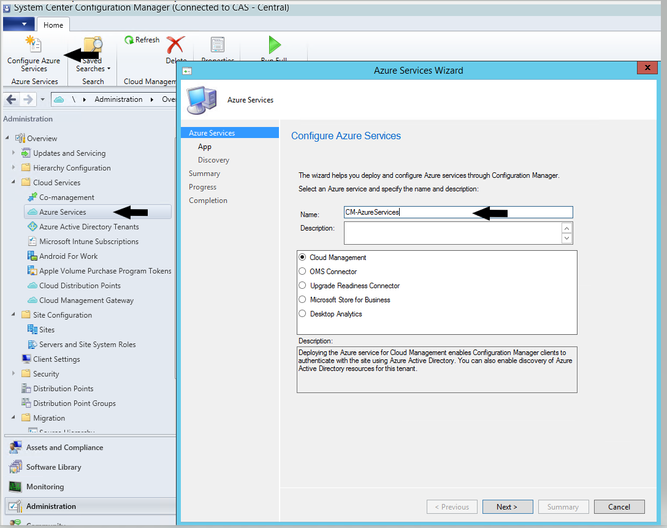
Open SCCM Console - > Administration -> Azure Services -> Configure Azure Services.
Name: No specific requirement. Use any meaningful name.
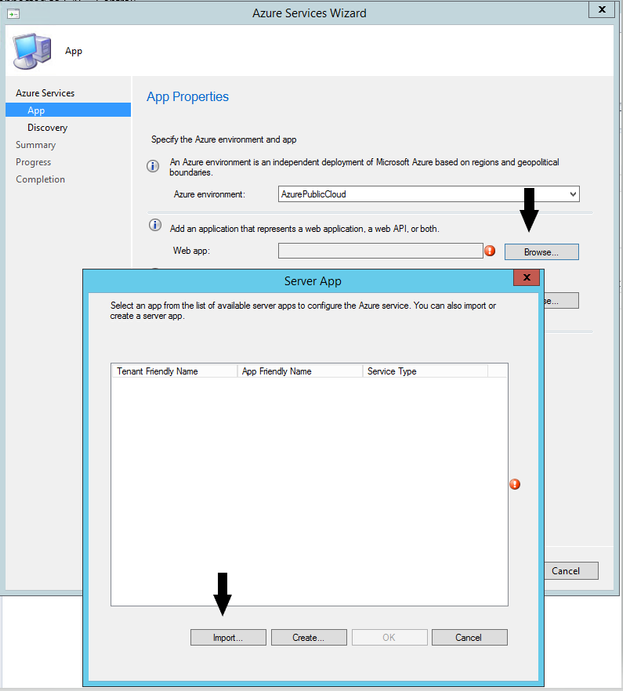
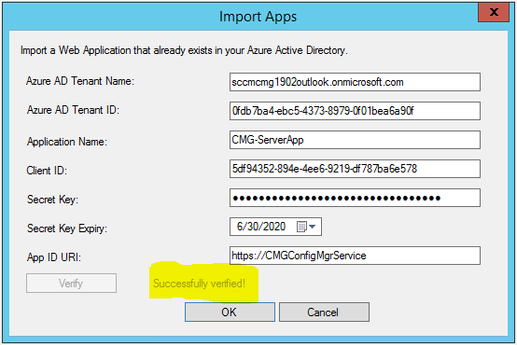
4.2 Click on Browse button next to Web app. Create option will be selected if you have Global Admin permissions to create the Apps automatically in Azure. We will be selecting import option as we are going to import the Apps created above.
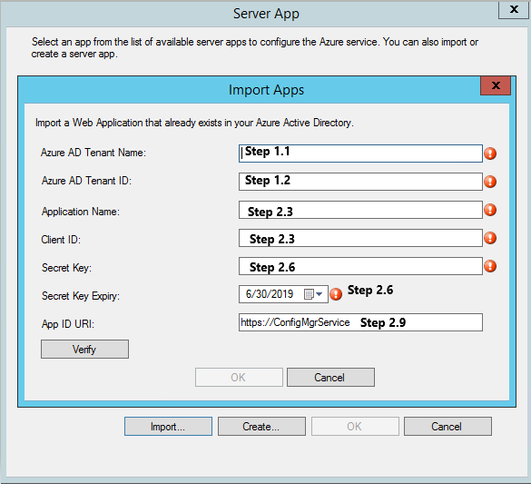
To import Server/Web App, use the values obtained from previous steps and enter into the corresponding boxes shown below.
If the values are accurate, you will get Successfully verified message when you click on Verify as you see below.
Click OK to proceed.
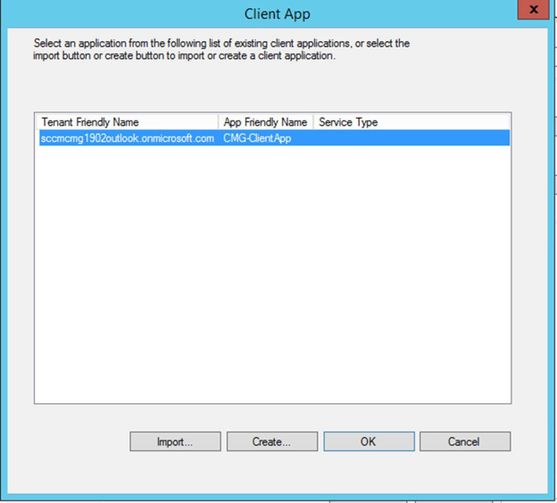
Select the imported Server App and Click OK to continue.
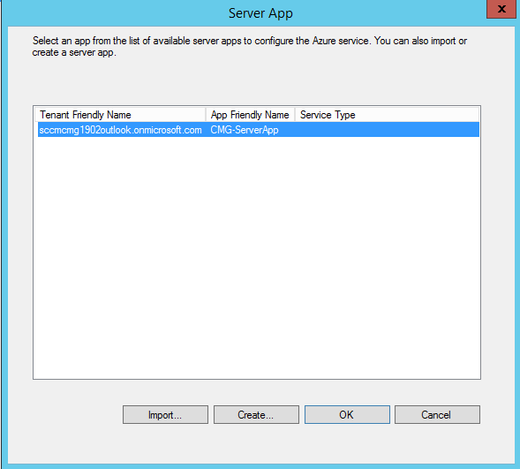
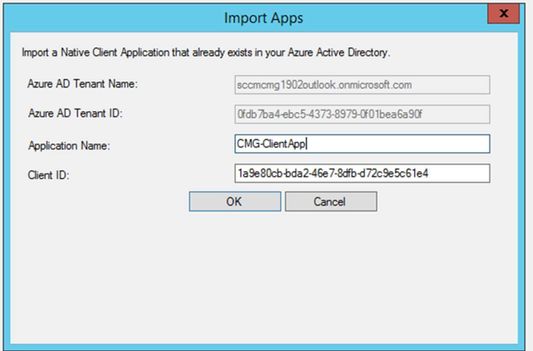
4.3 Importing Client/Native App
Values needed to import Client/Native App can be obtained from Step 3.2 above.
Click OK.
Select the imported App and Click OK.
On this screen, AAD User Discovery can be enabled. This is required if you want AAD User Token Authentication to work. Click Next to complete the wizard. If the clients are going to use PKI Certificates, this won't be required.
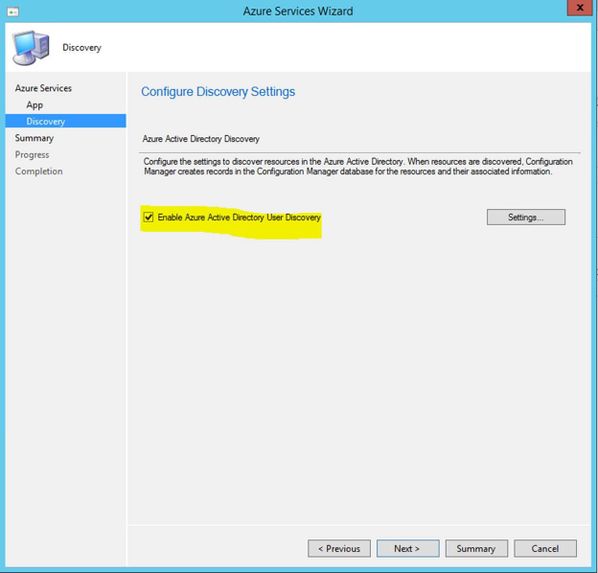
Click Next to complete the wizard. At this stage, AAD User Discovery should run and you can monitor SMS_AZURE_DISCOVERY_AGENT.LOG for details.
If you see the following error, you may have not granted permissions to Server/Web App correctly as show in Step 2.7.
ERROR: Error occurred. StatusCode = Forbidden, reason = Forbidden SMS_AZUREAD_DISCOVERY_AGENT
ERROR: Sync request failed. Exception: System.Net.WebException: Forbidden: Forbidden~~ at Microsoft.ConfigurationManager.AzureADDiscovery.AzureADQueryClient.GetAzureADQueryResult(String graphRequest)~~ at Microsoft.ConfigurationManager.AzureADDiscovery.AzureADSyncManager.Sync(Boolean runFullSync) ~~ Retrying after 30 seconds... SMS_AZUREAD_DISCOVERY_AGENT
5. Installing CMG
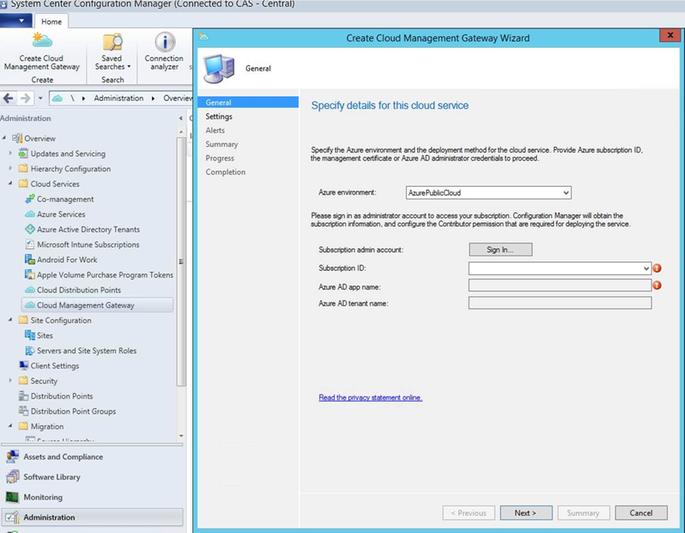
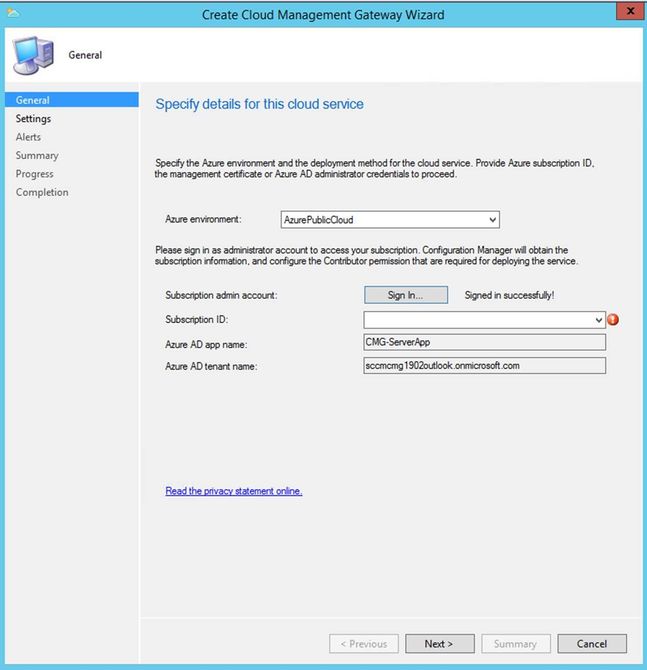
5.1 Run Create Cloud Management Gateway wizard
Administration-> Cloud Services -> Cloud Management Gateway -> Create Cloud Management Gateway
After signing in with AAD credentials, if you are not seeing Subscription ID as shown in screen below, it means the account used doesn't have proper access at Subscription level.
The user credentials used to sign in here must either be of a Co-Administrator or Subscription Owner to see the Subscription populated in the Wizard.
OR
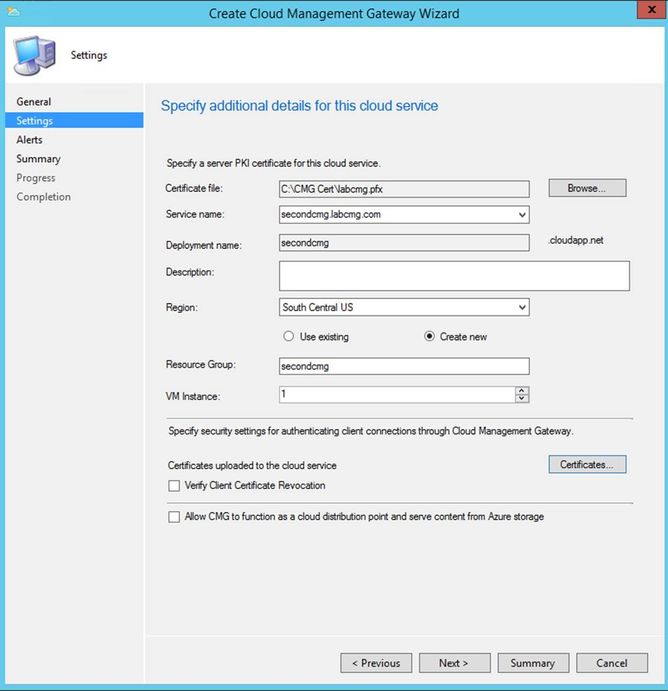
5.2 Complete the remaining steps to complete the creation of Cloud Management Gateway.
Certificate file: You need a .PFX (Cert with Private key exported). Look at this link for details https://docs.microsoft.com/en-us/sccm/core/clients/manage/cmg/certificates-for-cloud-management-gateway#bkmk_serverauthpublic
Note: Select the remaining options depending on your requirements. If public CA Cert is used for CMG and Clients are going to use AAD Token Auth, you don't need to specify and upload any additional root/intermediate certificates.
In case you use Internal CA Cert for CMG or for Client Authentication, you may have to upload respective Root and Intermediate certificates.
Configure Alerts in the next screen and complete the Wizard.
Common Installation errors:
You should monitor CMG status in the console and make sure it is in "Ready" state
If the status is in error Status, look at Program Files\Microsoft Configuration Manager\Logs\Cloudmgr.log for details.
ERROR: Exception occured for service secondcmg : Hyak.Common.CloudException: AuthorizationFailed: The client '27bbb19d-e564-4a7c-bd35-5c10db79ca6d' with object id '27bbb19d-e564-4a7c-bd35-5c10db79ca6d' does not have authorization to perform action 'Microsoft.ClassicCompute/domainNames/slots/read' over scope '/subscriptions/a43a12fa-d3f4-468e-bc84-b40357861640/resourcegroups/secondcmg/providers/Microsoft.ClassicCompute/domainNames/secondcmg/slots/Production'.~~ at Microsoft.Runtime.CompilerServices.TaskAwaiter.ThrowForNonSuccess(Task task)~~ at Microsoft.Runtime.CompilerServices.TaskAwaiter.HandleNonSuccess(Task task)~~ at Microsoft.Azure.Management.Resources.ResourceOperationsExtensions.CheckExistence(IResourceOperations operations, String resourceGroupName, ResourceIdentity identity)~~ at Microsoft.ConfigurationManager.AzureManagement.ResourceManager.CloudServiceDeploymentSlotExists(String resourceGroupName, String cloudServiceName, String deploymentSlot)~~ at Microsoft.ConfigurationManager.CloudServicesManager.CreateDeploymentTask.Start(Object taskState). SMS_CLOUD_SERVICES_MANAGER
To fix the above error, go to All Services -> Subscriptions -> Select the appropriate Subscription -> Resource Providers -> Microsoft.ClassCompute <- Register
Similarly, you may get an error for Microsoft.Storage provider if it is not registered. Go ahead and register Microsoft.Storage as we registered Microsoft.ClassicCompute above.
ERROR: Resource Manager - Deployment operation details: {"value":[{"id":"/subscriptions/a43a12fa-d3f4-468e-bc84-b40357861640/resourceGroups/secondcmg/providers/Microsoft.Resources/deployments/CreateStorageServicef776f7ca-13a0-4048-8c41-5249b20ae97b/operations/1793C29ACC9770E1","operationId":"1793C29ACC9770E1","properties":{"provisioningOperation":"Create","provisioningState":"Failed","timestamp":"2019-06-30T23:28:00.1224348Z","duration":"PT6.7336014S","trackingId":"901c9599-3491-407c-9921-40ef495864d5","statusCode":"Conflict","statusMessage":{"error":{"code":"MissingSubscriptionRegistration","message":"The subscription is not registered to use namespace 'Microsoft.Storage'. See https://aka.ms/rps-not-found for how to register subscriptions.","details":[{"code":"MissingSubscriptionRegistration","target":"Microsoft.Storage","message":"The subscription is not registered to use namespace 'Microsoft.Storage'. See https://aka.ms/rps-not-found for how to register subscriptions."}]}},"targetResource":{"id":"/subscriptions/a43a12fa-d3f4-468e-bc84-b40357861640/resourceGroups/secondcmg/providers/Microsoft.Storage/storageAccounts/secondcmg","resourceType":"Microsoft.Storage/storageAccounts","resourceName":"secondcmg"}}}]} SMS_CLOUD_SERVICES_MANAGER
Make sure Status changes to Ready before proceeding with additional changes in SCCM.
6. Additional Requirements to complete the setup
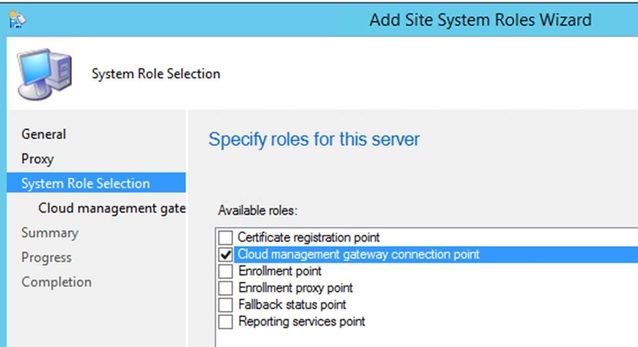
6.1 Install Cloud management gateway connection point role on a server of your choice. It can be on the Site System running Management Point role or another remote Site System without MP role installed. Wherever you install, make sure that Server is able to communicate with CMG. Refer to https://docs.microsoft.com/en-us/sccm/core/clients/manage/cmg/plan-cloud-management-gateway#required-ports for details.
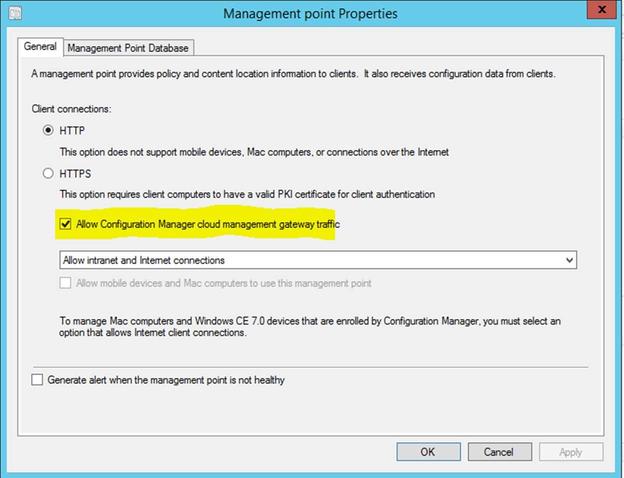
6.2 Enable MP to allow CMG traffic by checking "Allow Configuration Manager cloud management gateway traffic" under MP properties.
At this point, clients will get to know about CMG in the environment if they are communicating with a Management Point. If all the steps were followed properly, on the client side you will see successful retrieval of AAD User token. Clients will start communicating with CMG when the connection changes from “Intranet” to “Internet”.
Logs to monitor
LocationServices.log -> Check to see if the client is seeing CMG.
Internet Management Points from assigned MP: LocationServices 7/1/2019 10:50:58 PM 4168 (0x1048)
Name: 'SECONDCMG.LABCMG.COM/CCM_Proxy_MutualAuth/216172782113783842' HTTPS: 'Y' ForestTrust: 'N', Locality: '0', MPBGRFallbackType: 'None', MPFallbackTime: '0' LocationServices
Clientlocation.log: Connection Change must happen from Intranet to Internet for the client to start communicating with CMG.
Client is in Internet ClientLocation 7/2/2019 9:30:41 AM 4160 (0x1040)
Current internet management point is SECONDCMG.LABCMG.COM/CCM_Proxy_MutualAuth/216172782113783842 ClientLocation 7/2/2019 9:30:41 AM 4160 (0x1040)
ADALOperationProvider.log: Good to log to confirm if AAD User token acquisition worked. Not seeing an error after “Getting AAD (user) token) entry is an indication that it was successful.
Configuration Manager Applet
Note: Client certificate is Self-signed as we are using AAD User token instead of PKI Certificate for Authentication.
There is a certain requirement for AAD Device token Authentication to work, which I will discuss in my next blog.
Thank you,
Taj Mohammed












Wonderful – thanks so much