This post has been republished via RSS; it originally appeared at: Windows Dev AppConsult articles.
A while ago we have explored a feature added in Windows 10 1803 called App Installer, which allows to create powerful deployment experiences with AppX / MSIX packages.
Thanks to App Installer, you're able to deploy a package (with its optional dependencies) on a web site or an Intranet share and let your users to download from it, instead of using the Microsoft Store or a similar infrastructure. You have also the opportunity to enable automatic updates, exactly like the Store does: every time you deploy an updated version of the package in the same location, Windows will take care of automatically updating the application.
Updates checks can be configured in two ways:
- Every time the application starts. In this case, the update will be automatically downloaded and installed when the application is closed.
- At a specific frequency (for example, every 6 hours). In this case, the update will be automatically downloaded and installed if the application is not running; otherwise, it will be installed as soon as the application is closed.
Everything is controlled by a XML file, with .appinstaller extension, which is deployed on the server together with the AppX / MSIX package you want to distribute.
This is an example of an App Installer file:
<?xml version="1.0" encoding="utf-8"?>
<AppInstaller Uri="https://msix-appinstaller.azurewebsites.net/MyEmployees.Package.appinstaller" Version="1.0.0.0" xmlns="http://schemas.microsoft.com/appx/appinstaller/2017/2">
  <MainBundle Name="97437f1b-36c5-47b0-9f3d-9f5aaa5c5aab" Version="1.0.0.0" Publisher="CN=mpagani" Uri="https://msix-appinstaller.azurewebsites.net/MyEmployees.Package_1.0.0.0_Test/MyEmployees.Package_1.0.0.0_x86_x64.msixbundle" />
  <UpdateSettings>
    <OnLaunch HoursBetweenUpdateChecks="0" />
  </UpdateSettings>
</AppInstaller>
The two relevant nodes are:
- MainBundle, which specifies the Uri and the info about the MSIX package to deploy.
- UpdateSettings, which configures the auto update feature. The HoursBetweenUpdateChecks attribute can be set to 0, in case you want to check for updates every time the app is launched, or to a fixed value, in case you want to enable periodic checks.
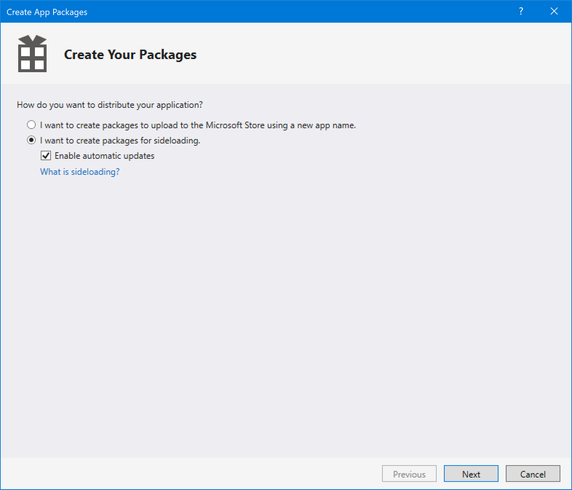
The App Installer file is simply a XML file, so it can be manually created with any text editor. However, the simplest way to generate it is through Visual Studio. When you trigger the process to create a MSIX / AppX package (right click on the UWP / Windows Application Packaging Project and choose Store -> Create App Packages), you can opt-in to enable automatic updates.

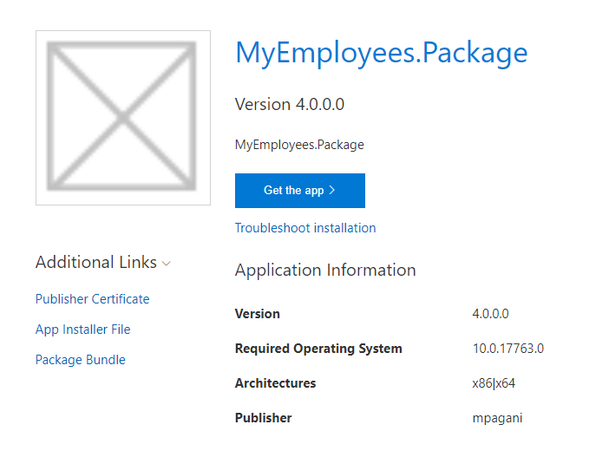
In this case Visual Studio will generate, other than the AppX / MSIX package, also the relevant App Installer file, ready to be deployed on your web server or local share. The output will include also a HTML page, which enables your users to start the installation process:

The Get the app button simply includes a link to the .appinstaller file using the appinstaller protocol, which is natively supported by Windows:
ms-appinstaller:?source=https://msix-appinstaller.azurewebsites.net/MyEmployees.Package.appinstaller
Thanks to this protocol the user won't have to download any files, but the installation experience will be automatically triggered:

In this post we're going to see 4 new App Installer features that were highly requested and that have been implemented in 1809 and the upcoming 19H1 update:
- Automatically notify the presence of an update
- Support critical updates
- Support downgrades
- Programmatically check for updates using a dedicated API
The first 3 ones can be implemented without any code change, while the 4th one is dedicated to developers. Let's start to see them in more details!
Moving to the new App Installer version
In order to leverage the new features described in this post, you will need to use the new App Installer definition. The versioning is defined through the xmlns attribute of the AppInstaller element. The current version looks like this:
<AppInstaller Uri="https://msix-appinstaller.azurewebsites.net/MyEmployees.Package.appinstaller" Version="1.0.0.0" xmlns="http://schemas.microsoft.com/appx/appinstaller/2017/2">
This is, instead, the definition of the new version:
<AppInstaller Uri="https://msix-appinstaller.azurewebsites.net/MyEmployees.Package.appinstaller" Version="1.0.0.0" xmlns="http://schemas.microsoft.com/appx/appinstaller/2018">
As you can see, the suffix of the schema is changed from 2017/2 to 2018. The other requirement, as per the title of this post, is to use Windows 10 19H1. The next version of Windows 10 is still in development and, as such, you can get it for the moment through the Windows Insider program.
New update experience
The current implementation of automatic updates has a limitation. If you deploy an update on the server and the user opens the application, he won't know that there's a new version until he restarts it. In some cases (think, for example, to a critical business app which is always kept open and rarely restarted), it may take a while before the conditions for the update to be applied are satisfied.
Windows 10 19H1 has introduced support for an update prompt. When the user starts the app and there's a new update available, he will see a prompt with a notification. The user will have the option to apply the update immediately or to continue opening the app and apply it once it's closed.
This is the user experience:

In order to enable this behavior, it's enough to add a new attribute in the App Installer file called ShowPrompt and set it to true:
<UpdateSettings>
  <OnLaunch HoursBetweenUpdateChecks="0" ShowPrompt="true" />
</UpdateSettings>
Critical updates
With the previous feature, you can show a prompt to notify the user that an update is pending. However, he's still able to open the app and postpone the update at a later time. What if the update contains a fix for a critical bug and users shouldn't be allowed to launch an outdated version of the app? Thanks to a new attribute, now you can also mark an update as critical and force the user to install it before opening the app.
This is the user experience:

As you can see from the message, the user doesn't have the option to launch the app anymore. The update will be applied anyway, regardless of his choice. The only difference is that, if he presses the Update button, the app will be started immediately after the update has been installed. If he presses Cancel, instead, the update will be applied but the app won't be launched.
In order to enable this behavior, you just have to add the UpdateBlocksActivation attribute and set it to true:
<UpdateSettings>
    <OnLaunch HoursBetweenUpdateChecks="0" ShowPrompt="true" UpdateBlocksActivation="true" />
</UpdateSettings>
In order to make it working, also the ShowPrompt attribute must be set to true.
Supporting downgrades
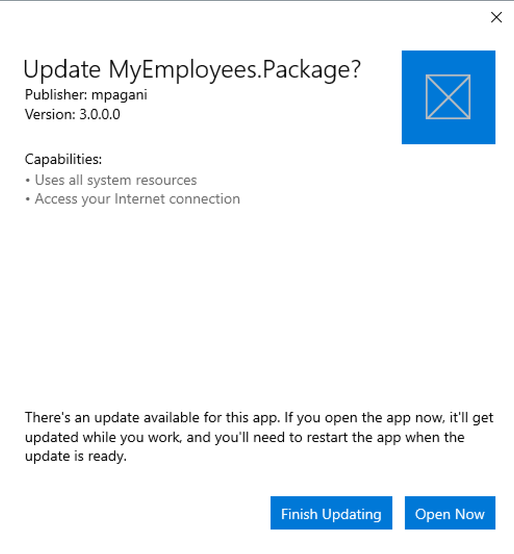
In some scenarios, you may need to ask to your users to downgrade their application to a previous version. For example, you may have discovered a critical bug in the new version which will require some time to be fixed but, at the same time, you can't block your users for a long time. Thanks to a new App Installer feature, you can enable applications to be downgraded while, normally, you would be able to install a package only if it has a higher version number than the one already installed on the machine. However, unlike for the previous features, downgrades can't be automatically delivered, but they must be manually installed. When the downgrade feature is enabled and the user presses the Get the app button from the web page, this is the experience he will see:

The user has the ability to press the Update button, but he's warned that the current version on his machine is newer.
To enable this feature you need to add a new element to the UpdateSettings node of the App Installer file:
<UpdateSettings>
  <OnLaunch HoursBetweenUpdateChecks="0"/>
  <ForceUpdateFromAnyVersion>true</ForceUpdateFromAnyVersion>
</UpdateSettings
The element is called ForceUpdateFromAnyVersion and must be set to true if you want to enable this feature.
Check for updates within the app
In some scenarios you may want more flexibility in handling the update story. For example, you could offer an option within the app to check for updates; or you can implement, within the app, a periodic check, so that you can immediately warn the user that there's a new version available, without waiting for him to close and restart the application. Before Windows 10 1809, the Universal Windows Platform included some APIs to check the availability of updates, but they were reserved only to applications published on the Microsoft Store. Now, instead, you can check for available updates also when the application is manually distributed using an App Installer file.
If your application is built on top of the Universal Windows Platform, you're good to go. Otherwise, if it's a Win32 application, you will have to integrate the UWP ecosystem in your project. You will need to add a reference to two files:
- Windows.md, which contains the metadata that describes all the APIs of the Universal Windows Platform.
- System.Runtime.WindowsRuntime, which is a library that contains the infrastructure required to properly support the IAsyncOperation type, which is used by the Universal Windows Platform to handle asynchronous operation with the well known async / await pattern. Without this library your options to interact with the Universal Windows Platform would be very limited, since all the APIs which take more than 50 ms to return a result are implemented with this pattern.
Let's see the required steps for a WPF or Windows Forms application:
-
Open your project in Visual Studio, right click on it and choose Add reference.
-
Look for the following folder on the system: C:\Program Files (x86)\Windows Kits\10\UnionMetadata\10.0.17763.0. If you don't have it, you must install first the Windows 10 SDK which ships with Visual Studio. Alternatively, you can download the specific installer from the official website.
-
Change the dropdown to filter the file types from Component files to All files. This way, the Windows.md file will become visible.

-
Click on it and press Add.
-
Now press again the Browse button. This time look for the following folder on the system: C:\Windows\Microsoft.NET\Framework\v4.0.30319
-
Look for a file called System.Runtime.WindowsRuntime.dll, select it and press Ok.
-
As last step, expand the References section of your project in Solution Explorer and look for the Windows reference.

-
Right click on it and choose Properties .
-
Change the value of the Copy Local property from True to False.
That's it. Now you can leverage APIs from the Universal Windows Platform in your Win32 application. The one we're looking for to check for updates is part of the Windows.ApplicationModel.Package class. Here is a sample usage:
private async Task CheckForUpdates()
{
    var result = await Package.Current.CheckUpdateAvailabilityAsync();
    if (result.Availability == PackageUpdateAvailability.Available)
    {
        MessageBox.Show("There's a new update! Restart your app to install it");
    }
}
As you can see, the API is pretty simple to use. You just call the CheckUpdateAvailabilityAsync(), which will return an enumerator of type PackageUpdateAvailability. The result can assume different values, based on the update status. In the sample, we just use the Available value to determine if there's indeed an update so that we can inform the user with a message. You could also check for the Required value, in case you want to apply a different logic if there's a critical update.
Wrapping up
In this short post we have seen some new features that have been added to App Installer in Windows 10 19H1, which addresses many feedbacks received from developers and IT Pros. Now, other than just enabling auto-updating, we can also notify the user that an update is pending; we can handle critical updates; we can support downgrade; we can provide a customized user experience. Thanks to these improvements, MSIX and App Installer are becoming more and more a great choice when it comes to distribute applications interanlly in your enterprise or to your customers!


