
This post has been republished via RSS; it originally appeared at: Containers articles.
First published on TECHNET on Apr 19, 2017A practical walkthrough, in six steps
This basic example demonstrates NGINX and swarm mode in action, to provide the foundation for you to apply these concepts to your own configurations.
This document walks through several steps for setting up a containerized NGINX server and using it to load balance traffic across a swarm cluster. For clarity, these steps are designed as an end-to-end tutorial for setting up a three node cluster and running two docker services on that cluster; by completing this exercise, you will become familiar with the general workflow required to use swarm mode and to load balance across Windows Container endpoints using an NGINX load balancer.
The basic setup
This exercise requires three container hosts--two of which will be joined to form a two-node swarm cluster , and one which will be used to host a containerized NGINX load balancer . In order to demonstrate the load balancer in action, two docker services will be deployed to the swarm cluster, and the NGINX server will be configured to load balance across the container instances that define those services. The services will both be web services, hosting simple content that can be viewed via web browser. With this setup, the load balancer will be easy to see in action, as traffic is routed between the two services each time the web browser view displaying their content is refreshed.
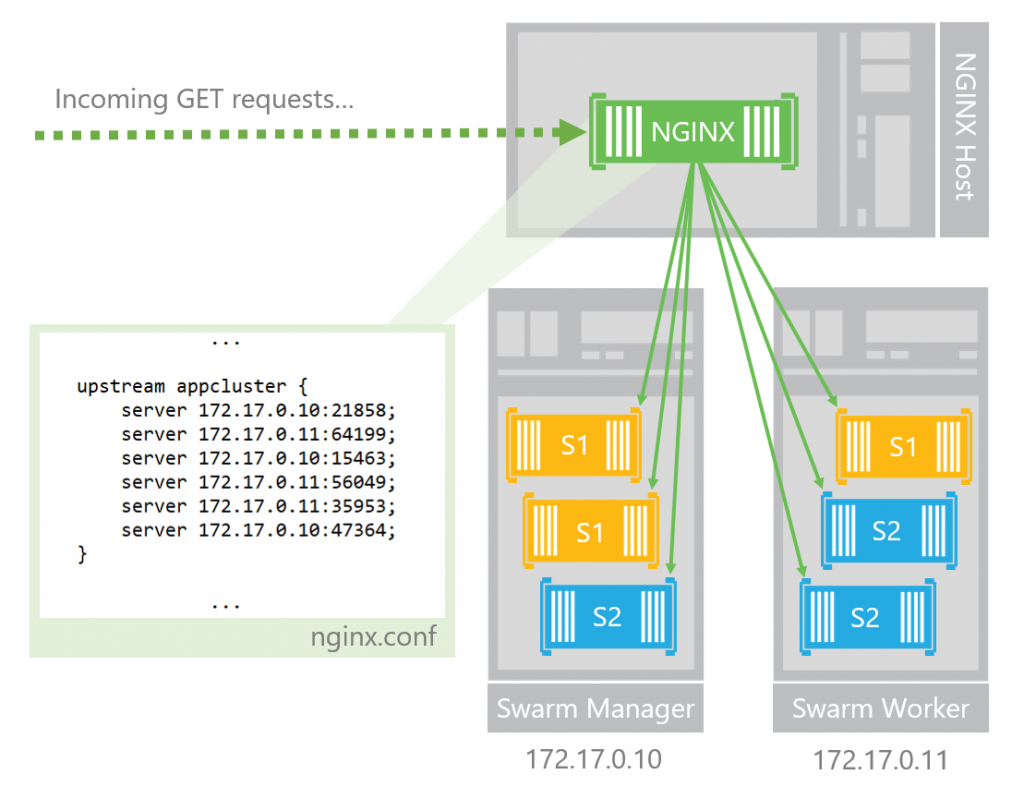
The figure below provides a visualization of this three-node setup . Two of the nodes, the "Swarm Manager" node and the "Swarm Worker" node together form a two-node swarm mode cluster, running two Docker web services, "S1" and "S2". A third node (the "NGINX Host" in the figure) is used to host a containerized NGINX load balancer, and the load balancer is configured to route traffic across the container endpoints for the two container services. This figure includes example IP addresses and port numbers for the two swarm hosts and for each of the six container endpoints running on the hosts.
System requirements
Three* or more computer systems running either Windows 10 Creators Update or Windows Server 2016 with all of the latest updates *, setup as a container host (see the topic, Windows Containers on Windows 10 or Windows Containers on Windows Server for more details on how to get started with Docker containers on Windows 10). +
Additionally, each host system should be configured with the following:
- The microsoft/windowsservercore container image
- Docker Engine v1.13.0 or later
-
Open ports: Swarm mode requires that the following ports be available on each host.
- TCP port 2377 for cluster management communications
- TCP and UDP port 7946 for communication among nodes
- TCP and UDP port 4789 for overlay network traffic
*Note on using two nodes rather than three:
These instructions can be completed using just two nodes. However, currently there is a known bug on Windows which prevents containers from accessing their hosts using localhost or even the host’s external IP address (for more background on this, see Caveats and Gotchas below). This means that in order to access docker services via their exposed ports on the swarm hosts, the NGINX load balancer must not reside on the same host as any of the service container instances.
Put another way, if you use only two nodes to complete this exercise, one of them will need to be dedicated to hosting the NGINX load balancer, leaving the other to be used as a swarm container host (i.e. you will have a single-host swarm cluster, a host dedicated to hosting your containerized NGINX load balancer).
Step 1: Build an NGINX container image
In this step, we'll build the container image required for your containerized NGINX load balancer. Later we will run this image on the host that you have designated as your NGINX container host.
Note: To avoid having to transfer your container image later, complete the instructions in this section on the container host that you intend to use for your NGINX load balancer.
NGINX is available for download from nginx.org . An NGINX container image can be built using a simple Dockerfile that installs NGINX onto a Windows base container image and configures the container to run as an NGINX executable. The content of such a Dockerfile is shown below.
FROM microsoft/windowsservercore
RUN powershell Invoke-webrequest http://nginx.org/download/nginx-1.12.0.zip -UseBasicParsing -outfile c:\\nginx.zip
RUN powershell Expand-Archive c:\\nginx.zip -Dest c:\\nginx
WORKDIR c:\\nginx\\nginx-1.12.0
ENTRYPOINT powershell .\\nginx.exe
Create a Dockerfile from the content provided above, and save it to some location (e.g. C:\temp\nginx) on your NGINX container host machine. From that location, build the image using the following command:
C:\temp\nginx> docker build -t nginx .
Now the image should appear with the rest of the docker images on your system (check using the
docker images
command).
(Optional) Confirm that your NGINX image is ready
First, run the container:
C:\temp> docker run -it -p 80:80 nginx
Next, open a new cmdlet window and use the
docker ps
command to see that the container is running. Note its ID. The ID of your container is the value of
<CONTAINERID>
in the next command.
Get the container’s IP address:
C:\temp> docker exec
<CONTAINERID>
ipconfig
For example, your container’s IP address may be 172.17.176.155, as in the example output shown below.

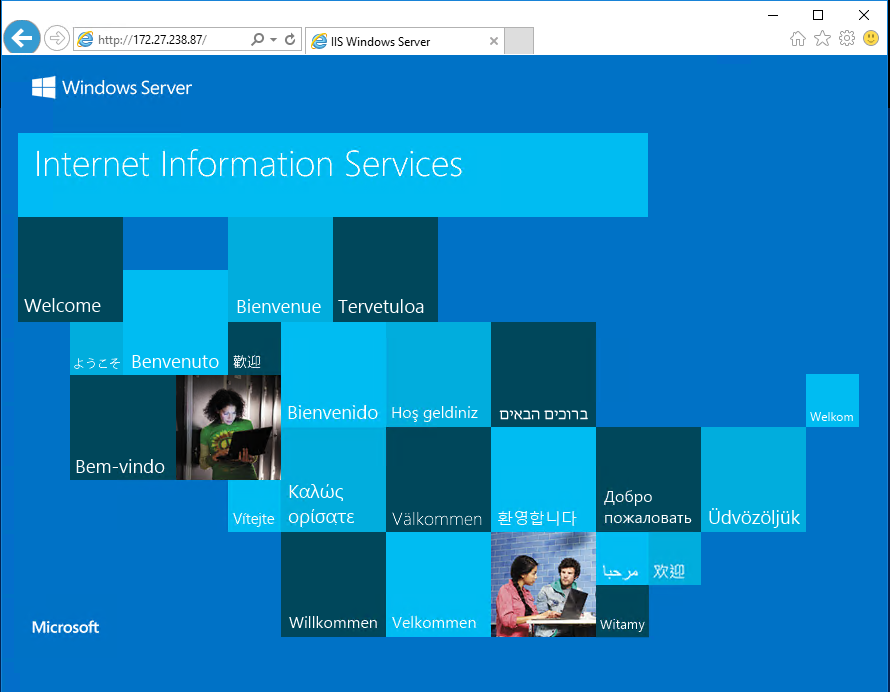
Next, open a browser on your container host and put your container’s IP address in the address bar. You should see a confirmation page, indicating that NGINX is successfully running in your container.

Step 2: Build images for two containerized IIS Web services
In this step, we'll build container images for two simple IIS-based web applications. Later, we'll use these images to create two docker services.
Note: Complete the instructions in this section on one of the container hosts that you intend to use as a swarm host.
Build a generic IIS Web Server image
Below are the contents of a simple Dockerfile that can be used to create an IIS Web server image. The Dockerfile simply enables the Internet Information Services (IIS) Web server role within a microsoft/windowsservercore container.
FROM microsoft/windowsservercore
RUN dism.exe /online /enable-feature /all /featurename:iis-webserver /NoRestart
Create a Dockerfile from the content provided above, and save it to some location (e.g. C:\temp\iis) on one of the host machines that you plan to use as a swarm node. From that location, build the image using the following command:
C:\temp\iis> docker build -t iis-web .
(Optional) Confirm that your IIS Web server image is ready
First, run the container:
C:\temp> docker run -it -p 80:80 iis-web
Next, use the
docker ps
command to see that the container is running. Note its ID. The ID of your container is the value of
<CONTAINERID>
in the next command.
Get the container's IP address:
C:\temp> docker exec
<CONTAINERID>
ipconfig
Now open a browser on your container host and put your container’s IP address in the address bar. You should see a confirmation page, indicating that the IIS Web server role is successfully running in your container.
Build two custom IIS Web server images
In this step, we’ll be replacing the IIS landing/confirmation page that we saw above with custom HTML pages--two different images, corresponding to two different web container images. In a later step, we’ll be using our NGINX container to load balance across instances of these two images. Because the images will be different, we will easily see the load balancing in action as it shifts between the content being served by the containers we’ll define in this step.
First, on your host machine create a simple file called, index_1.html. In the file type any text. For example, your index_1.html file might look like this:

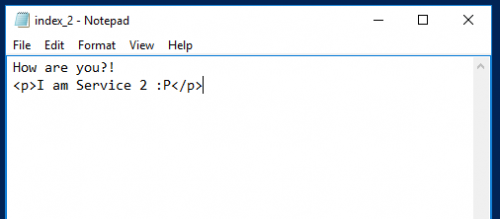
Now create a second file, index_2.html. Again, in the file type any text. For example, your index_2.html file might look like this:
Now we’ll use these HTML documents to make two custom web service images.
If the iis-web container instance that you just built is not still running, run a new one, then get the ID of the container using:
C:\temp> docker exec <CONTAINERID> ipconfig
Now, copy your index_1.html file from your host onto the IIS container instance that is running, using the following command:
C:\temp> docker cp index_1.html <CONTAINERID>:C:\inetpub\wwwroot\index.html
Next, stop and commit the container in its current state. This will create a container image for the first web service. Let’s call this first image, "web_1."
C:\> docker stop <CONTAINERID>
C:\> docker commit <CONTAINERID> web_1
Now, start the container again and repeat the previous steps to create a second web service image, this time using your index_2.html file. Do this using the following commands:
C:\> docker start <CONTAINERID>
C:\> docker cp index_2.html <CONTAINERID>:C:\inetpub\wwwroot\index.html
C:\> docker stop <CONTAINERID>
C:\> docker commit <CONTAINERID> web_2
You have now created images for two unique web services; if you view the Docker images on your host by running
docker images
, you should see that you have two new container images—“web_1” and “web_2”.
Put the IIS container images on all of your swarm hosts
To complete this exercise you will need the custom web container images that you just created to be on all of the host machines that you intend to use as swarm nodes. There are two ways for you to get the images onto additional machines:
Option 1: Repeat the steps above to build the "web_1" and "web_2" containers on your second host.
Option 2 [recommended]: Push the images to your repository on Docker Hub then pull them onto additional hosts.
Using Docker Hub is a convenient way to leverage the lightweight nature of containers across all of your machines, and to share your images with others. Visit the following Docker resources to get started with pushing/pulling images with Docker Hub:
Create a Docker Hub account and repository
Tag, push and pull your image
Step 3: Join your hosts to a swarm
As a result of the previous steps, one of your host machines should have the nginx container image, and the rest of your hosts should have the Web server images, "web_1" and "web_2". In this step, we'll join the latter hosts to a swarm cluster.
Note: The host running the containerized NGINX load balancer cannot run on the same host as any container endpoints for which it is performing load balancing; the host with your nginx container image must be reserved for load balancing only. For more background on this, see Caveats and Gotchas below .
First, run the following command from any machine that you intend to use as a swarm host. The machine that you use to execute this command will become a manager node for your swarm cluster.
-
Replace
<HOSTIPADDRESS>with the public IP address of your host machine
C:\temp> docker swarm init --advertise-addr=<HOSTIPADDRESS> --listen-addr <HOSTIPADDRESS>:2377
Now run the following command from each of the other host machines that you intend to use as swarm nodes, joining them to the swarm as a worker nodes.
-
Replace
<MANAGERIPADDRESS>with the public IP address of your host machine (i.e. the value of<HOSTIPADDRESS>that you used to initialize the swarm from the manager node) -
Replace
<WORKERJOINTOKEN>with the worker join-token provided as output by thedocker swarm initcommand (you can also obtain the join-token by runningdocker swarm join-token workerfrom the manager host)
C:\temp> docker swarm join --token <WORKERJOINTOKEN> <MANAGERIPADDRESS>:2377
Your nodes are now configured to form a swarm cluster! You can see the status of the nodes by running the following command from your manage node:
C:\temp> docker node ls
Step 4: Deploy services to your swarm
Note: Before moving on,
stop
and
remove
any NGINX or IIS containers running on your hosts. This will help avoid port conflicts when you define services. To do this, simply run the following commands for each container, replacing
<CONTAINERID>
with the ID of the container you are stopping/removing:
C:\temp> docker stop <CONTAINERID>
C:\temp> docker rm <CONTAINERID>
Next, we’re going to use the "web_1" and "web_2" container images that we created in previous steps of this exercise to deploy two container services to our swarm cluster.
To create the services, run the following commands from your swarm manager node:
C:\ > docker service create --name=s1 --publish mode=host,target=80 --endpoint-mode dnsrr web_1 powershell -command {echo sleep; sleep 360000;}
C:\ > docker service create --name=s2 --publish mode=host,target=80 --endpoint-mode dnsrr web_2 powershell -command {echo sleep; sleep 360000;}
You should now have two services running, s1 and s2. You can view their status by running the following command from your swarm manager node:
C:\ > docker service ls
Additionally, you can view information on the container instances that define a specific service with the following commands (where
<SERVICENAME>
is replaced with the name of the service you are inspecting (for example,
s1
or
s2
):
# List all services
C:\ > docker service ls
# List info for a specific service
C:\ > docker service ps <SERVICENAME>
(Optional) Scale your services
The commands in the previous step will deploy one container instance/replica for each service,
s1
and
s2
. To scale the services to be backed by multiple replicas, run the following command:
C:\ > docker service scale <SERVICENAME>=<REPLICAS>
# e.g. docker service scale s1=3
Step 5: Configure your NGINX load balancer
Now that services are running on your swarm, you can configure the NGINX load balancer to distribute traffic across the container instances for those services.
Of course, generally load balancers are used to balance traffic across instances of a single service, not multiple services. For the purpose of clarity, this example uses two services so that the function of the load balancer can be easily seen; because the two services are serving different HTML content, we’ll clearly see how the load balancer is distributing requests between them.
The nginx.conf file
First, the nginx.conf file for your load balancer must be configured with the IP addresses and service ports of your swarm nodes and services. The download for NGINX that was downloaded in step 1 as a part of building your NGINX container image includes an example nginx.conf file. For the purpose of this exercise, a version of that file was copied and adapted to create a simple template for you to adapt with your specific node/container information. Get the template file here and save it onto your NGINX container host machine. In this step, we'll adapt the template file and use it to replace the default nginx.conf file that was originally downloaded onto your NGINX container image.
You will need to adjust the file by adding the information for your hosts and container instances. The template nginx.conf file provided contains the following section:
upstream appcluster {
server <HOSTIP>:<HOSTPORT>;
server <HOSTIP>:<HOSTPORT>;
server <HOSTIP>:<HOSTPORT>;
server <HOSTIP>:<HOSTPORT>;
server <HOSTIP>:<HOSTPORT>;
server <HOSTIP>:<HOSTPORT>;
}
To adapt the file for your configuration, you will need to adjust the
<HOSTIP>:<HOSTPORT>
entries in the config file. You will have an entry for each container endpoint that defines your web services. For any given container endpoint, the value of
<HOSTIP>
will be the IP address of the container host upon which that container is running. The value of
<HOSTPORT>
will be the port on the container host upon which the container endpoint has been published.
When the services, s1 and s2, were defined in the previous step of this exercise, the
--publish mode=host,target=80
parameter was included. This paramater specified that the container instances for the services should be exposed via published ports on the container hosts. More specifically, by including
--publish mode=host,target=80
in the service definitions, each service was configured to be exposed on port 80 of each of its container endpoints, as well as a set of automatically defined ports on the swarm hosts (i.e. one port for each container running on a given host).
First, identify the host IPs and published ports for your container endpoints
Before you can adjust your nginx.conf file, you must obtain the required information for the container endpoints that define your services. To do this, run the following commands (again, run these from your swarm manager node):
C:\ > docker service ps s1
C:\ > docker service ps s2
The above commands will return details on every container instance running for each of your services, across all of your swarm hosts.
-
One column of the output, the “ports” column, includes port information for each host of the form
*:<HOSTPORT>->80/tcp. The values of<HOSTPORT>will be different for each container instance, as each container is published on its own host port. - Another column, the “node” column, will tell you which machine the container is running on. This is how you will identify the host IP information for each endpoint.
You now have the port information and node for each container endpoint. Next, use that information to populate the upstream field of your nginx.conf file; for each endpoint, add a server to the upstream field of the file, replacing the field with the IP address of each node (if you don’t have this, run ipconfig on each host machine to obtain it), and the field with the corresponding host port.
For example, if you have two swarm hosts (IP addresses 172.17.0.10 and 172.17.0.11), each running three containers your list of servers will end up looking something like this:
upstream appcluster {
server 172.17.0.10:21858;
server 172.17.0.11:64199;
server 172.17.0.10:15463;
server 172.17.0.11:56049;
server 172.17.0.11:35953;
server 172.17.0.10:47364;
}
Once you have changed your nginx.conf file, save it. Next, we'll copy it from your host to the NGINX container image itself.
Replace the default nginx.conf file with your adjusted file
If your nginx container is not already running on its host, run it now:
C:\temp> docker run -it -p 80:80 nginx
Get the ID of the container using:
C:\temp> docker exec <CONTAINERID> ipconfig
With the container running, use the following command to replace the default nginx.conf file with the file that you just configured (run the following command from the directory in which you saved your adjusted version of the nginx.conf on the host machine):
C:\temp> docker cp nginx.conf <CONTAINERID>:C:\nginx\nginx-1.10.3\conf
Now use the following command to reload the NGINX server running within your container:
C:\temp> docker exec <CONTAINERID> nginx.exe -s reload
Step 6: See your load balancer in action
Your load balancer should now be fully configured to distribute traffic across the various instances of your swarm services. To see it in action, open a browser and
-
If accessing from the NGINX host machine: Type the IP address of the nginx container running on the machine into the browser address bar. (This is the value of
<CONTAINERID>above). - If accessing from another host machine (with network access to the NGINX host machine): Type the IP address of the NGINX host machine into the browser address bar.
Once you’ve typed the applicable address into the browser address bar, press enter and wait for the web page to load. Once it loads, you should see one of the HTML pages that you created in step 2.
Now press refresh on the page. You may need to refresh more than once, but after just a few times you should see the other HTML page that you created in step 2.
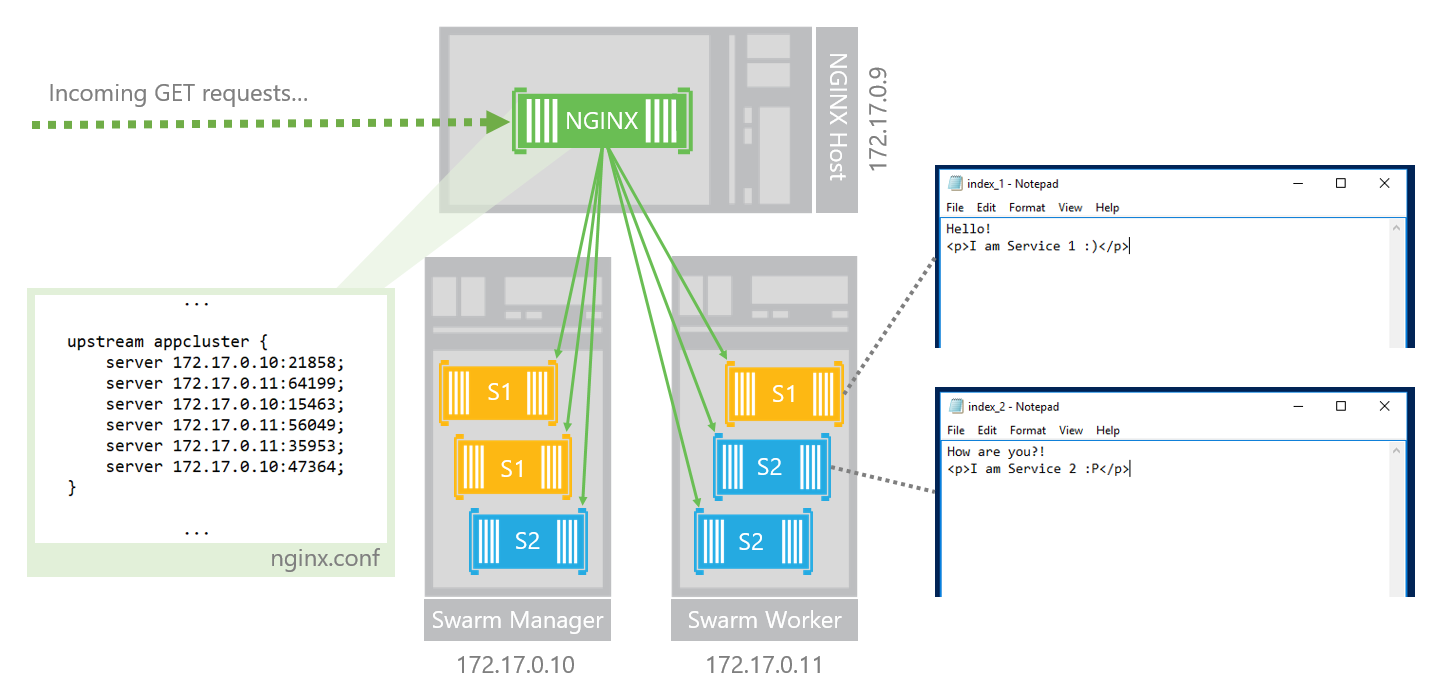
If you continue refreshing, you will see the two different HTML pages that you used to define the services, web_1 and web_2, being accessed in a round-robin pattern (round-robin is the default load balancing strategy for NGINX, but there are others ). The animated image below demonstrated the behavior that you should see.

As a reminder, below is the full configuration with all three nodes. When you're refreshing your web page view, you're repeatedly accessing the NGINX node, which is distributing your GET request to the container endpoints running on the swarm nodes. Each time you resend the request, the load balancer has the opportunity to route you to a different endpoint, resulting in your being served a different web page, depending on whether or not your request was routed to an S1 or S2 endpoint.
Caveats and gotchas
Is there a way to publish a single port for my service, so that I can load balance across just a few endpoints rather than all of my container instances?
Unfortunately, we do not yet support publishing a single port for a service on Windows. This feature is swarm mode’s routing mesh feature—a feature that allows you to publish ports for a service, so that that service is accessible to external resources via that port on every swarm node.
Routing mesh for swarm mode on Windows is not yet supported, but will be coming soon.
Why can’t I run my containerized load balancer on one of my swarm nodes?
Currently, there is a known bug on Windows, which prevents containers from accessing their hosts using localhost or even the host’s external IP address. This means containers cannot access their host’s exposed ports—the can only access exposed ports on other hosts.
In the context of this exercise, this means that the NGINX load balancer must be running on its own host, and never on the same host as any services that it needs to via exposed ports. Put another way, for the containerized NGINX load balancer to balance across the two web services defined in this exercise, s1 and s2, it cannot be running on a swarm node—if it were running on a swarm node, it would be unable to access any containers on that node via host exposed ports.
Of course, an additional caveat here is that containers do not need to be accessed via host exposed ports. It is also possible to access containers directly, using the container IP and published port. If this instead were done for this exercise, the NGINX load balancer would need to be configured to access:
- containers that share its host by their container IP and port
- containers that do not share its host by their host’s IP and exposed port
There is no problem with configuring the load balancer in this way, other than the added complexity that it introduces compared to simply putting the load balancer on its own machine, so that containers can be uniformly accessed via their hosts.