
First published on MSDN on Oct 25, 2018
Azure DevOps is a complete solution for software development, from planning to building to deployment. It has easy to use interface, with a nice flow from source code to publishing.
Here
is a nice link that talks about different services within Azure DevOps
Here are quick steps for on demand publishing websites from DevOps to AppService.
In this tutorial, we are going to show how to create a project in DevOps, upload source code to DevOps, build this source code and finally publish it to Azure AppService
1. DevOps Portal
Log into DevOps Portal at
https://dev.azure.com
Create a new project, by clicking on the
New Project
button as shown below
In the next screen, give a project name and click on the
Create
button
Once the project is create, you can clone the repo in Visual Studio as shown below
If you like to push your existing code to this repo, select 2nd option


2. Visual Studio
When you click on
Clone in Visual Studio
, VS will prompt you to select a local path as shown below
In the Visual Studio, select
Team Explorer
tab and click on
Create a new project
as shown below
In the new project dialog, select
Web | ASP.NET Web Application
and give a project name as shown below
In next window, select
MVC
and click
OK
button as shown below
Once the project is created, in the
Solution Explorer
open
View | Shared | _Layout.cshtml
page
Change the application name as shown below
Now, lets check-in this code
In the
Team Explore
, click on the
Changes
button as shown below
Enter a comment and commit the changes as shown below
Browse to the Azure DevOps portal, go to
Code
tab, you should see the new project files as shown below


3. Setup a Build pipeline in Azure DevOps
Now we have uploaded our source code to
Azure DevOps Repo
, lets build our source code
In the
Code
, click on the
Set up build
button
Select ASP.NET template from the list as shown below
Change the name and click on
Save & Queue
as shown below
In the next window, click
Save & Queue
Once the build is queued, you can click on the build name to get more details as shown below
Once the build is successfull, it is time to Publish


4. Publish to Azure AppService
To create a
Release Pipeline
, click on the
Release
button as shown below
In the template window, select
Empty Job
as shown below
Next goto
Tasks
tab and search for
Azure AppService
Select
Azure App Service Deploy
as shown below
Click on the
Azure App Service Deploy
, select Version
4.*(preview)
Select Azure Subscription and click on the
Authorize
button
Now, select
Web App on Windows
Next, select a AppService Website as shown below
Once the publish settings are done, click on
Save
as shown below


4. Setup a Release
Once the publish pipeline is done, you can click on the
Create a Release
button as shown below
In the next dialogbox, select
Stage 1
and click on
Create button
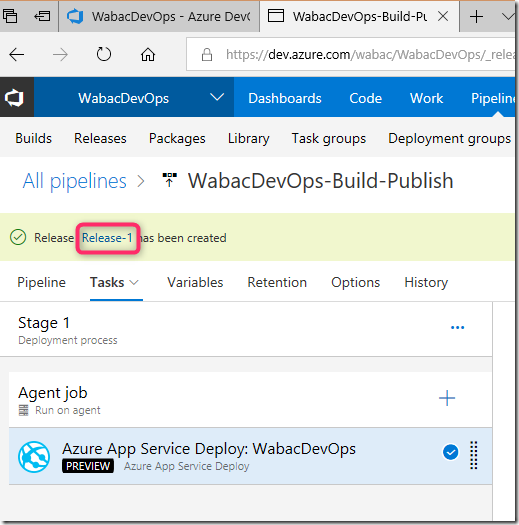
Now deploy this Release to Azure
Click on the
Release-1
as shown below
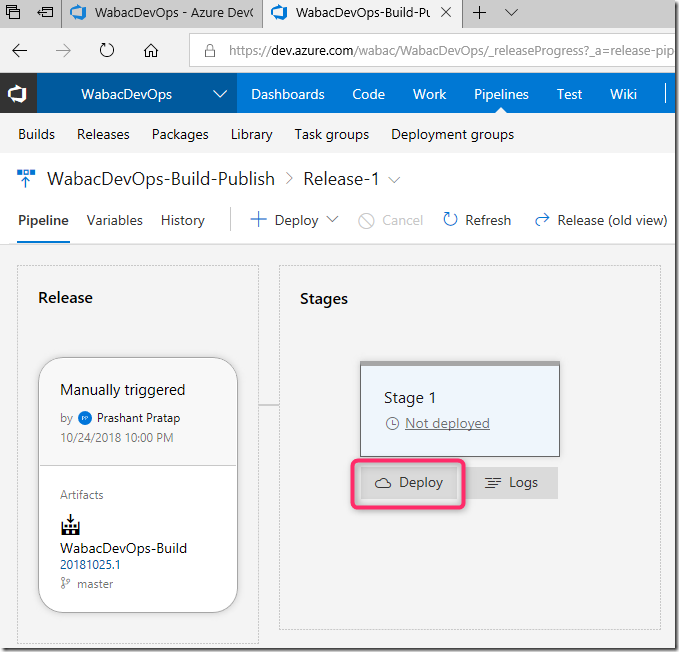
Next, click on the
Deploy
button as shown below
In the next dialogbox, click on
Deploy
button as shown below
This should start the deployment. You can click on the
In progress
link to get details as shown below
Here is the screenshot when the deployment is completed


5. Website
Now browse to your Azure AppService website, you should see the
Wabac
as shown below
