
First published on MSDN on May 21, 2018
This blogs talks about how to create a simple Durable Function App.
There are three components to Durable Function App.
Main / Starter Function
Workflow / Orchestrator Function
Activity Function
Durable Function App needs all three functions.
Main / Starter
function is responsible for starting a workflow instance.
Workflow / Orchestrator
function has workflow logic, calls activities and waits for external events.
Activity
function, actual work is implemented here.
In this sample Durable Function App, we are going to create a workflow with three activities and one external event. We are going to start workflow via PostMan. We are also going to use PostMan to get workflow instance status and to fire external events.
Here are high level steps:
Create Function App
Create Main / Starter Function
Create Workflow Function
Create Activity Function
Start Workflow
Workflow with external events
1. Create Function App
1. Log into Azure Portal:
https://portal.azure.com
3. Click on the
Add
button as shown below

4. In the search box, type
Function App
and click on the
Function App
resource as shown below

5. Click on
Create
button
6. In Function App blade, set name to
devbootcampdurable
as shown below

7. Click on the
Create
button
8. Once the resource is created, navigate to this newly created Function App resource
2. Add new Durable Function
1. Open a new tab in the browser and navigate to Azure portal
https://portal.azure.com
2. Go to
devbootcamp
Resource Group
3. Click on the
devbootcampdurable{your alias}
Function App
4. Hit
>>
button next to Functions
5. Select
Function App Settings
as shown below

6. Set the Function Runtime to
beta
as shown below

7. Now click on the + button next to Functions
8. Select “
Custom function
” as shown below

9. Change the Scenario to
Durable Functions
10. Click on the “
Durable Functions HTTP starter
” C# Function as shown below

11. Next, you should see prompt to install
Durable Extensions
as shown below

12. This should take about 2 min to complete. If you don’t see this dialog box, try again: go back to step #7
13. Once the extension is installed, you should see this below success dialog box

14. Next, portal will prompt to create a new Function.
15. Set the name to
Main
as shown below

16. Review the
Main
function code.
17. See the
functionName
variable and
instanceId
variable

3. Add Workflow Function
1. Click on the
+
button next to Functions
2. Set the scenario to
Durable Functions
3. Select
Durable Orchestrator Function
as shown below

4. Set the name of the function to
WorkflowOne
as shown below
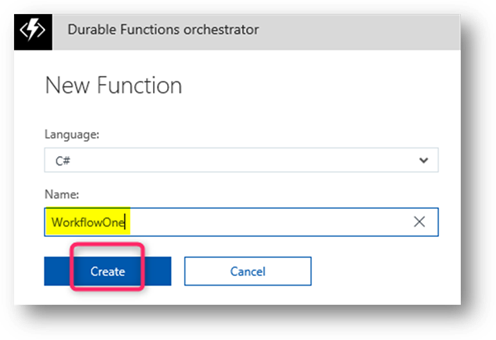
5. Click on the
Create
button
6. Once the WorkflowOne is created, review the code.
7. There are three activity calls to
Hello
Function show below

8. Change the Function name from
Hello
to
ActivityOne
,
ActivityTwo
,
ActivityThree
as shown below

4. Add Activity One Function
1. Click on the
+
button next to Functions
2. Set the scenario to
Durable Functions
3. Select
Durable Functions activity
as shown below

4. Set the name of the function to
ActivityOne
as shown below
5. Click on the
Create
button

6. Review the function code

7. Update the code as shown below:

8. Add two more activity functions, just go back to step # 1

5. Start Workflow
1. Click on the
Main
function
2. Click on the
Get Function URL
link as shown below

3. Next click on the copy

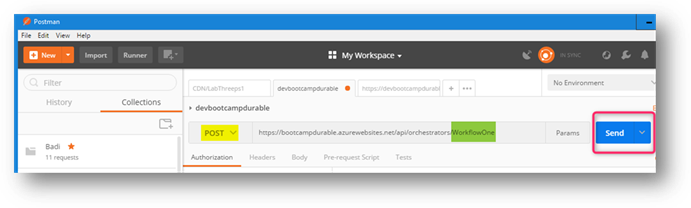
4. Open PostMan (install it from http://getpostman.com)
5. Copy this URL into PostMan
6. Rename
{funcitonName}
with
WorkflowOne
as shown below.
7. Set the HTTP to
POST
and click on Send
8. Review response. Look for
statusQueryGetUri
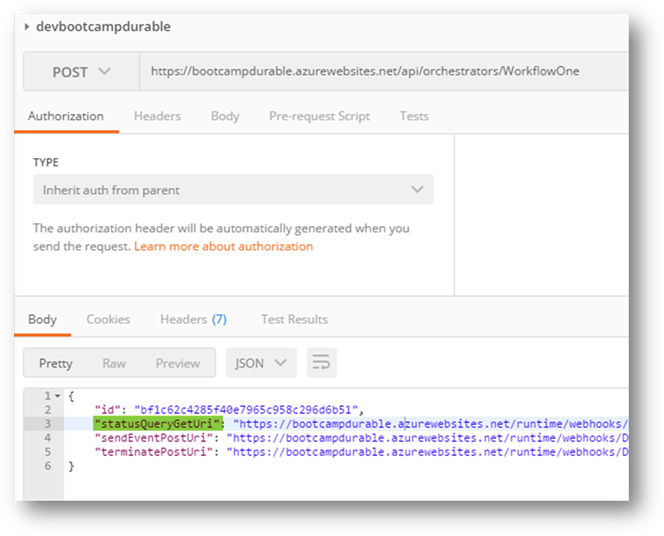
9. Now click on the
statusQueryGetUri
URL in the PostMan
10. Add these to end of the URL and click on the SEND as shown below
&showHistory=true&showHistoryOutput=true

11. Review response. Look for output for the workflow and individual activities

6. Wait for External Event
1. Go back to
WorkflowOne
function
2. Add these lines before return statement as shown
string strApprovalEvent = await context.WaitForExternalEvent<string>(“ApprovalEvent”);
if(strApprovalEvent == “true”)
{
outputs.Add(“Approved”);
}
else
{
outputs.Add(“Rejected”);
}

3. Start a new instance of Workflow, by click on the PostMan URL. Follow the
step #1
in the previous section
4. Now try to get the status of the Workflow, Follow the
step # 9
in the previous section
5. Review the results. Workflow is still running and all three activities are done.
6. Workflow is now waiting for external event as shown below

7. Now, click on the
sendEventPostUri
URL from the PostMan results for starting workflow
8. Remane the
{eventName}
with
ApprovalEvent
as shown below

9. Change the HTTP method to
POST
10. Select the
Body
, select
raw
and content type to
JSON
11.
In the body field type
“true”
12. Hit Send button as shown below:

13. Now check the status again. Follow the
step # 9
in the previous section
14. Review the output. Do you see
Approved
message ?
