This post has been republished via RSS; it originally appeared at: New blog articles in Microsoft Tech Community.
This blog is intent to describe how Azure Sentinel can be used as Side-by-Side approach with Splunk.
As most of the enterprises consume more and more cloud services, there is a huge requirement for Cloud-Native SIEM where Azure Sentinel comes in play and has following advantages.
- Easy collection from cloud sources
- Effortless infinite scale
- Integrated automation capabilities
- Continually maintained cloud and onprem use cases enhanced with Microsoft TI and ML
- Github community
- Microsoft research and ML capabilities
- Avoid sending cloud telemetry downstream
There are several best practice integration options available how to operate Azure Sentinel in Side-by-Side.
|
|
Alerts |
Events |
|
Upstream to sentinel |
CEF Logstash Logic Apps API |
CEF Logstash API |
|
Downstream from Sentinel |
Security Graph Security API PowerShell Logic Apps API |
API PowerShell |
This blog post has the focus to ingest Azure Sentinel alerts into Splunk by using the Microsoft Graph Security API.
The Microsoft Graph Security API provides a unified interface and schema to integrate with security solutions from Microsoft and ecosystem partners. This empowers customers to streamline security operations and better defend against increasing cyber threats. The Microsoft Graph Security API federates queries to all onboarded security providers and aggregates responses.

Preparation & Use
The following tasks describe the necessary preparation steps.
- Onboard Azure Sentinel
- Optional: Installation of Splunk
- Preparation Steps in Splunk
- Registration of an application in Azure AD
- Configuration Steps in Splunk
- Using of Azure Sentinel alerts in Splunk
Onboard Azure Sentinel
Detailed steps how to onboard Azure Sentinel is not part of this blog, however let me share a high-level checklist - how to fast-start Azure Sentinel.
Installation of Splunk
Usually in an enterprise where customer already decided for Splunk has a running environment. The primary reason to add this part was more to use the installation steps to build a lab environment or for evaluation propose.
In my environment I decided to use an Ubuntu server and build it in Azure.
Install the latest updates on the server
sudo apt-get update && sudo apt-get -y upgrade && sudo apt-get -y dist-upgrade && sudo apt autoclean && sudo apt-get clean && sudo apt-get autoremove -y
Create an account and download the latest version of Splunk for Debian/Ubuntu distribution (.deb) - here
Install the Splunk package
sudo dpkg -i splunk-8.0.1-xxxxxx.deb
Start Splunk for usage and define credentials for login (username/passwords)
sudo /opt/splunk/bin/splunk start --accept-license
Expected output: The Splunk web interface is at http://splunk:8000
Ones Splunk is started the web interface is available at http://splunk:8000.
Run the following command line to enable autostart for Splunk when server starts.
sudo /opt/splunk/bin/splunk enable boot-start
Register an Application in Azure AD
The installed app requires read access to the SecurityEvents.Read.All field in Microsoft Graph Security API. The steps how to register an app in Azure are described here: Walkthrough: Register an app with Azure Active Directory .
For further configuration in Splunk make a note of following settings:
Azure AD Application ID
Azure AD Application Secret
Tenant ID
Preparation Steps in Splunk
There is an app available which allows you to ingest Microsoft Security alerts from Microsoft Graph Security API. Use the following steps to install the app in Splunk.
Login with provided login credentials (username / password) during the installation of Splunk.
Logging and download the Microsoft Graph Security API Add-On for Splunk app from following source
https://splunkbase.splunk.com/app/4564/
In Splunk portal click to Manage Apps
In Manage Apps click to Install app from file and use the downloaded file microsoft-graph-security-api-add-on-for-splunk_011.tgz before for the installation, and click Upload.
Ones the app is installed reboot of Splunk is required, click to Restart Now.
After reboot the Microsoft Graph Security API Add-On for Splunk app can be used to ingest Azure Sentinel alerts into Splunk.
Preparation Steps in Splunk
Now is time to configure the app to connect with Microsoft Graph Security API.
In Splunk portal click to Microsoft Graph Security Add-on for Splunk
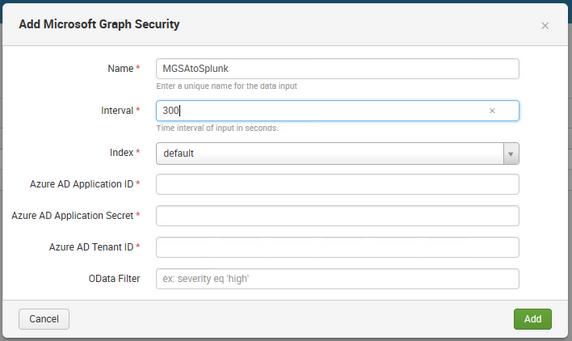
Click to Create New Input
Configure the input settings with noted data for registered Azure AD app configuration (Azure AD Application ID, Azure AD Application Secret and Tenant ID). Odata Filter can be used to filter alerts if required - Link, e.g. for Azure Sentinel alerts use - /security/alerts?$filter=vendorInformation/provider eq 'Azure Sentinel'.
Using of Azure Sentinel alerts in Splunk
Once the ingestion is processed, you can query the data by using sourcetype=GraphSecurityAlert in search field.
Now you see we have connected Splunk with Microsoft Graph Security API, and ingesting Azure Sentinel alerts into Splunk.
Summary
We just walked through the process of standing up Azure Sentinel Side-by-Side with Splunk. In this way, you can use Azure Sentinel to enrich alerts from your cloud workloads providing additional context and prioritization as they are then ingested into Splunk. This will help you easily address your cloud security gaps while maintaining your existing SIEM.


