This post has been republished via RSS; it originally appeared at: Healthcare and Life Sciences Blog articles.
Update: This blog was last edited on 4/1/20. We are continuously working on updating the blog with the latest modifications to the Healthcare Bot Service.
Why the Health Bot Service?
The Health Bot Service is an AI-powered, extensible, secure and compliant healthcare experience. Microsoft now has a specific template pre-built for COVID-19 Assessment. It takes inbound requests, asks about the patient’s symptoms, and assists in getting people access to trusted and relevant healthcare services and information based on the CDC recommendation.
We will take you step-by-step through the following, so that you can deploy the health bot with ease:
- Deployment Approach
- Configuration
- Design and Coding
- Creating a Web Chat Channel
- Embedding Web Chat in a Web Page
-
Enhancing COVID-19 bot with CDC-approved FAQ template
-
Viewing world-wide metrics with COVID-19 Metrics template
Deployment Approach
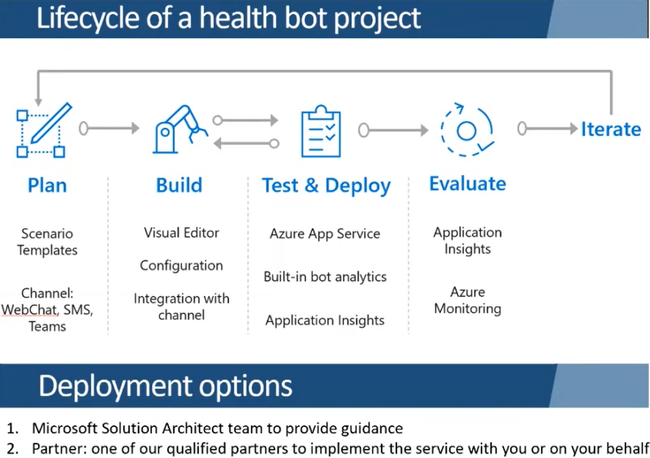
It’s very important to deploy the bot in a phased approach, where you plan to use scenario templates first and then customize and iterate over time. Below is a diagram of the life cycle best practices.
Configuration
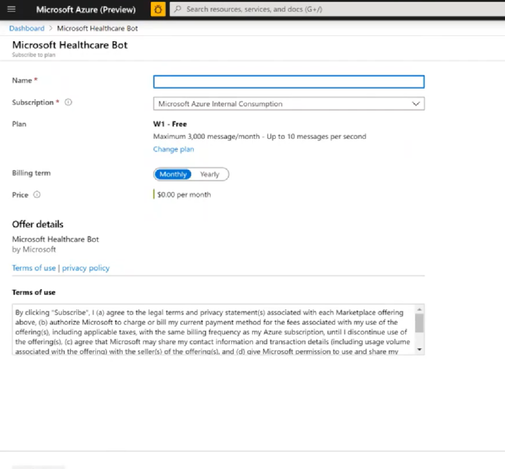
- Login to https://portal.azure.com and search For “Microsoft Healthcare Bot” in the Azure Marketplace.
- Enter details and click “Subscribe”.
3. You will get an email from Azure Marketplace with a config link that will redirect you to the Health Bot Service admin portal. Once configuration is done, you will see this home page. Click "Open scenarios template catalog” in blue.
4. Select “COVID-19 Assessment” from the pre-built templates. Then specify the name and click "Import Template".
5. Once you import the scenario, it will appear in the “Manage” tab under “Scenarios” on the left-hand toolbar. Click on the name of the template to take you to the visual designer.
Design and Coding
The relevant code is in Javascript, so if you are familiar more with the code, you can click the “Code” tab on the bottom left.
Click back to the “Designer” tab. It has a Visio-style look, but with programming capabilities. At the top, you can see the range of scenario elements. You have the ability to insert prompts (represented in green), if/else decision (represented in yellow), or add statements to print out messages (represented in blue). There are many different types of scenario elements, and more details that Microsoft documents here so that you can customize further.
If you click “Run” at the top, it will only run the current scenario in a debug mode. Below is how it looks after the run, asking you a set of questions on the right.
As you answer the series of questions in the chat on the right, you can see that it’s corresponding with the logic on the left hand side. For example, if you click on the “Symptoms” prompt, it’s highlighted in green on the left and reflected in the chat on the right.
After the questions are answered, the bot classifies patients based on the logic. In this example, if you’re classified as a high-risk patient, the bot reads, “We would like to talk with you as soon as possible.” You can have different end results, like a link to virtually schedule an appointment, a connection to a virtual agent, or a link to a virtual physician visit. All of these endpoints can be customized.
For customizing further, including handoff to Microsoft Teams and integration with FHIR API, see the resource appendix at the end of this article.
Creating the WebChat Channel
1. Go back to the Health Bot Service, select "Integrations" and click "Secrets".
2. Webchat_secret allows you to connect the bot to a web page, just like Azure Bot framework. The web chat channel is enabled by default. Copy the webchat_secret and the app_secret. More details here on embedding your health bot into your app via web chat.
3. To deploy web chat to Azure, go to Github repository link. After choosing the right link for deployment, click “Deploy to Azure”. Provide subscription and resource group details to deploy this into. This deploys an app service that will host the healthcare bot.
- Go back to your Azure portal and click on the Resource group that you created/chose in last step.
- It will create two things: the app service and the associated app service plan.
- Click on the app service, go to “Configuration” on the left-hand side. Provide the app_secret and the webchat_secret here, by clicking “Add new application setting” and adding the values copied from Integration -> Secrets page in health bot portal.
- Now that the configuration is done, you can modify the code. Go to "Advanced Tools">>SSH>>vi to edit the index.js file. Once that’s done, we are ready! Click “Run” on the left and you will get this Azure website.
10. There are many front-end UI changes that might be required to customize UI of the bot. Typical examples include: add bot avatar, delete text entry, add close/refresh button, disable previous user selections, not display user selection in assessment scenario etc. If you choose to deploy web chat framework v4, the front-end changes follow standard web development practices. More details on UI customizations can be found at this link.
Embedding a Web Chat into a Web Page
- This Azure website hosting the web chat channel has to be embedded into a web page. See the sample website below, this is an example of a public facing website.
2. Open visual studio for the code. Embed an iFrame as a tag. The source is the app service that is hosting the health bot. Front-end developers can then play around with this code.
3. If you click the COVID-19 info button, you want the web chat to pop up like this to start the triggered scenario. Now you know how to get the health bot on the web page!
Enhancing COVID-19 bot with CDC-approved FAQ Template
The COVID-19 FAQs template has 161 QnA pairs and answers frequently asked questions based on CDC's COVID-19 website. DISCLAIMER: This template has been created using current information about COVID-19 from the Centers for Disease Control (CDC) and is updated to the date of importing.
1. Login to health bot admin portal. Navigate to Scenarios -> Template Catalog.
2. Click on COVID-19 FAQs template and import the template by providing a QnA Maker subscription key. If you do not have a QnA Maker service provisioned, create one on Azure portal.
3. Once the import succeeds, navigate to Scenarios -> Manage. You can see the scenario here.
4. If you drill down to see it in Visual Designer, you will see that the code here fetches results from the language model of this custom QnA Maker and adds the source name. See below for how it displays to the user:
5. Importing the FAQ template also creates a language model in Language -> Models page at the end. The Update button helps you to retrain data in knowledge base created on importing this FAQ template.
6. The import template creates a scenario, it’s underlying language model as seen above and a Knowledge Base "Healthcare Bot COVID-19 CDC" in the Azure QnA Maker service using the subscription key provided during import step. More information on updating knowledge base can be found here.
7. Now, we are ready to test the FAQ scenario! Test it here in the in-house chat control as shown below, or test it on the public website. Note: You do not need to write a custom scenario to bring the two models - COVID-19 Assessment and COVID-19 FAQ - together. FAQ model will be available as a top level scenario.
Viewing world-wide metrics with COVID-19 Metrics template
The COVID-19 Metrics template can provide up-to-date metrics on COVID-19 cases around the world. Below are some example questions that you can ask the bot about reported cases:
- How many cases have been reported worldwide?
- How many cases have been reported in China?
- What countries have the highest number of COVID-19 cases?
DISCLAIMER: This COVID-19 Metrics template leverages an external data source provided by the ArcGis API. Users are responsible for complying with any terms and conditions required by the entities licensing the external data source. This template is being made available 'as is' and without any warranties. Users are expected to update and customize the template as appropriate for their own needs. Microsoft is not responsible for the performance, accuracy or results from the use of the template.
1. Go back to the Scenario Template Catalog and import COVID-19 Metrics.
2. Provide LUIS Prediction Key. PREREQUISITE: Create an Azure LUIS cognitive service prediction resource to access the COVID-19 Metrics natural language understanding (NLU) model.
Once imported, it will appear in Scenarios -> Manage tab as seen below:
3. Click on it to go to the Visual designer. Let’s say you enter: "How many confirmed cases in Italy?". See example answer below.
Resources for Customizing Further
- For handing off to a live agent via Microsoft Teams, check out this step-by-step guide
- Health Bot data connections can be used integrate with systems that support FHIR. Here are links from technical documentation to help you with FHIR integration:
- Add FHIR data connections to health bot scenarios
- Deploy Azure API for FHIR
- Get access token using Azure CLI
Thanks for reading and let us know how else we can help!
Nikita Pitliya, Microsoft Cloud Solutions Architect
Sam Brown, Microsoft Teams Technical Specialist


