This post has been republished via RSS; it originally appeared at: New blog articles in Microsoft Tech Community.
Applications running inside Azure Spring Cloud may need to make outbound calls to targets outside the Azure Spring Cloud. Sometimes the application may encounter network connection issue for different reasons. If we can run DNS resolve and TCP ping test from inside the Azure Spring Cloud to the outside target, it should be helpful for us to quickly narrow down network connection related issues.
This blog shows how to build a very simple App for DNS resolve and TCP ping tests. After we deploy this App inside the existing Azure Spring Cloud service. We can run quick test to verify the availability of network connection to a specific target.
Step 1: Create a simple Spring Web application with DNS resolve and TCP ping feature
Step 2: Deploy it to your Azure Spring Cloud
Step 3: Run DNS/Tcpping tests inside your Azure Spring Cloud instance
Step 1: Create a simple Spring Web application with DNS resolve and TCP ping feature
My test tool source code and compiled jar file can be found in:
https://github.com/renhanli/AzureSpringCloud_connectiontest/tree/main/src/main/java/com/network/connectiontest
https://github.com/renhanli/AzureSpringCloud_connectiontest/blob/main/target/connectiontest-0.0.1-SNAPSHOT.jar
You can use the following steps to build your own test application:
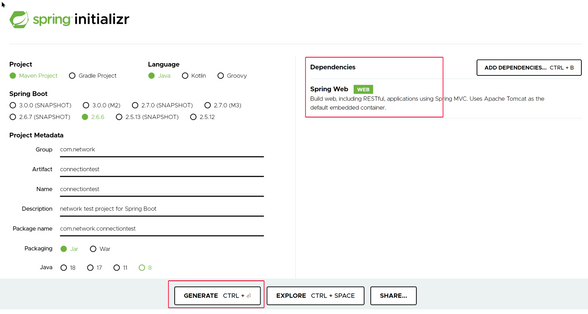
1. Go to Spring initializr to create a Spring Web template.
Select Generate when all the dependencies are set.
2. Download and unpack the package, then create a network test controller for a simple web application by adding the file \src\main\java\com\network\connectiontest\NetworkTestController.java with the following contents:
3. Build the project using Maven
4. Run local test
After you bring up the application in your local machine, you should be able to access http://localhost:8080
We can run DNS resolve test by providing the hostname
http://localhost:8080/dns?hostname=google.com
We can run tcpping test by providing the target IP/domain and port number
Step 2: Deploy it to your Azure Spring Cloud
Assume you already have your Azure Spring Cloud service created. If you do not have any Azure Spring Cloud instance created, please create one according to https://docs.microsoft.com/en-us/azure/spring-cloud/quickstart?tabs=Azure-CLI&pivots=programming-language-java#provision-an-instance-of-azure-spring-cloud
Use Azure CLI to create the network test App and deploy the .jar file to it.
1. Install the Azure CLI version 2.0.67 or higher and the Azure Spring Cloud extension with the command:
2. Login your account
3. Create the test app with endpoint enabled
4. Deploy the jar file to the app
Step 3: Run DNS/Tcpping tests inside your Azure Spring Cloud instance
Go to the networktest app we just created, use the URL provided in Overview Portal to run the test
For succeed dns resolve test, we can see the following output.
For failed dns resolve, we can see detailed error message and call stacks.
For succeed tcpping, we can see the following output.
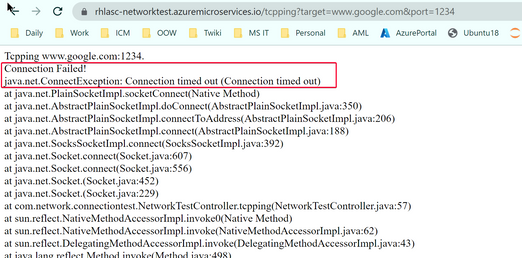
For failed tcpping, we can see detailed error message and call stacks.


