This post has been republished via RSS; it originally appeared at: New blog articles in Microsoft Tech Community.
Azure API Management (APIM) helps organizations publish APIs to external, partner, and internal developers to unlock the potential of their data and services.
It is easy for us to add the API manually in the Azure portal, or there are several options for you to create the API programmatically.
- ARM template
- Powershell or Azure CLI
- Bicep
- Visual Studio Code
- .Net SDK
In this article, we will provide a sample for creating an API via Azure SDK for .Net – APIManagement. and will use the latest preview package: Microsoft.Azure.Management.ApiManagement v8.0.0-preview
The complete code is shown at the end of this article.
To implement importing an API in APIM by .net SDK, the primary method is to create an API client to call REST API. It is like what we do in other ways. Basically, we need an API client and call the Create or Update REST API.
Considering a service credential is needed when the API client interacts with Azure resources, we need first to create an App on behalf of the API client and then grant permission in APIM.
In summary, there are mainly 3 steps to creating an API via.Net SDK.
- Authentication- grant permission for your API client to access APIM.
- API client creation - create an API client to send HTTP requests.
- API creation – set the API properties & send the HTTP request.
This article will provide friendly guidance for new APIM users.
Prerequisite:
- Microsoft Visual Studio 2019. Visual Studio 2019, including the free community edition, can be downloaded here.
- Microsoft Azure subscription. To use Azure services, including APIM and App registration, you need a subscription.
- Create an APIM service. You could also use the C# code to create a new APIM instance. However, this article focuses on creating a new API via .net SDK, so we suppose you already have an APIM instance. If you don’t have an existing APIM instance, you can create it by following instructions from this article.
Package Installation:
1. In visual studio, create a console application: start visual studio 2019 ->select create a new project -> select Console Application
2.select Tools > NuGet Package Manager > Package Manager Console from the menu.
3. Run the following command to install the Microsoft.Azure.Management.ApiManagement package:
4. Run the below command to install Microsoft.
Authentication:
To construct an API client, Credentials is required for the client to connect to Azure. This section will introduce how to get the value of servicecredential.
Step1. Register an application in Azure AD to represent the API client.
a. In the Azure portal, search for and select App registrations.
b. Select New registration.
c. In the Register an application page, enter your application’s registration information.
-Name. You can select a meaningful name for this app. In my sample, I use APIM-client.
-Select an option that suits your scenario in the Supported account types section.
-Leave the Redirect URI section empty.
d. Click Register to create the application.
e. On the app Overview page, find the Application(client) ID value and record it for later.
Step2. Create a client secret for this application to use in a subsequent step.
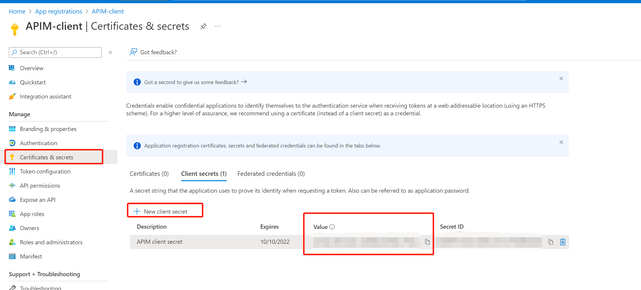
a. Under the Manage section of the side menu, select Certificates&secrets.
b. Under Client secrets, select New client secret.
c. In the Add a client secret page, enter the Description and the expiration time.
d. Click on Add.
e. You can find the client secret Value in the portal, and you need to record it for later use.
Step3. Grant delegated permission to your Application in APIM Access control (IAM)
- Navigate to your APIM.
- Under Access control (IAM), select Add -> Add role assignment.
- Assign a role to the above created application, which should be able to create or update API in this APIM, such as APIM service contributor.
If you want to understand the permission for a different role, you can click on view, and all permissions under the selected role will be displayed.
Now, we can use the above created application to get access to APIM. To get the value of service credentials, we need the Azure tenant ID, the above created application client ID and client seceret value.
The sample code below provides how to get the servicecredential token and initial an API client.
APIM Client creation:
After getting the value of servicecredential, we can create an API client by using ApiManagementClient Class.
Don’t forget to assign your subscription ID to the subscriptionId properties.
Create API
Step 1. APIManagementmodel Construction – set API properties
Similar to putting API properties in the Request body when creating API via Create or Update REST API, we need to construct an API parameter model to define your API via using ApiCreateOrUpdateParameter Class.
You could set your API properties in this part—for example, API display name, API path, and protocols.
Below is the sample. I just created an open API called “test-httpbin2”.
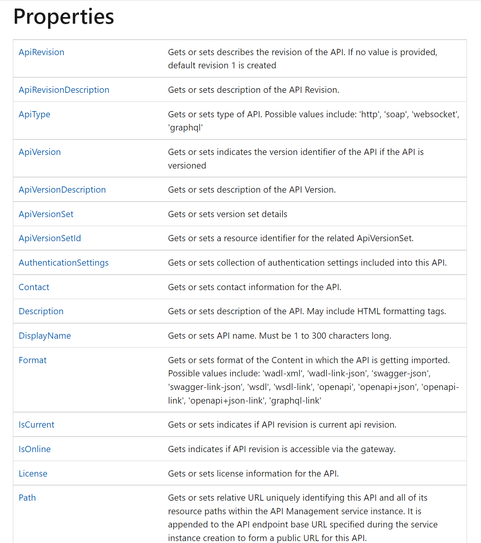
Also, you could customize your API by adding the value for the properties below. For more details, please see this document.
Step 2. Send Request to create API in APIM
Set the value of your resource group name, APIM service name, and apiID.
Now we can use the APIM client to send an HTTP request to create our API
Test result:
In the Azure portal, you can find the API has been created successfully.
The complete code is shown below:


