This post has been republished via RSS; it originally appeared at: New blog articles in Microsoft Community Hub.
Introduction
Microsoft Defender for Cloud provides organizations with Cloud Security Posture Management (CSPM), and Cloud Workload Protection (CWP) capabilities for their Azure, multicloud and hybrid workloads. We know that programmatically deploying and managing Defender for Cloud is top of mind for both Microsoft partners and customers and we commonly hear key questions such as:
- How can I automate onboarding of subscriptions to Microsoft Defender for Cloud?
- How can I enable Defender for Cloud plans across multiple Azure subscriptions and tenants at scale?
- As a Microsoft partner, how can I programmatically configure parts of Microsoft Defender for Cloud, like workflow automations, that can be leveraged in multiple customer deployments?
This article aims to answer these questions and more. We hear from Microsoft partners and customers, that not leveraging a more efficient approach when it comes to deploying and managing Microsoft Defender for Cloud, tends to take more time and cost more in resources. The following article will show how you can deploy and manage Microsoft Defender for Cloud at scale using a variety of options, including:
- Infrastructure as Code
- Azure Policy
- REST APIs
- Azure CLI
- PowerShell
You might already be familiar with some of these options, as they’re commonly used for automating deployment and management tasks in Azure. Infrastructure as Code (IaC) is particularly interesting as it ties into DevSecOps and allows you to use Bicep, Azure Resource Manager (ARM), Terraform, and CloudFormation templates to describe the infrastructure of your cloud environment as code. There are benefits of adopting this approach, as you can use version control for your IaC templates to track changes. To teach, in this article we use GitHub. In addition to tracking changes to your IaC templates, it’s important to test and deploy code from these templates to your Azure environment. This is widely referred to as Continuous Integration/Continuous Delivery (CI/CD). For CI/DC you can use DevOps tools and combine it with IaC templates and version control. The idea behind using this approach is to firstly use IaC to describe the desired state of your environment and put it under version control, in this case GitHub. Then whenever there is a change to IaC you put under version control, you can use DevOps tools to programmatically deploy these changes to your Azure environment. The CI/CD tool we use in this article is GitHub actions.
While this approach can be applied in general to other Azure services, this article’s focus is on managing and deploying Defender for Cloud at scale in combination with GitHub actions in the following areas:
- Pre-deployment best practice guidance
- Guided inventory of the configurable components within Microsoft Defender for Cloud
- Automate the deployment of Defender for Cloud at scale
- Leverage DevOps automation for deploying and managing Defender for Cloud as code (GitHub Actions)
We recommend going through each step to optimize deployments.
1) Pre-deployment best practice guidance
Before starting your Microsoft Defender for Cloud journey, consider the following best practice guidance:
- Ensuring that you have a Management Group hierarchy in the Azure environment according to the organization’s needs, to understand where Azure subscriptions are residing and what can you manage at scale in these subscriptions.
- Microsoft Defender for Cloud is a service that you enable on a subscription. With that being said, Management Groups help to more easily deploy Microsoft Defender for Cloud at scale.
- Understanding Role-based access control (RBAC) and different roles available within Microsoft Defender for Cloud (adding here a link with more information for your reference). Security Reader is the least privilege role when it comes to consuming information from Microsoft Defender for Cloud. Security Admin is a role suited for users who enable components of Microsoft Defender for Cloud (i.e., perform enabling/disabling of Defender for Cloud plans, dismissing of security alerts, etc.).
After considering this best practice guidance, you can explore which components of Defender for Cloud are configurable.
2) Guided inventory of the configurable components within Microsoft Defender for Cloud
While Defender for Cloud has many capabilities mapped to different configurable components, this article’s example will focus on configuring the following:
|
Component |
Possible to automate with |
|
Onboarding subscriptions to MDC |
REST API, Azure Policy, Azure CLI, PowerShell |
|
Enabling Defender for Cloud plans |
REST API, Azure Policy, Azure CLI, PowerShell |
|
Connecting AWS/GCP environment |
REST API |
|
Configuring Auto provisioning settings |
REST API, Azure Policy, PowerShell |
|
Continuous Export |
REST API, Azure Policy, PowerShell |
|
Workflow automation |
REST API |
Let’s explore how to configure these components at scale and automate it in a programmatic way.
3) Automate the deployment of Defender for Cloud at scale
1. Enable Microsoft Defender for Cloud on all subscriptions:
- This is done by triggering the registration of the Microsoft.Security resource provider to all subscriptions, using one of the following options:
|
Automation option |
Guidance |
|
REST API (see example here) |
To enable Microsoft Defender for Cloud on a subscription, make a POST request to:
POST https://management.azure.com/subscriptions/{subscriptionId} |
|
Azure Policy |
Use the following policy to enable Microsoft Defender for Cloud: |
|
Azure CLI |
Use the following Azure CLI command: |
|
Azure PowerShell |
Use the following PowerShell command:
Register-AzResourceProvider |
Please note that Defender for Cloud is automatically enabled on the default Log Analytics Workspace (LAW) - workspace deployed out of the box by Defender for Cloud. However, it is not automatically enabled on a custom LAW. Enabling Microsoft Defender for Cloud on a custom LAW can be done by enabling one of all of the following solutions:
- SecurityCenterFree for CSPM
- Security for Microsoft Defender for Servers
- SQLAdvancedThreatProtection, and SQLVulnerabilityAssessment for Microsoft Defender for SQL Servers on machines
2.Ensure Azure Security Benchmark is assigned:
- Assigning Azure Security Benchmark policy initiative can happen at different scopes, i.e. on the Management Group scope or on the individual subscription scope. The Management Group scope is recommended for organizations who want to centrally control the Azure Security Benchmark policy initiative (adding here a link with guidance for your reference). All subscriptions within the management group automatically inherit the policies applied to the management group. In addition, each Azure tenant is given a single-level management group called root management group. This root management group is built into the hierarchy to have all management groups and subscriptions fold up to it. This group allows global policies to the applied to it, i.e. ensuring that any newly created subscription is onboarded onto Microsoft Defender for Cloud (adding a link here with guidance for your reference). Assigning the Azure Security Benchmark policy initiative to a Management Group can be done using several automation options (i.e., ARM template, Azure REST API, CLI or PowerShell – adding a link here with guidance for your reference).
Automation option
Guidance
REST API
To assign the Azure Security Benchmark policy initiative, make a PUT request to:
https://management.azure.com/{scope}/providers/
Microsoft.Authorization/policyAssignments/{policyAssignmentName}
?api-version=2020-09-01 with the following request bodywith the following request body:
{
"properties": {
"policyDefinitionId": "/providers/Microsoft.Authorization/policySetDefinitions
/1f3afdf9-d0c9-4c3d-847f-89da613e70a8",}
}
Azure CLI
Use the following Azure CLI command:
az policy assignment create --name ‘policyAssignmentName’ –policy-set-definition 1f3afdf9-d0c9-4c3d-847f-89da613e70a8
Azure PowerShell
Use the following Azure PowerShell command:
$definition = Get-AzPolicySetDefinition -Name 1f3afdf9-d0c9-4c3d-847f-89da613e70a8
New-AzPolicyAssignment -Name 'policyAssignmentName'
-PolicySetDefinition $definitionARM Template
To create a Microsoft.Authorization/policyAssignments resource, add the following JSON to the resources section of your ARM template:
{
"type": " Microsoft.Authorization/policyAssignments",
"name": "policyAssignmentName",
"apiVersion": "2019-09-01",
"properties": {
"policyDefinitionId": "1f3afdf9-d0c9-4c3d-847f-89da613e70a8"
}
}
3. Enable Microsoft Defender for Cloud plans:
- This is done by changing the pricing tier from “Free” to “Standard” for the particular Microsoft Defender for Cloud plan that you would like to enable. Please note this is a subscription level setting.
|
Automation option |
Guidance |
|
REST API |
To enable Microsoft Defender for Cloud using it’s REST API, make a PUT request with the following request body: { "properties": { "pricingTier": "Standard" } } for the following URL and add the relevant subscription ID and the pricingName: https://management.azure.com/subscriptions/{subscriptionId} Note that {pricingName} can be any of the following: VirtualMachines, SqlServers, AppServices, StorageAccounts, SqlServerVirtualMachines, Containers, KeyVaults, Dns, Arm, etc. |
|
Azure Policy |
Use the following policies to enable the particular Defender for Cloud plans:
|
|
Azure CLI |
Use the following Azure CLI command to enable Microsoft Defender for Cloud, e.g. for virtual machines: az security pricing create -n VirtualMachines --tier 'standard' |
|
Azure PowerShell |
Use the following Azure PowerShell command to enable Microsoft Defender for Cloud, e.g. for virtual machines: Set-AzSecurityPricing -Name "virtualmachines" -PricingTier "Standard" – subplan “P2” |
|
ARM Template |
To create a Microsoft.Security/pricings resource, add the following JSON to the resources section of your ARM template, e.g for virtual machines:
{ "name": " VirtualMachines", "type": "Microsoft.Security/pricings", "apiVersion": "2018-06-01", "properties": { "subPlan": "P2", } } |
Please note that when enabling Defender for Servers, besides the ‘PricingTier’, there is a ‘subPlan‘ parameter you need to be aware of, so you can determine if P1 or P2 is enabled.
4. Configure Auto-provisioning settings:
This lets Microsoft Defender for Cloud automatically provision the LA/AMA agent (and other extensions) to all the VMs in that subscription (including even Azure Arc connected machines connected to that subscription) to all the machines in the subscriptions. This is done either through the Azure portal or by leveraging Azure Policy:
|
Agent/Extension |
Azure Policy |
|
Log Analytics agent |
|
|
Log Analytics agent for Azure Arc machines |
Configure Log Analytics extension on Azure Arc enabled Linux servers
Configure Log Analytics extension on Azure Arc enabled Windows servers |
|
Vulnerability assessment for machines |
[Preview]: Configure machines to receive a vulnerability asssessment provider
|
|
Guest configuration agent |
Deploy prerequisites to enable Guest Configuration policies on virtual machines |
|
Microsoft Defender for Containers components |
[Preview]: Configure Azure Kubernetes Service clusters to enable Defender profile
[Preview]: Configure Azure Arc enabled Kubernetes clusters to install Azure Defender's extension
Deploy Azure Policy Add-on to Azure Kubernetes Service clusters
[Preview]: Configure Azure Arc enabled Kubernetes clusters to install the Azure Policy extension
|
5) Onboard AWS and/or GCP environment to Microsoft Defender for Cloud (depending on your environment)
Please note to onboard AWS or GCP environment to Microsoft Defender for Cloud, you need to create a security connector. The security connector is the representation of your AWS or GCP environment in Microsoft Defender for Cloud. You can create the security connector programmatically, by leveraging the REST API:
|
Automation option |
Azure Policy |
|
REST API |
To create a security connector for AWS/GCP, make a PUT request to:
An example of the request body can be found here. |
6) Configure Continuous Export
- Please note this is a subscription level setting and it can be configured by leveraging one of the following options:
|
Automation option |
Azure Policy |
|
Azure Policy |
Deploy export to Log Analytics workspace for Azure Security Center alerts and recommendations |
|
REST API |
To configure Continuous Export, make PUT request to:
https://management.azure.com/subscriptions/{subscriptionId}
An example of the request body can be found here. |
7. Configure Workflow Automation
- This is done by either leveraging Azure Policy or the REST API:
|
Automation option |
Azure Policy |
|
Azure Policy |
Deploy Workflow Automation for alerts
|
|
REST API |
To create a security connector for AWS/GCP, make a PUT request to:
An example of the request body can be found here. |
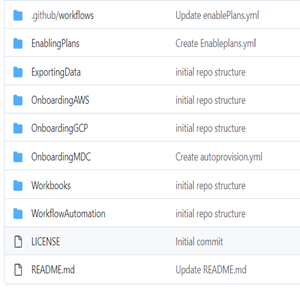
You can leverage IaC to describe your infrastructure as code and put it under version control. For this you will need a repository. The repository that we use can be found here and it contains the following structure:
|
Repository / #root folder for customer -> OnboardingMDC / #subfolder for onboarding MDC --> onboardingMdc.yml #onboarding MDC yml file -> EnablingPlans / #subfolder for enabling MDC plans --> enablingPlans.yml -> OnboardingAWS / #subfolder for onboarding AWS --> onboardingAws.yml -> OnboardingGCP / #subfolder for onboarding GCP --> OnboardingGcp.yml -> ConfigureAutoProvisioning / #subfolder for configuring auto provisioning settings --> configureAutoProv.yml -> ContinuousExport / #subfolder for configuring continuous export --> continuousExport.ylm -> WorkflowAutomation / #subfolder for configuring workflow automation --> workflowAutomation.yml
|
|
You can modify the repository structure to suit your organization or your customer’s or organization’s needs.
4) Leverage DevOps automation for deploying and managing Microsoft Defender for Cloud as code
Now that you have a clear view of how to structure your code repository and what you can use to automate each Microsoft Defender for Cloud component, you can proceed to automate different actions. For this process you can leverage GitHub actions, consisting of the following high-level actions:
- Create your GitHub account
- Create a repository using the structure shared above, or preferably just fork the above repository into yours
- Create a service principal in Azure & store the credentials in GitHub
- Initiate your CI/CD by leveraging GitHub actions to run different workflows
A. Create a service principal in Azure
To create a service principal and what permission it needs you can follow the process here.
After you create a service principal, you output will look similar to the following:
{
"appId": "00000000-0000-0000-0000-000000000000",
"displayName": "AzServPrinGitHubActions",
"password": "V1W8Q~B3gLSorqpiSOGAE.2PYW2dRoB91w4YBcXn",
"tenant": "00000000-0000-0000-0000-000000000000"
}
B. Collect the service principal credentials
In the next step, you need to leverage the service principal you created, to give GitHub permissions to your Azure environment. For this purpose, you need to leverage the CLIENTID, the Client Secret, Subscription ID, and Tenant ID from the service principal you have created. You have options of collecting this information from the Azure portal or by leveraging Cloud shell, similar to the following sample:
# Fill in the Name of the ServicePrincipal you just created and the subscription you want to use
$SPName = "GitHubAzureConnections"
$AzSubscriptionName = "Name_of_your_subscription"
Connect-AzureAD
$Subscription = (Get-AzSubscription -SubscriptionName $AzSubscriptionName)
$ServicePrincipal = Get-AzADServicePrincipal -DisplayName $SPName
$AzureADApplication = Get-AzureADApplication -SearchString $SPName
$OutputObject = [PSCustomObject]@{
clientId = $ServicePrincipal.AppId
clientSecret = (New-AzureADApplicationPasswordCredential -ObjectId $AzureADApplication.ObjectId).Value
subscriptionId = $Subscription.Id
tenantId = $Subscription.TenantId
}
$OutputObject | ConvertTo-Json
You output, should look similar to the following:
{
"clientId": "12345678-1234-abcd-1234-12345678abcd",
"clientSecret": "abcdefghijklmnopqrstuwvxyz1234567890=",
"subscriptionId": "12345678-1234-abcd-1234-12345678abcd",
"tenantId": "12345678-1234-abcd-1234-12345678abcd"
}
C. Store the credentials to GitHub
You then need to store these credentials in GitHub, for which you can find guidance here. In this article we store the JSON from the guidance as the value of a GitHub secret with name of 'AZURE_CREDENTIALS'. Make sure you add the output to the ‘Value’ box generated when creating the new secret.
D. Leverage GitHub Actions
After you’ve stored credentials to GitHub, you can leverage GitHub actions to do perform various tasks covered in this article, like enabling Defender for Cloud plans at scale or configuring export of data from Microsoft Defender for Cloud. The tasks you perform with GitHub actions, should be based on your organization’s need and use cases. To provide you with a glimpse of how to use GitHub actions to achieve this, we added the following tasks:
Initiate a deployment in MDC
- Set a security contact for the subscription
Set-AzSecurityContact -Name "default1" -Email "john@contoso.com" -Phone "214275-4038" -AlertAdmin -NotifyOnAlert
- Set a workspace to hold the security Data
Set-AzSecurityWorkspaceSetting -Name "default" -Scope "/subscriptions/00000000-0000-0000-0000-00000000000" -WorkspaceId "/subscriptions/00000000-0000-0000-0000-00000000000/resourcegroups/mainws/providers/microsoft.operationalinsights/workspaces/securityuserws"
Log in to Azure with the service principal credentials used with the stored credentials (see in section C. Store the credentials in GitHub)
Enablement of Microsoft Defender for cloud for your subscriptions
Set-AzContext -Subscription "d07c0080-170c-4c24-861d-9c817742786c"
Setting of the Azure Security benchmark
Register-AzResourceProvider -ProviderNamespace 'Microsoft.PolicyInsights'
$Policy = Get-AzPolicySetDefinition | where {$_.Properties.displayName -EQ 'Azure Security Benchmark'}
New-AzPolicyAssignment -Name 'policyAssignmentName>' -DisplayName 'Defender for Cloud Default <subscription ID>' -PolicySetDefinition $Policy -Scope '/subscriptions/00000000-0000-0000-0000-00000000000'
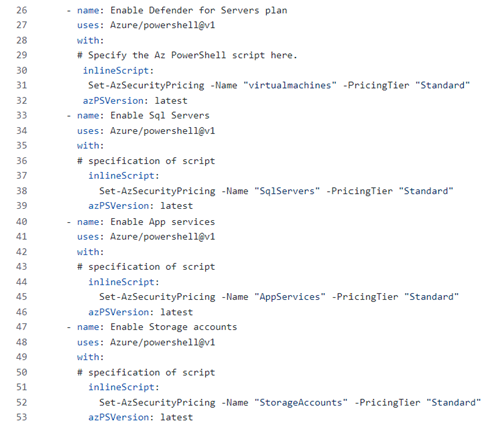
Enable the Defender plans leveraging a PowerShell script on GitHub Actions. Yaml File can be found here
Enabling Auto provisioning using a PowerShell script
Yaml File can be found here
Workflow Automation
- Enable alertsSteaming To3rd party Siem.psq
Example”
.\EnableAlertsStreamingTo3rdPartySiem.ps1 -scope <Scope> -subscriptionId <Subscription Id> -resourceGroupName <RG Name> -eventHubNamespaceName <New event hub namespace name> -eventHubName <New event hub name> -location <Location> -siem <Splunk / QRadar> -aadAppName <New AAD application name> -storageName <New storage name>
Splunk
.\EnableAlertsStreamingTo3rdPartySiem.ps1 -scope '' -subscriptionId <Subscription Id> -resourceGroupName <RG Name> -eventHubNamespaceName <New event hub namespace name> -eventHubName <New event hub name> -location <Location> -siem 'Splunk' -aadAppName <New AAD application name>
Qradar
.\EnableAlertsStreamingTo3rdPartySiem.ps1 -scope '' -subscriptionId <Subscription Id> -resourceGroupName <RG Name> -eventHubNamespaceName <New event hub namespace name> -eventHubName <New event hub name> -location <Location> -siem 'QRadar' <New Storage name>
The following are images of leveraging GitHub Actions to onboard and enable Microsoft Defender for Cloud.
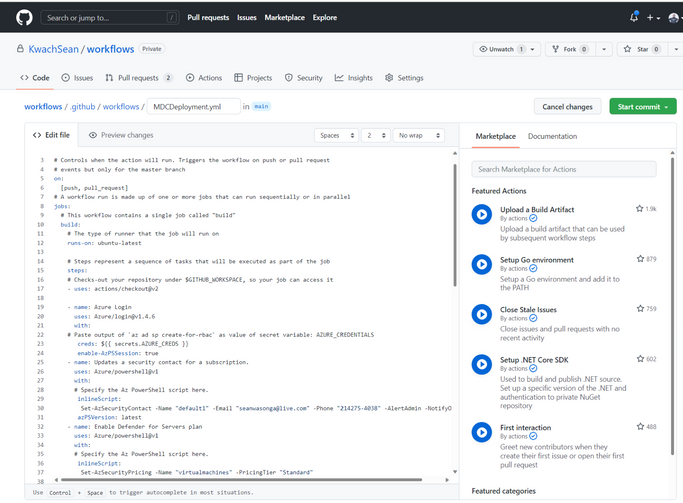
1. After gaining access to the workflow YAML file, you have the option of the consolidated action ( MDCdeployment.yml ) or you can individually select whichever action you prefer (e.g. enabling a specific Defender plan, updating a contact, auto provisioning etc.). In this example we shall select the consolidated action approach (see MDCdeployment.yml).
Figure after editing the Yaml file to your specific actions start the commit
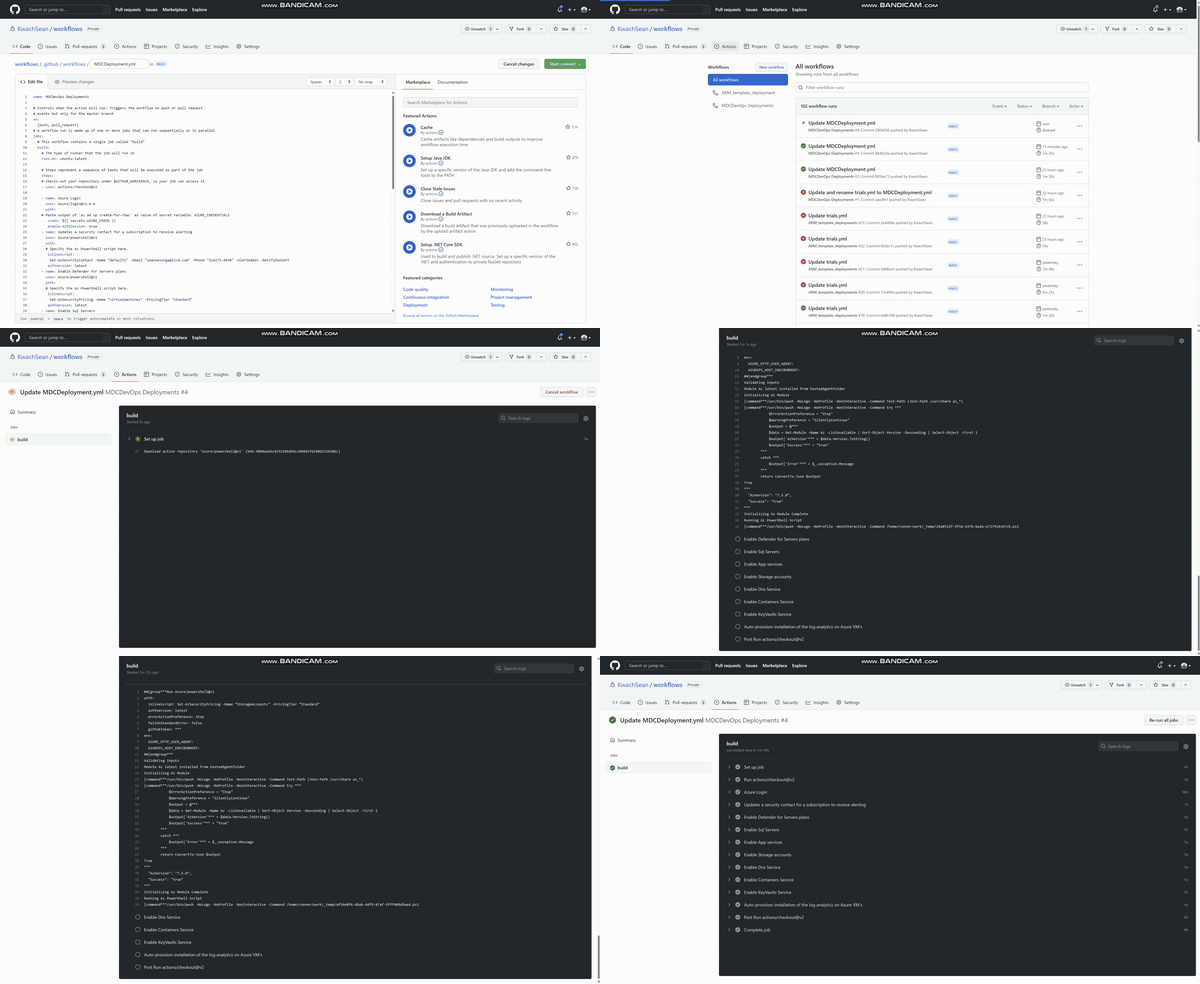
2. Once the commit is triggered the CI/CD process through GitHub Actions is initiated and it should proactively start to enable the actions as submitted in the file (in this case we are enabling plans and auto provisioning installation of the LA agent on VMS in azure)
Figure (GitHub Actions enabling defender Plans)
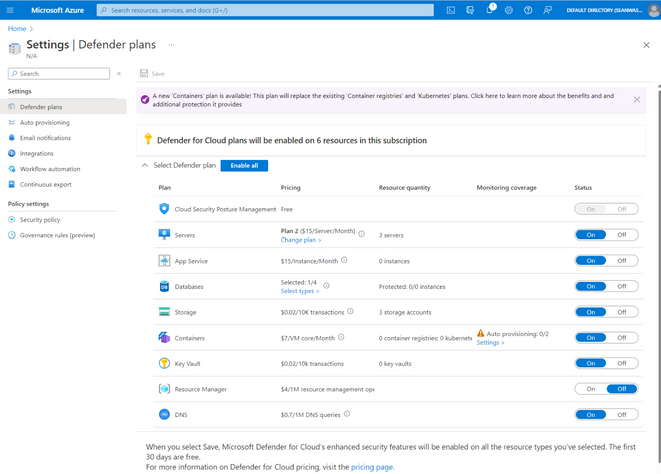
3. After running the process above you would have successfully Onboarded and Enabled Microsoft Defender for Cloud by leveraging a CI/ CD process.
Figure (successfully enabled Defender for Server Plans
Figure (successfully added Security Contact)
Figure (auto provisioning Enabled)
In Summary
We have shown you to how to describe Microsoft Defender for Cloud deployment using code and then used a DevOps tool to deploy that code in your Azure environment. The benefits is as a partner or a customer you can deploy or mange Microsoft Defender for Cloud more efficiently, taking you less time and taking you less resource cost to do so.
Resources
Reference list of REST APIs used in Defender for Cloud: Microsoft Defender for Cloud REST APIs | Microsoft Learn
Reviewers:
Tom Janetscheck Senior PM
Sebastien Molendijk, Senior PM
Contributors:
Sebastien Molendijk, Senior PM
Tom Janetscheck Senior PM
Shay Amar, Senior PM


