This post has been republished via RSS; it originally appeared at: Microsoft Tech Community - Latest Blogs - .
Azure Static Web Apps provides 2 mechanisms for authentication: built-in authentication and custom authentication. It enables the authentication by defining the routing rules and the roles in the configuration file staticwebapp.config.json.
In this blog, we are going to introduce how to enable built-in authentication for Azure Static Web Apps with Azure Active Directory step by step.
Pre-requires
1. Create new Static Web App from the Azure Portal
2. Check workflow file content for the app_location setting. The default path of app_location in the workflow file should be defined as "/".
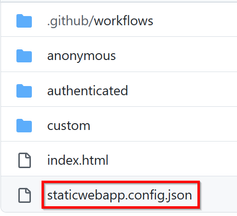
3. Manually create the configuration file staticwebapp.config.json in the folder set as the app_location in the workflow file.
4. Configure built-in authentication in the file staticwebapp.config.json by the following sample
{
  "routes": [
    {
      "route": "/anonymous/*",
      "allowedRoles": ["anonymous"]
    },
    {
      "route": "/authenticated/*",
      "allowedRoles": ["authenticated"]
    },
    {
      "route": "/custom/*",
      "allowedRoles": ["custom"]
    }
  ]
}
5. Define root html for the Azure Static Web App
	<html lang="en">

	<head>
	    <meta charset="UTF-8">
	    <meta http-equiv="X-UA-Compatible" content="IE=edge">
	    <meta name="viewport" content="width=device-width, initial-scale=1.0">
	    <title>Azure Static Web Apps auth demo</title>
	    <style>
	        body {
	            background-color: white;
	        }
	    </style>
	</head>

	<body>
	    <h1>Azure Static Web Apps auth demo</h1>
	    <div>
	        <a href="/.auth/login/aad">Login</a> | <a href="/.auth/logout">Logout</a>
	    </div>
	    <hr>
	    <div>
	        <ul>
	            <li><a href="/anonymous/">Anonymous Role page</a></li>
	            <li><a href="/authenticated/">Authenticated Role page</a></li>
	            <li><a href="/custom/">Custom Role page</a></li>
	        </ul>
	    </div>
	    <hr>
	</body>

</html>
6. Create 3 folders anonymous/authenticated/custom and put a simple index.html file inside the folder. Below is the sample index.html
	<html lang="en">
	<head>
	    <meta charset="UTF-8">
	    <meta http-equiv="X-UA-Compatible" content="IE=edge">
	    <meta name="viewport" content="width=device-width, initial-scale=1.0">
	    <title>Anonymous</title>
	    <style>
	        body {
	            background-color: white;
	        }
	    </style>
	</head>
	<body>
	    <h1>Anonymous Role page</h1>
	</body>
</html>
Built-in Authentication Introduction
Before we tested the code, I would like to introduce more about the built-in authentication.
By default, every user belongs to the built-in anonymous role, and all logged-in users are members of the authenticated role.
To be specific, even if a user does not login, the user is default having the anonymous role. And after the user login, the user will get the authenticated role.
We can also define a custom role by setting up a value in allowedRoles and associate user to the custom roles via invitations.
For example, define a custom rule "custom" in the routing.
    {
      "route": "/custom/*",
      "allowedRoles": ["custom"]
    }
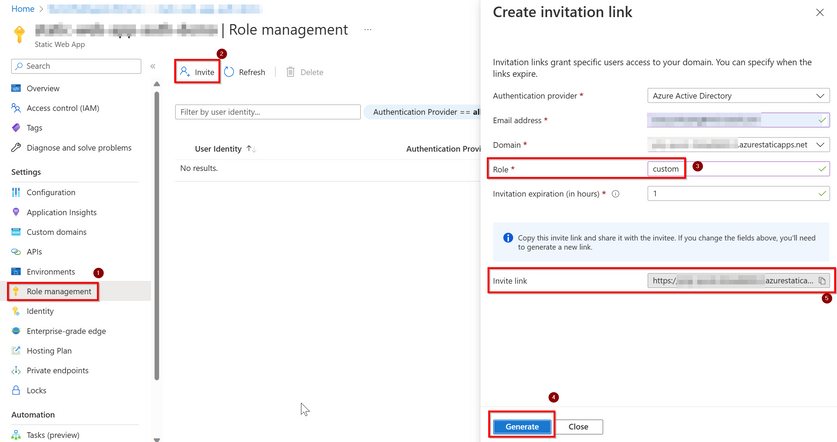
Create invitation link and send the link to the user to active the role setting.
Static Web Apps > Role management > Invite > put your custom role name in the Role column
Demo
1. Access the Static Web App without Login
2. We can access the route /anonymous/* because we are default having the anonymous role
3. We cannot access the route /authenticated/* because we haven't login, so we don't have the authenticated role
4. Click Login to acquire the authenticated role
5. After login, we can access the route /authenticated/*
6. But we still getting blocked for the route /custom/* because we do not have the custom role
7. Assign custom role to the specific user by invitation link
8. Active custom role by accessing the link and login AAD (Please make sure to do this step, otherwise the role will not be assigned)
9. Check the custom role is assigned successfully on the Azure Portal
10. After activating the custom role from the invitation link, we can now access the route /custom/*
Congratulations!
After these steps, you are now understanding how to enable the built-in authentication to protect your Azure Static Web Apps.
Hope this article is helpful for you and thank you for reading.


