This post has been republished via RSS; it originally appeared at: Microsoft Tech Community - Latest Blogs - .
Azure Container Apps is a fully managed environment that enables you to run microservices and containerized applications on a serverless platform. When you host your apps or microservices in Azure Container Apps, you may not always want to publish them directly to the internet. Instead, you may want to expose them through a reverse proxy, a content delivery network(CDN) or any other similar device.
Azure Front Door is Microsoft’s modern cloud Content Delivery Network (CDN) that can help you deliver higher availability, lower latency, greater scale, and more secure experiences to your users accessing your container apps.
In this article, you learn to configure a Container App with Front Door with Custom Domain. (For configuring without Custom Domain, see Configure Container App with Front Door without Custom Domain - Microsoft Community Hub)
PREREQUISITES
- Front Door
- Container App with Ingress enabled (Configure Ingress for your app in Azure Container Apps | Microsoft Learn)
- Custom domain name
- Optional : Associated certificate (signed by a well-known authority)
Note: This article uses Front Door Standard/Premium.
This configuration makes use of a custom domain on both Front Door and the Container App in the backend. This is recommended for production-grade scenarios and meets the practice of not changing the host name in the request flow. You are required to have a custom domain (and associated certificate) available to avoid having to rely on the default ".azurecontainerapps.io" domain.
By associating the same domain name to both Front Door and App Service in the backend, the request flow doesn't need to override the host name. The backend web application will see the original host as was used by the client.
| To configure Front Door with Container App hosted in Internal Environment
Follow the steps mentioned at Create a private ACA environment with Azure Front Door This will create a Private Link to the internal load balancer in the environment MC_ resource group.Proceed with the steps specified below. |
I. ADDING CUSTOM DOMAIN TO CONTAINER APP
To add a custom domain for your container app, follow the instructions at Custom domain names and certificates in Azure Container Apps | Microsoft Learn
II. CONFIGURE A CUSTOM DOMAIN ON AZURE FRONT DOOR
Azure Front Door provides the option of associating a custom domain with the default host. With this option, you deliver your content with a custom domain in your URL instead of an Azure Front Door owned domain name.
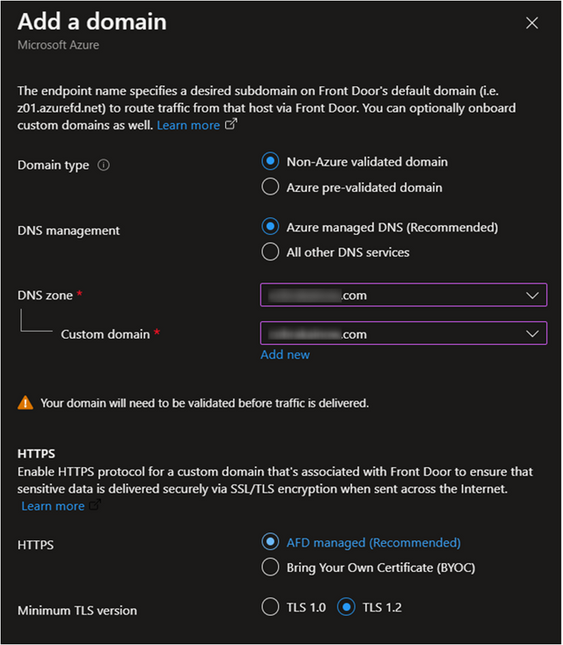
- On the Front Door, navigate to Domains, select +Add.
- Enter, or select the following information:
Setting Description Domain Type Azure pre-validated Domain - domains validated by another Azure service (currently only supports static webapp)
Non-Azure validated domain
This example uses Non-Azure validated domainDNS Management Azure managed DNS or other (based on user's configuration) DNS Zone (if you choose Azure managed DNS)
Custom domainSelect from list of available DNS zones.
Select existing (or) add new. You can add APEX domain or subdomainHTTPS AFD Managed (requires validation) or Bring your own Certificate (retrieve certificate from Key Vault) Minimum TLS version 1.0 or 1.2
III. CREATE A NEW AZURE FRONT DOOR ENDPOINT
- In the Front Door Manager tab, select Add an endpoint and give your endpoint a globally unique name. You can create more endpoints in your Azure Front Door profile after you complete the deployment.
- Select Add to add the endpoint.
IV. ADD A ROUTE
- To add a Route, first expand an endpoint from the list of endpoints in the Front Door manager.
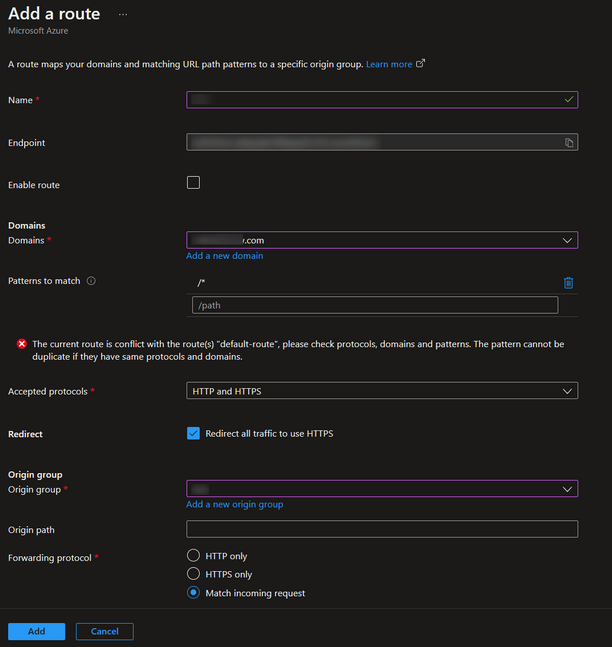
- Next, select + Add a route to configure routing to your Container App origin.
On the Add a route page, enter, or select the following information and select Add to add the route to the endpoint configuration.
Setting Description Name Enter a name to identify the mapping between domains and origin group. Domains Select the custom domain that you added earlier. Patterns to match Set all the URLs this route will accept. Accepted protocols Select the protocol the route will accept. (NOTE: If you choose HTTP as an accepted protocol, ensure that you allow insecure connections on your Container Apps Ingress configuration) Redirect Enable this setting to redirect all HTTP traffic to the HTTPS endpoint. Origin group Select Add a new origin group. Then select + Add an origin. Enter <originname> for the Name and then for the Origin Type select Custom. In the Host name, type the Container Apps URL and in Origin Host Header, type the Custom Domain. Select Add to add the origin to the origin group. Once the origin has been added, select Add to save the origin group configuration. Origin path Leave blank. Forwarding protocol Select the protocol that will be forwarded to the origin group.
V. VALIDATING THE CUSTOM DOMAIN
Navigate to Domains. The new custom domain will have a validation state of Pending. Select the Pending validation state. A new page will appear with DNS TXT record information needed to validate the custom domain. The TXT record is in the form of _dnsauth.<your_subdomain>. If you're using Azure DNS-based zone, select the Add button, and a new TXT record with the displayed record value will be created in the Azure DNS zone. If you're using another DNS provider, manually create a new TXT record of name _dnsauth.<your_subdomain> with the record value as shown on the page.
VI. CONFIGURING DNS
Navigate to Domains. Select the DNS state link.
The Add or update the CNAME record page will appear and display the CNAME record information that must be provided before traffic can start flowing. If you're using Azure DNS hosted zones, the CNAME records can be created by selecting the Add button on the page. If you're using another DNS provider, you must manually enter the CNAME record name and value as shown on the page.
After you've validated and associated the custom domain, verify that the custom domain is correctly referenced to your endpoint.
Lastly, validate that your application content is getting served using a browser.
CONSIDERATIONS
- While configuring Ingress for the container app, ensure that the option "Limited to Container Apps Environment" is not selected. Otherwise, you will not be able to access the container app outside the environment (ie) through the front door.
- If you have deployed your container app environment in a custom VNET, ensure that the DNS is configured accordingly so that the Front door will be able to access the container app (https://learn.microsoft.com/en-us/azure/container-apps/networking#dns)
REFERENCES
Configure an endpoint with Front Door manager - Azure Front Door | Microsoft Learn
How to configure origins - Azure Front Door | Microsoft Learn
How to add a custom domain - Azure Front Door | Microsoft Learn
Onboard a root or apex domain to an existing Front Door - Azure portal | Microsoft Learn
Configure HTTPS for your custom domain - Azure Front Door | Microsoft Learn


