
This post has been republished via RSS; it originally appeared at: Windows Dev AppConsult articles.
Microsoft Graph is all about you! About the data of the user: Azure Active Directory, Office 365 data, Enterprise Mobility and Security services, Education tenant data and Windows Services.
As a developer, the beauty resides in the unified way to authenticate, access and query the data. It can simply be by using a HTTPS Rest service or the SDK for your platform.
I could continue describing the Microsoft Graph for pages and pages but there is better way to discover it with the nice 30 Days of Microsoft Graph blog series .
Microsoft Graph in Mixed Reality? I start with a little bit of context before detailing all steps.
Using the Microsoft Graph in HoloLens and Mixed Reality
Let me tell you my journey, I started using this useful and comprehensive tutorial https://docs.microsoft.com/en-us/graph/training/uwp-tutorial ; It allows you to create an UWP app that uses the Microsoft Graph in 30min!
It works really great for a 2D UWP app because it uses all the goodness of
- The Windows Community toolkit controls for Graph
- The High level classes from the .NET SDK for Graph
- Under the hood, the Microsoft Authentication Library (MSAL) is used to authenticate to the Azure Active Directory for using Microsoft Graph
For HoloLens and Mixed Reality, it is different because our project is in Unity. We cannot reference and manage NuGet packages as we do in Visual Studio projects.
Do I give up? No! Here is what I have done:
1. I went through the tutorial - https://docs.microsoft.com/en-us/graph/training/uwp-tutorial . I had the full working project and looked at the dependencies.
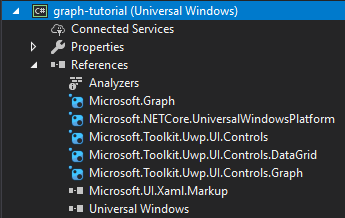
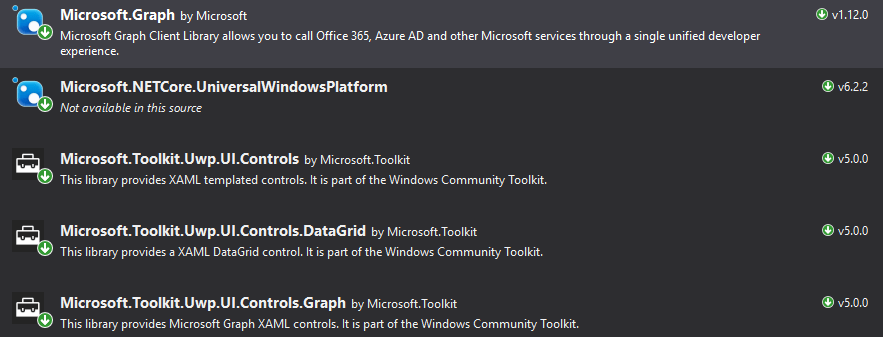
These dependencies are the following NuGet packages.
2. Looking deeper at the XAML and the code, I first wanted to remove the Windows Community Toolkit dependencies because I cannot use them in a Unity 3D project.
To do so, I will have to perform the Microsoft Graph Authentication alone (and not simply use the graph login control from the Toolkit). I have done some researches and I have read carefully the blog post of my colleague Marc Plogas . I had 2 options: (1) Do it really alone. Humm?! or (2) Use the MSAL UWP dll: I went for the option 2.
➡ Explanations and code in Step 3 below ⬅
3. Lastly, the code of the tutorial uses the .NET SDK for Graph . Because all the SDK for the Microsoft are wrappers on the HTTP Rest API, I decided to not take an extra dll in the Unity project but just do HTTP calls using the UWP HttpClient.
➡ Explanations and code in Step 4 below ⬅
So, we are good to go ?: We will keep only one dll which will be the MSAL one.
Here are now the real steps for using Microsoft Graph in your HoloLens or Mixed Reality apps.
--
Step 1. Register an entry ? for your app in the Azure Active Directory
This is the easy (but mandatory) part: In order to be able to query the Microsoft Graph, our app has to be known and registered in the Azure Active Directory .
I would make no sense to rewrite here how to do it because it is well explained in the tutorial we mentioned earlier. Just follow: Register the app in the portal .
? You have now the App Id which is like
0664402e-24c2-456d-8157-e8e110c45348
. Save it for later.
Step 2. Create the Unity ? App
Project setup ?
Please note that for today, I used the Unity 2018 version . Here are all the tools:
- Windows version 1809 for the PC and HoloLens
- Visual Studio 2017 version 15.9.0
- Windows SDK version 10.0.17763.0
- Unity 2018.2.18f1
Note: If you are familiar with Unity and Mixed Reality, please refer to Create a Windows Mixed Reality App from 0 – The Unity project .
Configure the Unity project for Windows Mixed Reality:
- File menu / Build Settings ➡ Universal Windows Platform selected as the Build platform
- Edit menu / Project Settings / Player ➡ Virtual Reality Supported checked
- Edit menu / Project Settings / Player ➡ Other Settings / .NET as Scripting Backend. Please also use the Experimental (.NET 4.6 Equivalent) for the Scripting Runtime Version.
- Put the camera at the origin (0,0,0) and use Solid Color = Black .

- Add an empty game object named
ScriptManagerwith a scriptStartupwhere we will place all the source code for simplicity.
Field of view feedback
(Not action here)
As explained in a previous post , I use some "technical piping" in order to display some text in front of the user from any code within the app. You will see it in action when you will run the sample. The only point that you have to remember is: Call
FOVFeedback.instance.ModifyText("Some text");
when you want in any class in your Unity project!
If you write the app from scratch and not use the sample code on GitHub, just use
Debug.Log("Some text");
Plugins
We use the MSAL dll for the authentication. Because there no NuGet packaging system in Unity we are going to get this dll from the disk and add it to the Assets folder.
Again Marc Plogas explained this in a previous blog post .
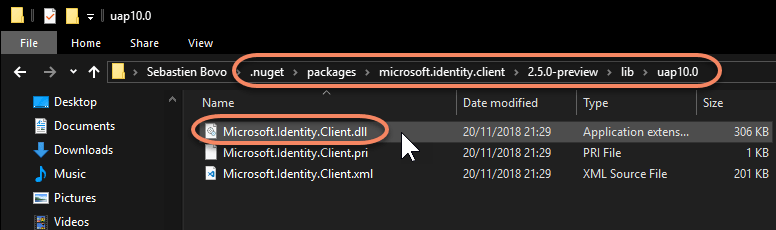
So, the dll to use is the one located in
C:\Users\<<YOUR_USER>>\.nuget\packages\microsoft.identity.client\2.5.0-preview\lib\uap10.0
.
Note: This folder exists and would be populated if you have used this component at least one time for one project (This will be the case if you go through the Graph tutorial that I mentioned)
Drag & drop this dll in the Unity Project Window inside the Assets folder. Create a Plugins\WSA folder for this purpose.
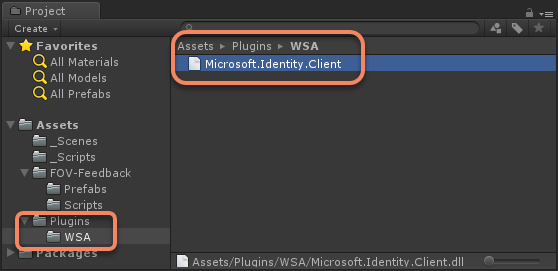
Note: Using the Plugins\WSA automatically flag the dll to be used only for Windows:
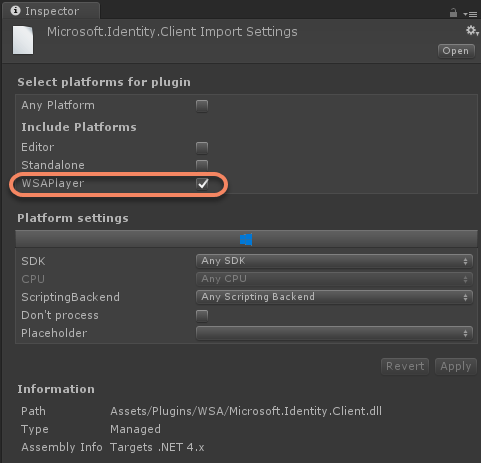
? With the MSAL dll in the
Assets\Plugins\WSA
folder, we can now use the Microsoft.Identity.Client namespace classes in our code.
Step 3. ✅ Authenticate against the Azure Active Directory
To authenticate against the Azure Active Directory we use Microsoft Authentication Library (MSAL) . This library takes care of displaying the well-known "login browser popup". As a developer we do not have to worry about two-factor authentication, pin, etc. At the end, we get a token to use for all subsequent calls to Microsoft Graph.
Let's create a GoGraph method in the Startup class as follows:
   private async Task GoGraph()


   {


   #if UNITY_WSA && !UNITY_EDITOR


   // Get the authentication token using Microsoft.Identity.Client


   bool authenticated = false;


   PublicClientApplication client = new PublicClientApplication("<<YOUR_APP_ID>>"); // (1)


   AuthenticationResult authResult = null;


   IEnumerable<string> Scopes = new List<string> { "User.Read", "User.ReadBasic.All" }; // (2)


   try


   {


   authResult = await client.AcquireTokenAsync(Scopes);


   // Display some text like ($"UniqueId={authResult.UniqueId}, AccessToken={authResult.AccessToken}");


   authenticated = true;


   }


   catch (MsalException msaEx)


   {


   // Display some text like ($"Failed to acquire token: {msaEx.Message}");


   }


   catch (Exception ex)


   {


   // Display some text like ($"Failed to acquire token: {ex.Message}");


   }


   // To be continued...


   }


   #endif
(1)
<<YOUR_APP_ID>>
has to be replaced by the App Id you got from the Step 1 .
(2)
{ "User.Read", "User.ReadBasic.All" }
are the required permissions you will need to perform the Microsoft Graph calls. You will find theses permissions in the Graph APIs reference for each method. Here is an example for the List users method. 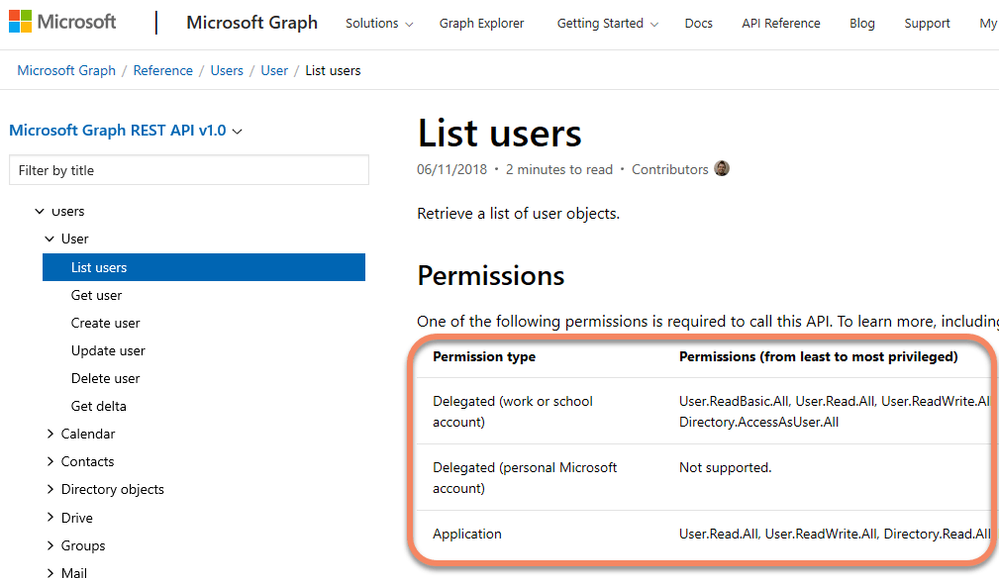
Let's use this GoGraph method In the Start method of the Startup class:
   public class Startup : MonoBehaviour


   {


   // Use this for initialization


   async void Start()


   {


   await GoGraph();


   }
Note: I will give you the needed
using
statements later in this article.
Step 4. ? Query Microsoft Graph
Once authenticated, we just have to provide the token for each call to the Microsoft Graph. This is done by using:
httpClient.DefaultRequestHeaders.Authorization = new AuthenticationHeaderValue("bearer", authResult.AccessToken);
.
The call I want to do here is the one missing from the a previous article - https://blogs.msdn.microsoft.com/appconsult/2018/10/05/call-remote-assist-from-your-hololens-app/ . That is to say: Search a person in the Azure Active Directory and get its Object ID in order to call him with Remote Assist from HoloLens. Please use the following code just after
// To be continued...
   if (authenticated)


   {


   // Query MS Graph using a HTTP GET


   string GraphUriAndQuery = @"https://graph.microsoft.com/v1.0/users?$filter=startswith(Displayname,'Marty')&$select=id";


   var uri = new System.Uri(GraphUriAndQuery);


   using (HttpClient httpClient = new HttpClient())


   {


   try


   {


   httpClient.DefaultRequestHeaders.Authorization =


   new AuthenticationHeaderValue("bearer", authResult.AccessToken); // <-- Authentication token got from the MSAL code


   string result = await httpClient.GetStringAsync(uri);


   Rootobject root = new Rootobject(); // JSON pasted as a class :-). See below


   MemoryStream ms = new MemoryStream(Encoding.UTF8.GetBytes(result));


   DataContractJsonSerializer ser = new DataContractJsonSerializer(root.GetType());


   root = ser.ReadObject(ms) as Rootobject;


   // Display some text like ($"id={root.value[0].id}"); // root.value[0].id is the Object ID of the first person found


   }


   catch (Exception ex)


   {


   // Display some text like ($"Failed to query MS Graph: {ex.Message}");


   }


   }


   }
You noticed that this code uses a class named
Rootobject
. It represents the object(s) we will received from the Graph call. This class can be easely created by using the nice Visual Studio Feature called Paste JSON as Classes . You just have to test the Graph API in the Graph Explorer , copy (to the clipboard) the resulting JSON and go back to Visual Studio: Edit menu / Paste Special / Paste JSON As Classes . Here is a demo: 
For the Graph call done today, the classes are the following. You can add them in the Startup.cs file just after the Startup class:
   public class Rootobject


   {


   public string odatacontext { get; set; }


   public Value[] value { get; set; }


   }


   public class Value


   {


   public string id { get; set; }


   }
Finally, as promised, the
using
statements required are:
   using System.Collections;


   using System.Collections.Generic;


   using System.Threading.Tasks;


   using UnityEngine;


   using System;


   #if UNITY_WSA && !UNITY_EDITOR


   using System.Net.Http;


   using System.Net.Http.Headers;


   using System.IO;


   using System.Runtime.Serialization.Json;


   using System.Text;


   using Microsoft.Identity.Client;


   #endif
The sample code ?
As usual, you will find the sample code on GitHub - https://github.com/Microsoft/Windows-AppConsult-Samples-MixedReality/tree/master/MixedReality-MSGraph .
Here is extracted the full code you will need for the Startup.cs script:
   using System.Collections;


   using System.Collections.Generic;


   using System.Threading.Tasks;


   using UnityEngine;


   using System;


   #if UNITY_WSA && !UNITY_EDITOR


   using System.Net.Http;


   using System.Net.Http.Headers;


   using System.IO;


   using System.Runtime.Serialization.Json;


   using System.Text;


   using Microsoft.Identity.Client;


   #endif


   public class Startup : MonoBehaviour


   {


   // Use this for initialization


   async void Start()


   {


   await GoGraph();


   }


   private async Task GoGraph()


   {


   #if UNITY_WSA && !UNITY_EDITOR


   // Get the authentication token using Microsoft.Identity.Client


   bool authenticated = false;


   PublicClientApplication client = new PublicClientApplication("06644049-fd27-4366-9dfb-c9f1bd99d35a");


   AuthenticationResult authResult = null;


   IEnumerable<string> Scopes = new List<string> { "User.Read", "User.ReadBasic.All" };


   try


   {


   authResult = await client.AcquireTokenAsync(Scopes);


   // FOVFeedback.instance.ModifyText($"UniqueId={authResult.UniqueId}, AccessToken={authResult.AccessToken}");


   authenticated = true;


   }


   catch (MsalException msaEx)


   {


   FOVFeedback.instance.ModifyText($"Failed to acquire token: {msaEx.Message}");


   }


   catch (Exception ex)


   {


   FOVFeedback.instance.ModifyText($"Failed to acquire token: {ex.Message}");


   }


   if (authenticated)


   {


   // Query MS Graph using a HTTP GET


   string GraphUriAndQuery = @"https://graph.microsoft.com/v1.0/users?$filter=startswith(Displayname,'Marty')&$select=id";


   var uri = new System.Uri(GraphUriAndQuery);


   using (HttpClient httpClient = new HttpClient())


   {


   try


   {


   httpClient.DefaultRequestHeaders.Authorization =


   new AuthenticationHeaderValue("bearer", authResult.AccessToken);


   string result = await httpClient.GetStringAsync(uri);


   Rootobject root = new Rootobject();


   MemoryStream ms = new MemoryStream(Encoding.UTF8.GetBytes(result));


   DataContractJsonSerializer ser = new DataContractJsonSerializer(root.GetType());


   root = ser.ReadObject(ms) as Rootobject;


   FOVFeedback.instance.ModifyText($"id={root.value[0].id}");


   }


   catch (Exception ex)


   {


   FOVFeedback.instance.ModifyText($"Failed to query MS Graph: {ex.Message}");


   }


   }


   }


   #else


   FOVFeedback.instance.ModifyText(":-( The app does not work in the Editor");


   #endif


   }


   }


   public class Rootobject


   {


   public string odatacontext { get; set; }


   public Value[] value { get; set; }


   }


   public class Value


   {


   public string id { get; set; }


   }
Note: This code uses FOVFeedback.instance.ModifyText() which is in the repo. Do not hesitate to replace with
Debug.Log()
if you create the sample from scratch.
Conclusion
This is really a trivial sample querying for the Object ID of an user in the Azure Active Directory ; but you have now the base Unity/Visual Studio project to do everything you want ?? with Microsoft Graph in HoloLens and Mixed Reality! Just use the Graph Explorer and update the HTTP call + the JSON classes.
Remember that, because the Microsoft Graph can be used by any code and any platform, you can get great insights and data in you Mixed Reality Apps! It is now your turn ?
Bye,
@sbovo for the ? ? Windows AppConsult team.
--
References
- 30 Days of Microsoft Graph - https://developer.microsoft.com/en-us/graph/blogs/announcing-30-days-of-microsoft-graph-blog-series
- Build UWP apps with Microsoft Graph - https://docs.microsoft.com/en-us/graph/training/uwp-tutorial
- Graph Explorer - https://developer.microsoft.com/en-us/graph/graph-explorer
- Microsoft Graph and HoloLens: Authentication - https://blogs.msdn.microsoft.com/appconsult/2018/04/12/microsoft-graph-and-hololens-authentication/
- Graph APIs reference - https://docs.microsoft.com/en-us/graph/api/overview?view=graph-rest-1.0
- How to: Serialize and Deserialize JSON Data https://docs.microsoft.com/en-us/dotnet/framework/wcf/feature-details/how-to-serialize-and-deserialize-json-data