This post has been republished via RSS; it originally appeared at: New blog articles in Microsoft Tech Community.
Procedure
The purpose of this guide is to provide the steps needed to deploy a 2-node Windows Server Failover Cluster (WSFC) hosting a clustered instance of SQL Server 2019. A 3rd Windows server running on a separate subnet will also be deployed to host a standalone instance of SQL Server. An availability group will be created between the clustered instance of SQL Server and the standalone instance of SQL Server spanning two subnets. For simplicity, this guide uses default instances of SQL Server and default ports for connectivity.
Create a Windows Server Failover Cluster
The first step is to create a Windows Server Failover Cluster (WSFC). Think of this as the container for you clustered instance of SQL Server.
Complete the steps in this document up to and including the section “Create the failover cluster” https://docs.microsoft.com/en-us/windows-server/failover-clustering/create-failover-cluster.
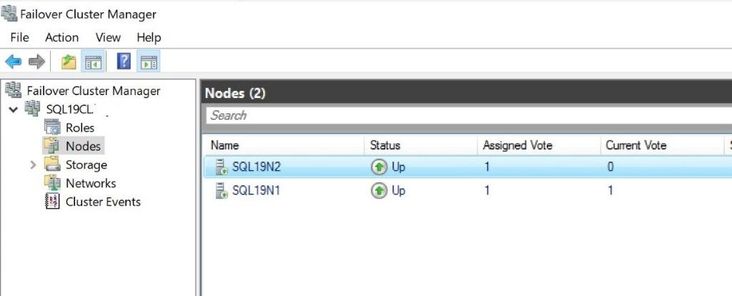
When you’re done, you should have something that looks like this on the Nodes page in Failover Cluster Manager (FCM):
Install a Clustered Instance of SQL Server
Once you have a WSFC, you can now deploy the clustered instance of SQL (SQL FCI) into the WSFC.
Follow the steps here: https://docs.microsoft.com/en-us/sql/sql-server/failover-clusters/install/sql-server-failover-cluster-installation?view=sql-server-ver15#-failover-cluster-installation-options
On step 30, you’ll finish with Node 2 of the SQL FCI. Do not perform this step on the 3rd server that will host the AG.
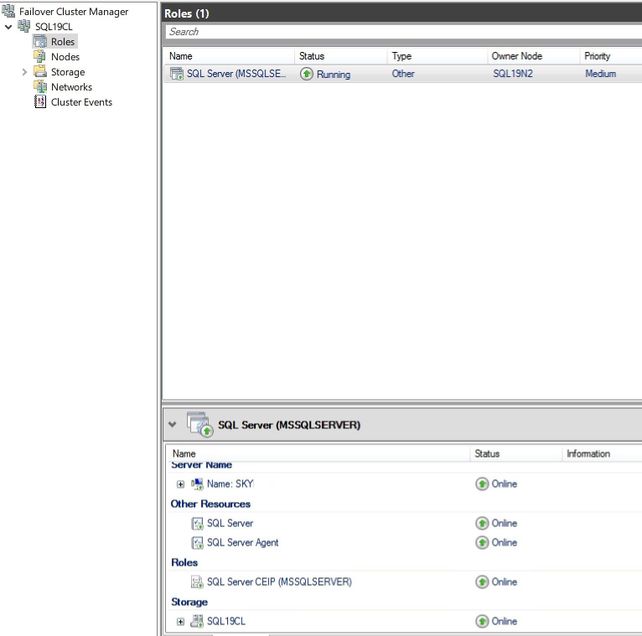
You should now have something that looks like this under the Roles page in the FCM:
Add the Third Node
The next step is to add the tertiary server.
If you haven’t already, deploy a Windows Server in your DR subnet.
Install a standalone instance of SQL Server onto Node 3. A default instance name is easiest to work with.
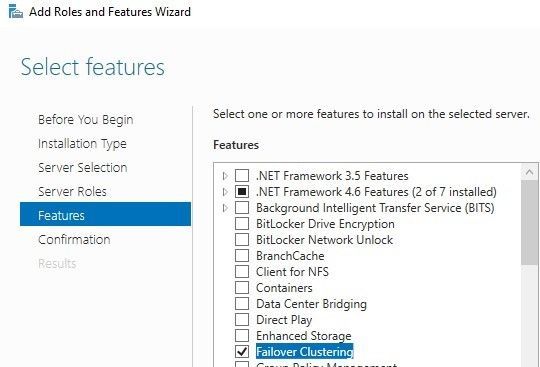
Install the Failover Clustering feature.
Next
1. Verify network connectivity from Node 3 to both Nodes 1 and 2.
2. Verify network connectivity from Nodes 1 and 2 to Node 3.
3. Connect to the cluster you built in step 1 using the FCM on Node 3.
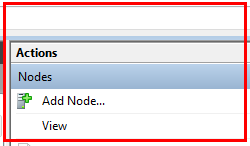
Now, use the Add Node wizard in the Actions pane of the FCM.
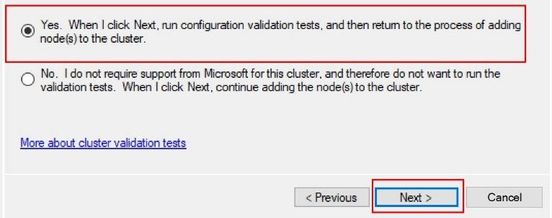
Validate node and perform all tests.
Upon completion of the wizard, your node 3 should now be part of the cluster.
Configure Always On High Availability
Before continuing, ensure the following TCP ports are open (in both directions) between the clustered instance of SQL Server and the standalone instance of SQL Server
TCP 1433, for the default instance or the port(s) in use for named instances.
TCP 5022, for the default Availability Group endpoint port.
TCP 1433, or other custom port for the Listener port.
UDP 1434, for interaction with the SQL Browser service
Now it’s time to configure Always On High Availability.
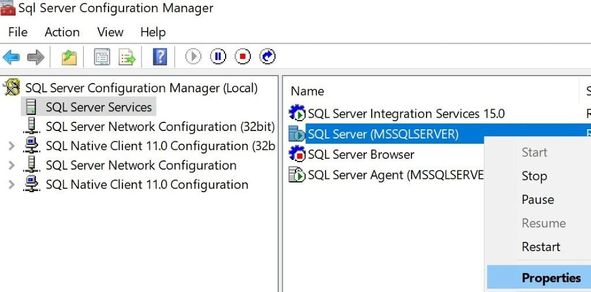
From the clustered instance of SQL Server, open the SQL Server Configuration Manager and right-click > properties of the SQL Server service:
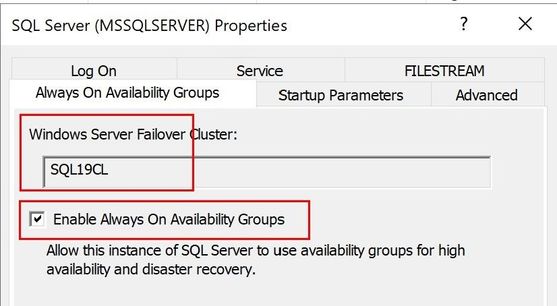
Next, click on the Always On Availability Groups tab. Confirm the WSFC value is correct and check the Enable Always On Availability Groups check box. This requires SQL Server to recycle.
Recycle the clustered instance of SQL Server using the FCM using stop/start role as shown:
Follow steps a and b above on the DR node using the SQL Server Configuration Manager to recycle the SQL Server service this time.
Create the Availability Group
Before you begin, run the following commands on both instances to enable permissions for the systems to manage availability groups:
Starting with the clustered instance of SQL Server, create an empty database – the name is arbitrary.
Ensure the database is in full-recovery mode.
Create a full backup of the database.
Create a transaction log backup of the database that is appended to the full backup.
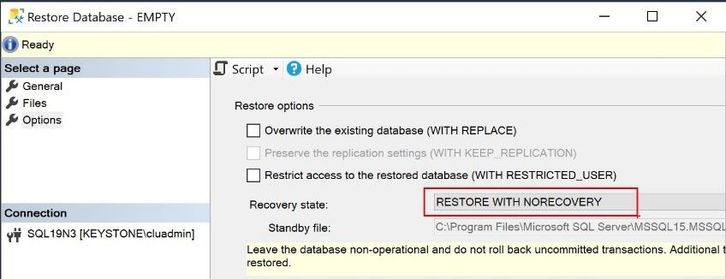
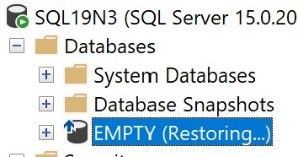
Copy your backup file to the DR node and restore the backup With No Recovery leaving the database in a restoring state.
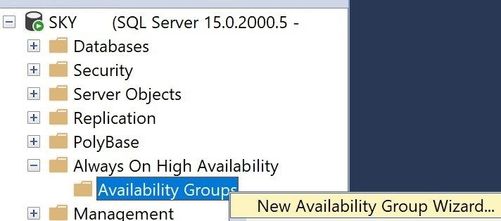
Return to the clustered instance of SQL Server and start the new Availability Group Wizard.
Provide a meaningful name for your availability group.
Select the database. Meets prerequisites should be displayed under the Status field.
Click the Add Replica button and add in your DR node. Leave the Availability Mode as Asynchronous commit. Whether you use a Readable Secondary is up to you. Click Next. We’ll create the Listener in a later step.
Select Join Only for your data synchronization option and click Next.
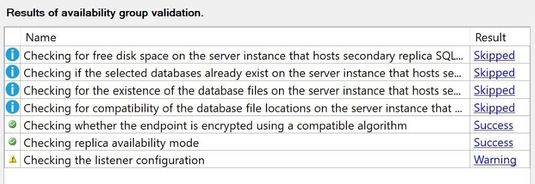
Review the validation tests and resolve any errors. You can ignore the listener warning.
Review the summary screen, script out if you like, and click Finish.
The wizard should complete successfully:
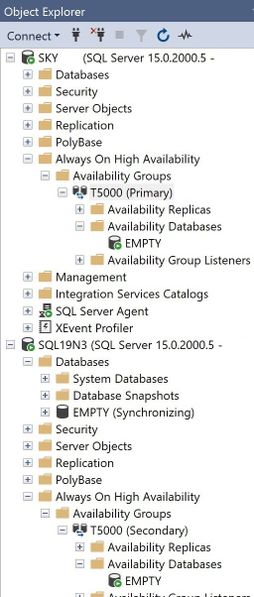
Connect your object explorer in SSMS to both instances. Review the availability group and the availability database. Your clustered instance of SQL Server should be the Primary and the DR node should be Secondary.
You can also launch the availability group dashboard to review the health of your AG:
From the dashboard, everything should be green and healthy:
Create the Listener
With the availability group created and healthy, it’s now time to create the listener.
Most likely it will be necessary to stage the listener objects in Active Directory and DNS. Perform the following tasks:
In active directory, create a computer object with the name of the listener you would like. Grant Full Control permissions to the computer object for the Cluster computer object (SQL19CL in this example) and the standalone SQL Server (SQL19N3 in this example). The computer object should be created in the same container as the rest of the computer objects created during this exercise:
Next, you’ll need to stage the Host (A) records in DNS. Create a Host (A) record for the listener in each subnet, one for the clustered instance of SQL Server, and one for the standalone instance of SQL Server. Grant full control to the entries for the failover cluster and standalone SQL Server similar to what you did in the previous step:
Back on the primary node of the clustered instance of SQL Server, run the following to refresh your DNS resolver cache:
ipconfig /flushdns
Use ping <host>, to ensure the host entries resolve properly.
Perform the task on the standalone SQL Server.
From the primary in object explorer, right-click on the Availability Group Listeners folder and select Add Listener…
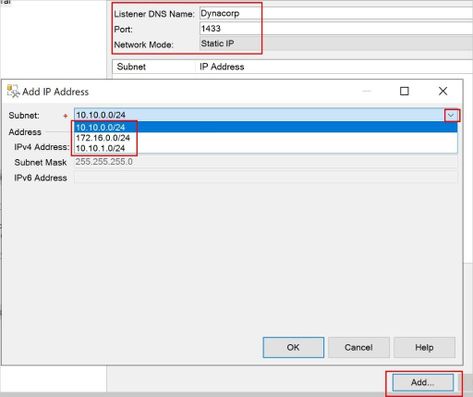
Enter the DNS name for your listener. Choose a port to access the listener on. Then change the Network Mode from DHCP to Static IP. Click the Add… button and then add the two IP addresses, 1 for the network your clustered instance of SQL Server is on and one for the network your standalone instance of SQL Server is on. These are the IP addresses you configured in step 1b.
When you're finished, click OK to create the listener
Your listener should now be present in object explorer under the Availability Group Listeners folder.
You should also be able to connect to the listener from object explorer. Running select @@servername should return the name of the clustered instance of SQL Server.
FCM Review
At this point, you’ve verified everything from the SQL Server perspective. Navigate back to the Failover Cluster Manager and let’s see what’s happened.
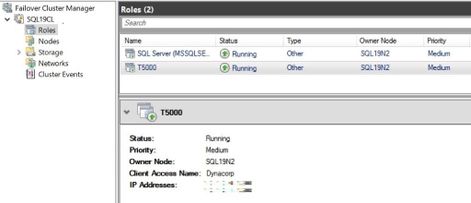
From the FCM, navigate to your cluster > Roles. You should see your clustered instance of SQL Server as 1 role. You should also see your availability group as a second role. Select the availability group role and notice the information in the summary tab. You’ll see the current owner, the Client Access Name which is your listener and the IP addresses for it:
Performing a Failover
The configuration does not allow for automatic failover. You are able to configure either Synchronous or Asynchronous Availability Modes. In general, Asynchronous commit mode should be suitable for your DR node; however, depending on network latency and other needs such as reporting, you may want to enable Synchronous commit mode. Understand the implications prior to deciding to run with either commit mode.
While in Asynchronous commit mode, only forced failovers are possible. This can make testing difficult due to the need to re-seed the availability group to return to ‘normal’. It this situation, and again if your network latency permits, switch the commit mode to Synchronous mode prior to a failover test as shown below.
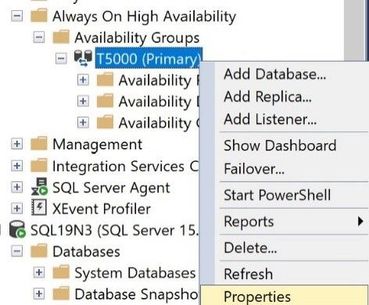
Connect to the primary using object explorer. Navigate to the availability group and right-click > properties.
Change the Availability Mode to Synchronous commit and click OK.
Notice that in the availability group dashboard the synchronization state should have changed from Synchronizing to Synchronized. Depending on how far behind the secondary replica is, this might take a moment.
Once you’ve transitioned into the Synchronizing state from the Secondary, launch the failover wizard:
Review the messages and confirm No Data Loss under the Failover Readiness field. Click Next.
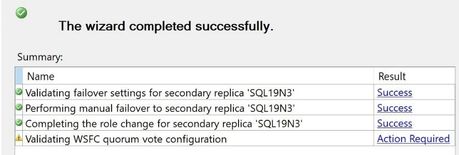
Review the Summary and click Finish. Confirm Success. Click Close.
From object explorer, run your select @@servername statement again using your listener connection and notice that you’re now connected to the DR node.
Repeat steps 4 and 5 to return the availability group back to the clustered instance of SQL Server.
Once you’ve failed back, change the commit mode back to Asynchronous, if desired/necessary.
At this point, it’s important to note that failovers of the Availability Group should only be performed via the SSMS Object Explorer. Failovers of the clustered instance of SQL Server should only be performed using the Failover Cluster Manager. A failover of the clustered instance of SQL Server simply changes ownership of the clustered instance of SQL Server from one node to the other and does not change the primary/secondary configuration of the availability group.
Addendums
Some customer environments may make it necessary to adjust the NodeWeight of the DR Node (eliminate voting rights in the WSFC). This may be necessary if you encounter situations where the FCI on Nodes 1 and 2 are unexpectedly failing over.
Adjust Quorum Vote
Here we’re adjusting the vote for the DR node because we do not want it to be able to cause a failover of the clustered instance of SQL Server.
Next, change the quorum node weight for Node 3.
From an administrative PowerShell prompt run the following commands:
You should get some output that looks like this. Notice that your DR node has a weight of 1. We want to change this to 0 to remove it’s ability to failover the cluster.
Continue by running the following commands:
You should now see that Node 3 has a weight of 0 as shown below:
This will also be reflected in the FCM as shown here:
Multi-subnet Failover
In the event of needing to failover your availability group you’ll want to make some configuration changes to support the infrastructure you’ve just set up. In an Always On environment where one or more secondary replicas are on a separate subnet, a DNS (A) record will exist for the listener on each subnet. For the cluster to initialize the listener on the secondary subnet after a failover both the cluster and client application need to be configured correctly to utilize the multi-subnet.
Verify Current Configuration
Login to one of the nodes in your cluster and open PowerShell as an administrator and run the following commands one at a time:
Identify the listener name as shown below:
Next, get the HostRecordTTL value. This will show how long the listener name will be cached in DNS, in seconds.
Change the Configuration
Depending on the results of steps 1 and 2 above, you may need to change either value. If you’re persisting both DNS records and client connections strings are using “MultiSubnetFailover=True” then you’ll need to set the value of RegisterAllProvidersIP to 1. Conversely, if you have clients connecting using ADO.NET with .NET 3.5SP1 or SNAC11, you may need to set the RegisterAllProvidersIP value to 0. See references below for more information. In some cases, if your TTL is too high, clients won’t refresh their DNS cache soon enough and may have connection problems after a failover.
Change the RegisterAllProvidersIP value to 1:
References
Clustered SQL Server: https://docs.microsoft.com/en-us/sql/sql-server/failover-clusters/install/sql-server-failover-cluster-installation?view=sql-server-ver15
Create a Failover Cluster: https://docs.microsoft.com/en-us/windows-server/failover-clustering/create-failover-cluster
Availability Commit Modes: https://docs.microsoft.com/en-us/sql/database-engine/availability-groups/windows/availability-modes-always-on-availability-groups?view=sql-server-ver15
Always On Availability Groups: https://docs.microsoft.com/en-us/sql/database-engine/availability-groups/windows/overview-of-always-on-availability-groups-sql-server?view=sql-server-ver15
WSFC with SQL Server and Availability Groups: https://docs.microsoft.com/en-us/sql/sql-server/failover-clusters/windows/windows-server-failover-clustering-wsfc-with-sql-server?view=sql-server-ver15
SQL Server Multi-SubNet Clustering: https://docs.microsoft.com/en-us/sql/sql-server/failover-clusters/windows/sql-server-multi-subnet-clustering-sql-server?view=sql-server-ver15
Configure and Manage Quorum: https://docs.microsoft.com/en-us/windows-server/failover-clustering/manage-cluster-quorum
Configure Cluster Quorum NodeWeight: https://docs.microsoft.com/en-us/sql/sql-server/failover-clusters/windows/configure-cluster-quorum-nodeweight-settings?view=sql-server-ver15
Multi-Subnet Failover: https://docs.microsoft.com/en-us/sql/database-engine/availability-groups/windows/create-or-configure-an-availability-group-listener-sql-server?view=sql-server-ver15#MultiSubnetFailover

