This post has been republished via RSS; it originally appeared at: New blog articles in Microsoft Tech Community.
In part 1, we have learned how to manually migrate a classic Cloud Service to Cloud Service Extended Support by recreating a new CSES(Cloud Service Extended Support) resource and redeploy the modified project. The manual way actually offers user more flexibility, but it will also consume more time.
For this reason, Azure Cloud Service Extended Support officially offers a feature called In-place migration and this will do almost everything for users to migrate from a classic Cloud Service to CSES except the code change in your local project. In this part, we will focus on the feature how the in-place migration will be done and what this feature can do.
The main advantage of in-place migration compared to manual migration
Before how to do the in-place migration, let us highlight the main advantage:
- The only operation which user needs to do is to send multiple requests / to run some commands in PowerShell / to click some buttons in Azure Portal. It will be much easier than the manual migration process.
- If the original classic Cloud Service is using some certificates, for example HTTPS enabled, all the certificates will be saved in a new Key Vault and configured automatically.
- If the original classic Cloud Service is using classic reserved IP address to keep the IP address static, it will also be automatically migrated to ARM public IP address.
- The original domain name {csname}.cloudapp.net will be kept.
- All the extensions which are both supported by classic Cloud Service and CSES will be automatically migrated and enabled, for example the RDP extension.
Before you begin
There will be some additional points to do before we start the migration. Please have a check of following points carefully since it may cause unexpected issue if they are not matched:
1. Follow the “Before you begin” part of the document to make sure if you are an administrator/coadministrator of the subscription and if the resource providers Microsoft.ClassicInfrastructureMigrate, Microsoft.Compute, Microsoft.Network and Microsoft.Storage are already registered.

2. We should have a running classic Cloud Service. Please take care: If your classic Cloud Service was deployed before 2017 without classic Virtual Network setting and the deployment was never deleted, please kindly delete the current deployment and redeploy it. Otherwise, the in-place migration progress will be failed.
Then, let us move on the main process.
Original resource status:
Since the process of this in-place migration is quite simple and the way is already explained clearly in official document for Portal and for PowerShell, in this blog I’ll use Azure Portal as example and mainly focus on providing you information about what it maximumly can do and what change there will be. Some of the resources in this blog may be unnecessary for your project, I’ll point it out later with keyword optional.
Resources overview:
- Classic Cloud Service: csbeforemigration

- (optional) Classic Reserved IP: classiccsreservedip

- (optional) Classic Virtual Network: classiccsvnet

(optional) A subnet in Classic Virtual Network: classiccssubnet

- (optional) Classic Network Security Group: classiccsnsg

It can be linked to the subnet when we create subnet in Classic Virtual Network manually in Azure Portal.

(optional) An inbound security rule in Classic NSG: addedbeforemigration

- Resource Group: csbeforemigrationrg

Setting of classic Cloud Service:
- The role and instance:

- The .cscfg setting:

- (optional) The certificate:

- (optional) The extension:

- (optional) The RDP:

In-place migration process:
The in-place migration process can mainly be split into three steps: validate, prepare and commit. Please check following steps to see how it works.
- In Azure Portal, find the classic Cloud Service which we need to migrate. On the left side, switch to Migrate to ARM page.

If you cannot see the Validate button, please click on the Refresh migration state button of the migration page but not the one of your browser, then the Validate button should appear.

- Click Validate. If there is anything wrong blocked the operation, for example, the .cscfg setting missing InstanceAddress setting will block the Validate step, the detail part will show you the issue and we need to fix the issue at first then come back to this page.


- Once the validation is passed, we can click on Prepare button
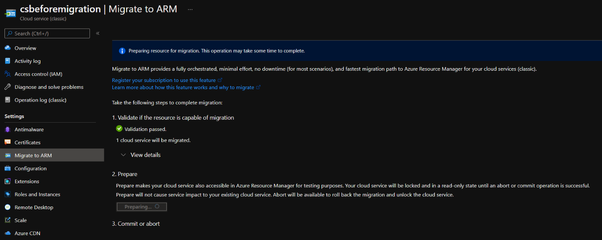
If everything is good, you’ll see the result such as:

- Keep the current page and open another Azure Portal page in your browser. Look for a resource group called {classic cloud service name}-Migrated. In this blog, it’s called csbeforemigration-Migrated. In that resource group, you should be able to find following resources:

| One Cloud Service Extended Support |
| One public IP address |
| One Load Balancer |
| One Key Vault (Only if your classic Cloud Service is with any certificate) |
Please check the above resources for following points. If anyone of these is not matching, please stop here and raise a support ticket to Azure support for help.
1. Whether the new public IP address is having the same URL as your classic Cloud Service and IP address as your classic reserved IP if you use.

2. Whether all the certificates are saved in the Key Vault secret part.
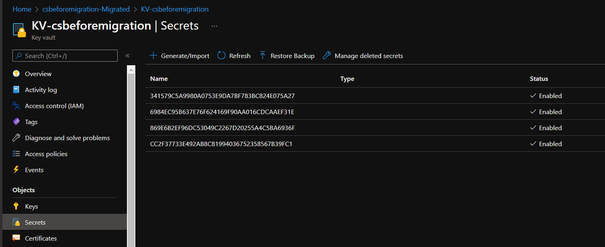
To check this, you may get authorization failure as following:

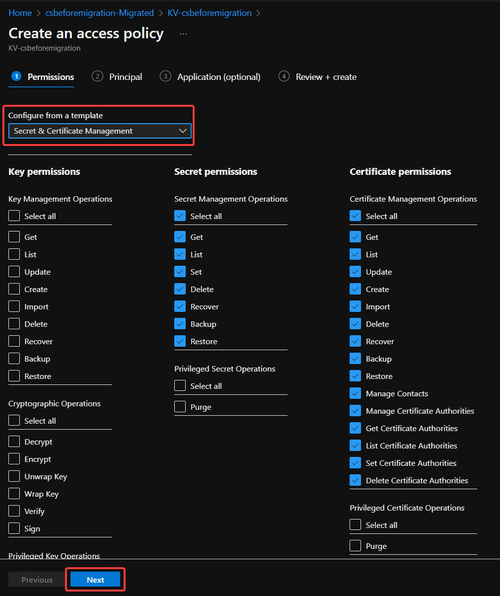
Please follow these steps to add an access policy to make yourself able to list certificates and secrets part.
a. From Key Vault, click on Access policies and create button

b. Select the corresponding permission that you need. If only for checking certificate part, we can simply select the Secret & Certificate Management template click Next.
c. Type in the email address of the account signed in and select it. Please make sure your account is in the selected item shown at bottom side.
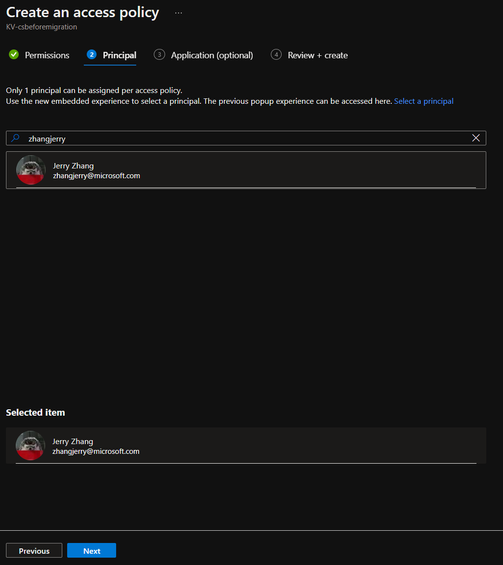
d. Skip the Application step and click Create.

- Once the above information is checked, we can click on Commit button.
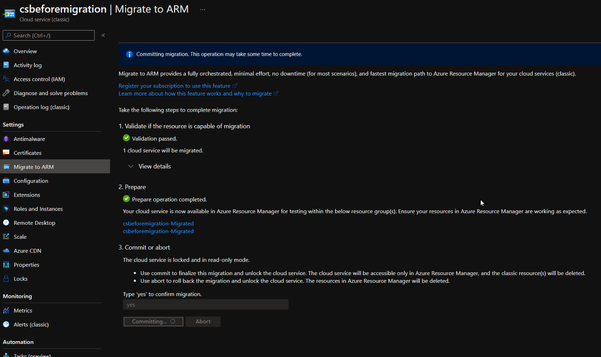
- Once the migration is done, there will be a notification in Azure Portal.

Result:
Overview of all resources
Main resource group and resources:

The name of the resources will be in following format:
- New resource group: {classic Cloud Service name}-Migrated
- New CSES: {classic Cloud Service name}
- New Public IP: Group-{original resource group name}-{original classic Reserved IP name}
- (optional) New Key Vault: KV-{classic Cloud Service name}
- New Load Balancer: LB-{classic Cloud Service name}
P.S. If the classic Cloud Service is without classic Reserved IP address, a new public IP address will be created in the same resource group after in-place migration but the naming format will be IP-{classic Cloud Service name}.
Then about Virtual Network and Network Security Group, it is more complicated. Please check following description and match your own situation:
- If the classic Cloud Service is originally using classic Virtual Network and classic Network Security Group, we’ll be able to find another resource group with name Group-{original resource group name}-{classic Virtual Network name}-Migrated and the new Virtual Network and NSG can be found here.

The name of these two resources will be in following format:
1. New Virtual Network: Group-{original resource group name}-{classic Virtual Network name}
2. New Network Security Group: Group-{original resource group name}-{classic Network Security Group name}
The subnet created in classic Virtual Network, the link between this subnet and classic NSG and the manually created security rule in classic NSG will all be migrated.


- If originally there is only classic Virtual Network but not classic NSG, then after migration, only the Virtual Network resource will be migrated. The new Virtual Network will be in a resource group with name Group-{original resource group name}-{classic Virtual Network name}-Migrated.
The naming format of Virtual Network will be the same: Group-{original resource group name}-{classic Virtual Network name}.
The subnet created in classic Virtual Network will also be migrated.
- If originally the classic Cloud Service doesn’t use any Virtual Network, a new Virtual Network will be automatically created for you. The naming format will be: VNet-{classic Cloud Service name} and it will in the same resource group as CSES resource.
Setting in the CSES:
- The usage of the classic reserved IP address will also be migrated

- All the supported extensions are also migrated as well

- The RDP setting will also be migrated but sometimes the username might be in wrong format. We can simply delete this and add another RDP setting instead.

- Although it’s empty in the Certificates page, the usage of the certificate is still migrated as well. The reason why we cannot see certificate here is because during in-place migration, under current design, all the certificates will be uploaded into Secrets part of the Key Vault. But during normal use of CSES, it’s recommended to upload certificate into Certificates part. This difference caused the certificates invisible from CSES Certificates page.

After migration and possible error
Once the in-place migration is successful, please remember to check the new configuration .cscfg from Azure Portal and use this configuration to replace your original .cscfg configuration of project in your local environment.
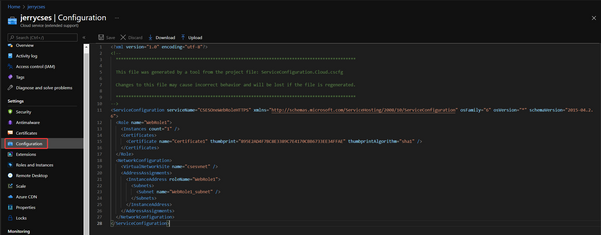
There are also some common errors which users may get. Please kindly check our official document about the prerequisites for deployment and common errors and known issues.
According to the official document, the classic Cloud Service will be retired on 31st August 2024. Every user is required to migrate their deployment from classic Cloud Service to other services and the Cloud Service Extended Support is a good choice for most of users. The in-place migration is the officially recommended way for this purpose and will make everyone easy to start using CSES.
