This post has been republished via RSS; it originally appeared at: New blog articles in Microsoft Community Hub.
Introduction
The SQL injection attack (SQLI) remains one of the most critical attack in OWASP Top 10 and it consists of injection of a SQL query via the input data from a client to the web application.
Azure Web Application Firewall (Azure WAF) detects SQLI attacks and applies block mitigations by default. In certain instances, this could be a false positive that requires investigation and creation of Azure WAF exclusions. In order to complete a successful investigation, full context about the attack is needed and a process that guides you through the investigation is required. Such a guided investigation process is automated in this Microsoft Sentinel Notebook and allows you to tune Azure WAF policy with minimal user interaction.
This Notebook analyzes SQL injection attacks on Azure WAF integrated with Azure Front Door premium and implements automated exclusions using Azure WAF APIs.
This notebook can be found here and will be explained in detail in this blog.
This Notebook is built using Microsoft Threat Intelligence Center’s Python package MSTICpy.
Please note that all notebooks are on GitHub and under constant revision, so be aware that the Notebook you use might be slightly different from those described in blog posts.
Prerequisites
Azure Front Door premium log ingestion setup
Azure WAF with Azure Front door premium generates detailed logging for each request and logging is integrated with Azure Diagnostics. Make sure Diagnostic settings are configured to send logs to Azure Log Analytics workspace.
Setting up Azure WAF data connector in Sentinel
Go to Microsoft Sentinel and select the workspace which was configured earlier and select Data Connectors in the left side panel. Search for Azure web application firewall and select Azure web Application Firewall (WAF). Select Open connector page on the bottom right.
Setting up Sentinel WAF SQL injection incidents
Microsoft Sentinel incidents for WAF SQL injection attacks are prerequisite to run this notebook. Microsoft Sentinel incidents should be created using Microsoft Sentinel analytic rules. This notebook can execute on any Sentinel analytic rule that uses Azure Diagnostic table log and uses the log category of “FrontDoorWebApplicationFirewallLog” and analytic rule properties contains “SQLI” or "SQL Injection".
You can create a custom SQLI analytic rule that detects SQLI attacks by leveraging Azure WAF generated events, or you can also use out-of-box SQLI analytic rule detection templates.
- For more information on creating your own custom rule, see this link.
- For more information on using Azure WAF out-of-box SQL injection analytic rule, see https://techcommunity.microsoft.com/t5/azure-network-security-blog/automated-detection-and-response-for-azure-waf-with-sentinel/ba-p/3692525
For the out-of-box Azure WAF SQL injection analytic rule, do not turn on the playbook automation rule when enabling this out-of-box rule and just refer to the “SQLi and XSS WAF Detection templates” section. Choose the “Front Door Premium WAF – SQLI Detection” rule.
Setting Up Jupyter Notebooks
This notebook is available to launch directly in Azure Machine Learning Studio (AML). You may use the steps below to launch. For more information on AML, see this link.
- From the Microsoft Sentinel portal, navigate to the Threat Management section and open the Notebooks blade.
- Go to the Templates tab.
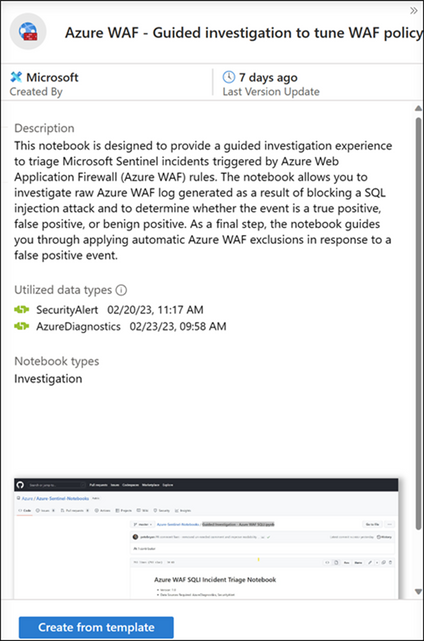
- Search for and select Azure WAF – Guided investigation to tune WAF policy.
4. On the right panel, select Create from template. You can rename the selected notebook or keep the default name and save it to a default AML workspace. Then select OK.
5. The notebook is now accessible to your AML workspace. From the same panel, select Launch notebook. You will be prompted to log into the AML workspace.
6. At this point, make sure you fill out the msticpyconfig.yaml file found in the Microsoft Sentinel Notebooks folder. Please ensure this yaml file is in the same folder as the Notebook. See the MSTICpy documentation for more information.
An example msticpyconfig.yaml is as follows:
AzureSentinel:
Workspaces:
Default:
# An entry named "Default" allows authentication without
# having to specify a workspace name
WorkspaceId: "52b1ab41-869e-4138-9e40-2a4457f09bf3"
TenantId: "72f988bf-86f1-41af-91ab-2d7cd011db49"
SubscriptionId: "cd928da3-dcde-42a3-aad7-d2a1268c2f48"
ResourceGroup: ABC
WorkspaceName: Workspace1
- Select a compute instance for your Notebook server.
- Select the Python 3.8 – Azure ML instance.
Running the Notebook
Restart Kernel and clear outputs
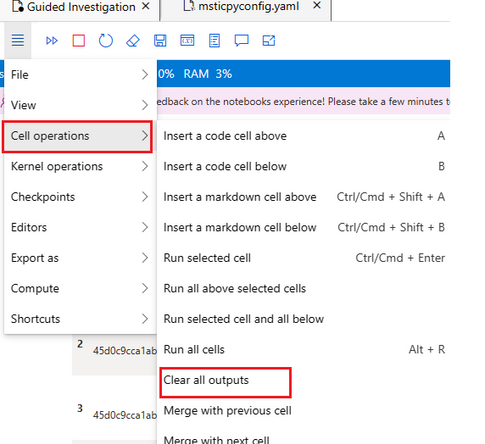
Follow the instructions in the FAQ to restart kernel and clear outputs.
Notebook initialization
The top of the notebook describes its purpose: Triage Microsoft Sentinel incidents triggered due to SQL injection from Azure WAF integrated with Azure Front Door Premium.
The following lines of code should be part of the first cell in the Notebook. This cell needs to be run just one time when running the notebook for the first time. You can add a cell by using the + operator at the top of the Notebook.
To run the code cell, just press the “Run cell” arrow button that is present to the left of each code cell.
Running the first set of cells the environment will install MSTICpy, load the config of the workspace and set up user customizable parameters.
If you are unfamiliar with using a Jupyter notebook, you may want to take a look at the Getting Started with Microsoft Sentinel Notebooks and Get started with Jupyter Notebooks and MSTICpy in Microsoft Sentinel first. These guides will help you through the basics of Jupyter Notebook features and shortcuts, as well as some configuration tips and uses of notebooks in threat hunting.
Authenticate to Microsoft Sentinel APIs and Select Subscriptions
The next set of cells will authenticate you with the Azure APIs and Microsoft Sentinel using MSTICpy’s data connector features. With this information, it will authenticate you with your Log Analytics workspace.
This authentication process has two parts: First one authenticates to the Azure CLI and second one authenticates to Kusto Client. The first time you use this notebook, both these authentication steps are needed. Select enter in the dialog box after the two authentications are successful.
Get SQLI incidents.
This cell looks for Microsoft Sentinel incidents triggered due to SQLI analytic rules. These analytic rules generate Microsoft Sentinel incidents. A drop-down option with a list of SQL incidents is provided. Select the incident you are interested in investigating.
Review details of the incident
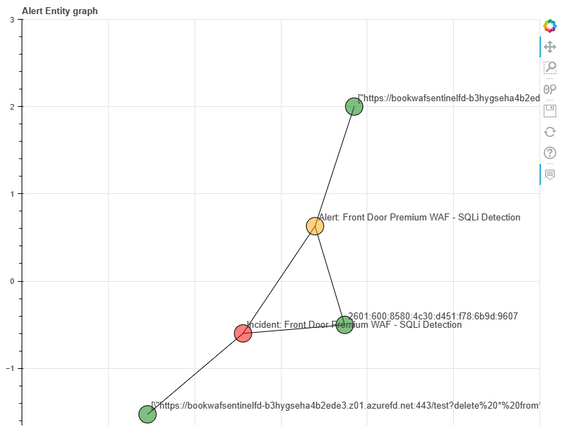
In this cell, you can understand core details of the incident selected including the severity, who it is assigned to and the status of the incident. You can understand the related Sentinel alerts associated with the incident and investigate the alert entity graph. Using the alert entity graph, you can pivot on the various entities like IP, domain, and URL entities. In case multiple alerts are aggregated for a specific incident, this graph would display the relationships of all alerts related to the incident. The entity timeline describes the time when the entity, alert and incident were triggered. Use the time range selector to select the time range to focus the investigation.
Review Threat Intelligence (TI) results
This cell looks up entities of the incident in Threat Intelligence feeds to determine if the entities are associated with malicious activity. If this cell finds any of the incident entities appearing in TI feeds as Indicators of Compromise (IoC), it provides a summary of results, and provides links to further details. The type of IoC, TI provider name, and severity of the IoC is presented to you.
Get raw events in incident time frame.
Microsoft Sentinel incidents can be composed of multiple events, running the next cell retrieves the raw Azure WAF events related to that incident and displays details provided in the WAF event. The result of this cell is a list of all WAF events related to the incident and prompts you to pick the specific event that you are interested in investigating.
Once an event is selected, this cell maps the Azure WAF SQLI rule present in the event to the OWASP Modsec GitHub repo to identify the rule logic that was triggered by the event. It then displays the OWASP rule details about the SQLI attack including the OWASP CRS version, OWSASP defined severity of attack and other OWASP specific details.
Review other events related to this rule.
By running this cell, you can associate the raw event selected in the previous cell with other related events in the pre-selected timeline. This cell provides a summary of the rule triggering the SQL injection attack and provides a historical graph of rule events grouped by malicious Request URI, client IP addresses and hostname.
Determine the incident status.
Please watch the attached video and it explains this section in detail.
Select the status of the incident via a drop-down menu. Based on the information in the previous step, you can decide if the incident is a true positive, false positive or benign positive. For proper investigation, all Azure WAF SQL injection incidents can be classified as follows:
- True Positive: A malicious SQL injection attack was detected by Azure WAF.
- False Positive: A false alarm, meaning the SQL injection attack didn’t happen.
- Benign Positive: An action detected by Azure WAF that is real, but not malicious, such as a penetration test or known activity generated by an approved application.
If you select true positive or benign positive, you will be directed to update the incident status and priority of the incident.
When you select false positive, you will be able to create exclusions using Azure WAF APIs.
The next set of cells perform the following functions:
- Retrieves existing WAF policy configuration by querying WAF APIs
- Determine the number of exclusions you want to apply.
- Define the exclusions you want to apply to the rule. More details about Azure Front WAF exclusions can be found here: https://learn.microsoft.com/en-us/azure/web-application-firewall/afds/waf-front-door-exclusion.
- The user defined exclusions are applied to the WAF policy.
Review Updated Exclusion Rules
This cell retrieves the latest WAF APIs rules, and you can validate the newly applied exclusion rules are as expected.
Update Incident
After the exclusions were defined and applied to WAF policy, you can update the incident with low severity and comment “Incident triaged in notebook, WAF policy updated with exclusions”.
Conclusion
As we have seen above, this notebook provides a rich guided investigation experience that helps you in analyzing Azure WAF triggered incidents in Microsoft Sentinel and automatically creating exclusions when a false positive is generated by Azure WAF.
FAQ
- What is best way to start a fresh run of Notebook with all outputs cleared?
Clear all outputs
2. How can you start a fresh run of all cells?
Restart kernel


