This post has been republished via RSS; it originally appeared at: New blog articles in Microsoft Community Hub.
Welcome to my first blog post on Azure DevOps. My name is Rachel Irabor. I'm a Microsoft learn student ambassador, Power Platform and Dynamics 365 Customer Engagement developer.
What is Azure DevOps
Azure DevOps is a set of tools for developers, project managers, and other contributors to work together on software development. It lets companies create and improve products more quickly than they could with older methods of software development. Azure DevOps has integrated features that you can access through your web browser or IDE client. You can use all of the services that come with Azure DevOps or just the ones you need to add to your current workflows.
In this blog post, I will show you how to create a new organisation in Azure DevOps and how to create a new repository in Azure DevOps. Both an Azure account and Azure subscription will be required to complete these steps. You can apply for the Azure for Student offering if you are a student to complete these steps.
The Step-by-Step process:
Step 1
- Login into Azure Portal.
- Go to the search bar and search for Azure DeveOps organization.
- Click on Azure DeveOps organization.
Step 2
- Scroll down and click on My Azure DeveOps organization.
- Next, it will ask you sign into your account. Sign into your account.
Step 3
- Click on Create new organization.
- Click on Continue.
Step 4
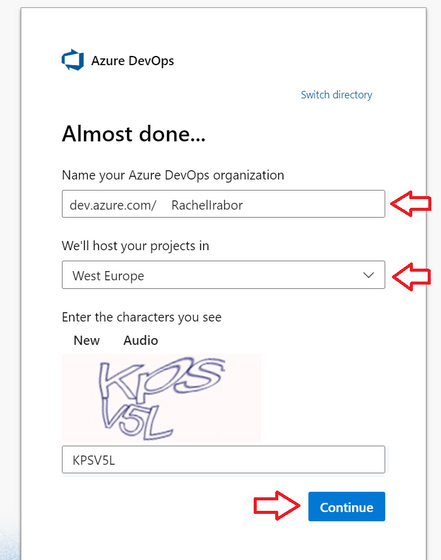
- Next, name your organization.
- Select the closest region to host your project.
- Click on Continue.
- Wait for it to load.
Create a new project
Step 5
- There is no opportunity to select Public for visibility. You can decide to leave the visibility on Private and then click on Create project.
- If your decision is to change the visibility to Public. To change the visibility to Public, click on organization policies.Then go to security policies and turn on Allow public projects. Click on Save. You can easily go back turn off allow public project.
- Reload the page. Now you can choose between Private or Public.
Step 6
- Give your project a name (a name that you can easily identify what the project is about.
- For visibility, select Private.
- Click on Create Project.
Create a new repository
Step 7
- Click on Repo.
Step 8
- Click on the plus sign at the left hand side of the screen.
Step 9
- Next click on new repository.
Step 10
- Repository type, select Git.
- Add the repository name.
- Next, select the Add a Readme.
- change Add a gitignore from none to VisualStudio.
Learning resources on Azure DeveOps
- Getting started with Azure DeveOps
- Create a new repo in your project
- Azure for students
- Create your first pipeline in Azure DeveOps


