
This post has been republished via RSS; it originally appeared at: Microsoft Tech Community - Latest Blogs - .
Power Platform is quite popular for "citizen developers" now and the demand retrieving data and APIs with Power Platform has been increased by the developers. Some major SaaS services have been published as reusable APIs, but most existing systems are not exposed as reusable APIs because such systems would have been developed as specific use cases.
Power Apps has offered "Custom Connectors" to retrieve external systems via Web APIs, so the citizen developers can leverage your systems. As first step, you should expose your systems as Web APIs for Power Apps usage if the systems might have not provided yet.

Citizen developers can develop various applications by leveraging existing systems if existing systems would have officially been published their systems as Web APIs. This will accelerate their businesses as Digital Transformation. This is a part of series posts
- No.1: Setup Power Apps "custom connectors" to simply call your Web APIs via API Management
- No.2: Enable Developer portal for API Management to expose your Web APIs as ecosystem
- No.3: Authentication and authorization with Azure AD
- No.4: Enterprise network usage
In most cases, it will be required to build up additional components when existing systems haven't offered usable APIs. IT departments should collaborate with citizen developers how to expose as Web API - specification, versioning, authentication, authorization, or others. This is different way from traditional usage, but this collaboration will offer much values with flexible activities across departments.
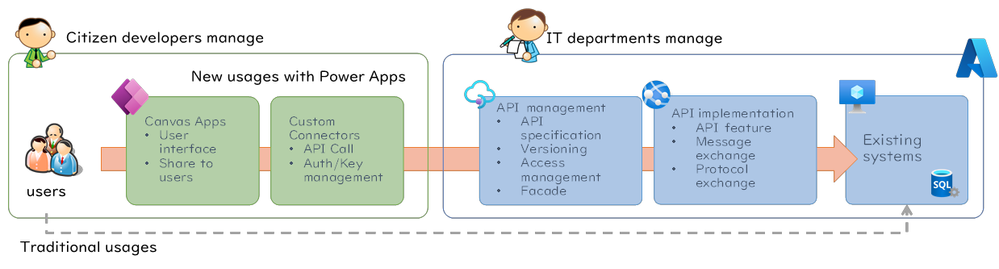
At the beginning, citizen developers and IT departments have to consent which features or data are required and specifications for Web APIs. It's hard to read or write JSON/YAML directly, so it should be easy to define such specifications if IT they will exchange such info as Swagger.
Microsoft Azure has offered API Management for this case. You can publish your Web API securely, monitor the usage or lots of benefit by using API Management. Refer to API Management overview article for the details. Through this post, you can expose your existing systems as Web APIs for Power Platform with API Management by following steps below.
- Publish your Web API on Azure App Service
- Configure your Web API on API Management
- Setup new custom connector on Power Platform Studio
- Leverage your Web API on Power Apps with custom connector
1. Publish your Web API on Azure App Service
Let me assume that we have already published a Web API on Azure App Service by enabling Swagger. It's quite easy to setup, because you just need to create a ASP.NET Core Web API project on Visual Studio. This article should be helpful to follow the steps.
https://docs.microsoft.com/en-us/aspnet/core/tutorials/first-web-api?view=aspnetcore-6.0&tabs=visual-studio
The template project enables Swagger on only development environments, so remove the syntax below, between 13 and 17 lines, in Program.cs when you would enable Swagger on your App Service env.
var builder = WebApplication.CreateBuilder(args);

// Add services to the container.

builder.Services.AddControllers();
// Learn more about configuring Swagger/OpenAPI at https://aka.ms/aspnetcore/swashbuckle
builder.Services.AddEndpointsApiExplorer();
builder.Services.AddSwaggerGen();

var app = builder.Build();

// Configure the HTTP request pipeline.
if (app.Environment.IsDevelopment())
{
    app.UseSwagger();
    app.UseSwaggerUI();
}

app.UseHttpsRedirection();

app.UseAuthorization();

app.MapControllers();

app.Run();
Access swagger URL on your ASP.NET Core API - such like https://localhost:7155/swagger/index.html. You can acquire a swagger JSON file for your Web API from the link below.

Publish your ASP.NET Core Web API on Azure App Service by following this article.
2. Configure your Web API on API Management
Now, I believe you have already acquired a JSON file for your Web API. Choose "OpenAPI" among "Create from definition" items to utilize your JSON file.
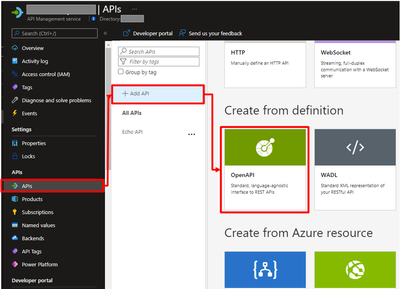
Select your swagger JSON file here, so your API definition on API management will be automatically generated. Next, you need to specify endpoint for your Web API on App Service. Choose "HTTP(s) endpoint" and put your App Service endpoint - you can also setup this endpoint in "Settings" tab.

Now, it's ready to call your API via API Management. Open "Test" tab and Click "Send" button, so you should receive API results.

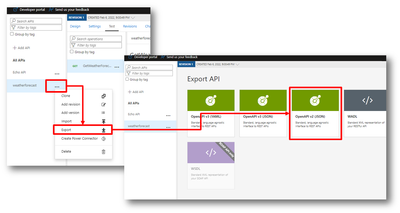
It's required to download Open API JSON file for Power Platform "custom connectors". Click your generated API and choose "Import". Note that Power Platform "custom connectors" require "Open API v2" as of Feb 2022 - not Open API v3 YAML/JSON.
Pick up a subscription key on your API Management to create "custom connectors" on Power Platform. Open "Subscriptions" tab on your API Management and pick up primary or secondary key to utilize on Power Platform.

3. Setup new custom connector on Power Platform Studio
A citizen developer can utilize your Web API. Open Power Apps Studio, choose "Custom Connectors" among left items, and create new custom connector with "Import and OpenAPI file".
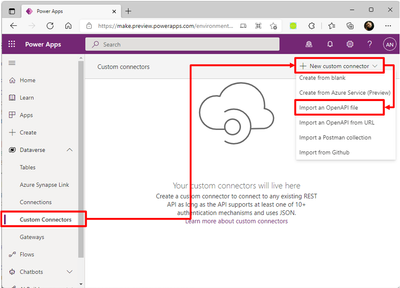
You just need to follow wizard and create new connector on "5.Test" step first. Put your API Key which you have picked up on your API Management here.
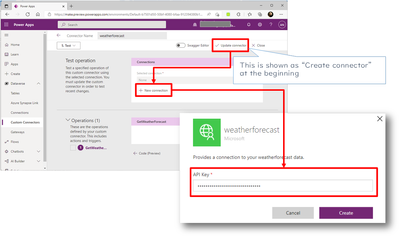
You can find your connection on "Connections" menu after creating new connection.

Go back to your custom connector among "Custom Connectors" menu. Now, you can execute "Test operation" on "5.Test" step.
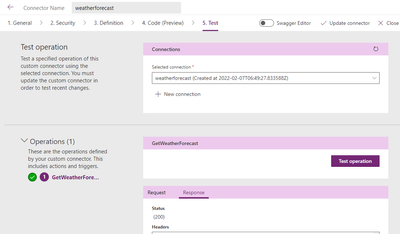
Now, you are ready to leverage your Web API on Power Platform!
4. Leverage your Web API on Power Apps with custom connector
Now, you are ready to create new Canvas App on Power Apps. Create your apps as "Bank app" and add your custom connector on Data.

Put "Vertical gallery" component on your canvas and you will find some error icons, so you need to edit formulas to fix the errors.
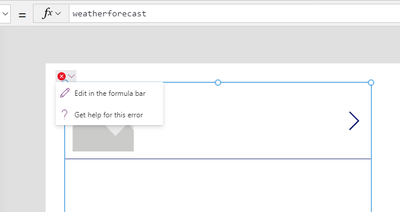
Update your formulas by following below.

Now, you can retrieve your Web APIs on Power Platform like below.

In next post, we will publish Web APIs via Developer Portal on API Management, so you can make ecosystem with your APIs for citizen developers.