
This post has been republished via RSS; it originally appeared at: Ask The Performance Team articles.
First published on TECHNET on Nov 01, 2012Welcome to day 11 of our Launch Series, and part 3 of our RDS series. The past few posts have covered the numerous User Interface changes and enhancements that have been made within Windows Server 2012 with regards to Remote Desktop Services (RDS). Today we are going to look at creating Personal Desktop Collections with VDI.
To Create a Personal - Managed Virtual desktop Collection
1. Open the Server Manager , Click Remote Desktop Services and Select Overview
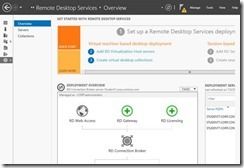
2. In Deployment Overview Section, Click Tasks and Select Edit Deployment properties .

3. Expand Active Directory and Select the Organization Unit if you would like to add the Virtual desktops to the domain , Click Apply

4. Select Collections tile

5. In Collection Section, Click Tasks and Select Create Virtual Desktop Collection , Click Next

6. Type the Name of the Collection and Click Next

7. Select the Personal Virtual desktop collection and Click Next

8. Specify the Virtual Desktop Template which you must configure in Hyper V and Make sure sysprep the virtual machine once you have install the software required by users and Click Next

9. Specify the User Assignment and Click Next

10. Click Next

11. Specify the unattended installation settings and Select the OU

12. Specify the Users and Groups and Specify the Prefix and Suffix for the Virtual Desktop

13. Specify Virtual Desktop allocation and Click Next

14. Specify Virtual desktop storage and Click Next

15. Confirm Selections and Click Create

16. View Progress and Click Close

17. In Collection Section , Right Click Personal ( Collection Name) and Select Task Status details

Personal - Unmanaged Virtual desktop Collection
1. In Collection Section, Click Tasks and Select Create Virtual Desktop Collection , Click Next

2. Type the Name of the Collection and Click Next

3. Select the Personal Virtual desktop collection and Uncheck Automatically create and manage virtual desktops , Click Next

4. Specifying the Existing Virtual Desktops and Click Next

5. Specify the User Assignment and Click Next

6. Specify the Users and Groups and Click Next

7. Confirm Selection and Click Create

8. View Results

9. In the Virtual Desktop Section under Personal Unmanaged Collection, we can see the Virtual machine which we have added and we can add more virtual desktop.

10. We must assign the Virtual desktop to the specific users if we use Disable automatic user assignment.

Well, that’s it for the post. Tomorrow we will conclude our 4 part RDS series with Session Hosts and RD Web Access.
-AskPerf blog Team