(Updated April 2020 to include lookups using workspace tables)
In this blog post “Active Lists out; make_list() in”,
Azure Sentinel has a variety of methods to perform lookups, enabling diverse sources for the lookup data and different ways to process it. Overall, I think you will find that Azure Sentinel capabilities offer unparallel lookup prowess.
Why lookups?
Why do you need to look up information in a SIEM query, whether hunting queries or detection rules? The top reasons are:
- Whitelisting – making sure a query ignores known outliers that do not justify alerting on. For example, excluding a backup process from a query identifying access to large amounts of data.
- Watch lists – in reverse, making sure that alerts with the listed entities are promoted, whether by assigning a higher severity or by alerting only on those. For example, flagging access to sensitive finance files.
- Enrichment – extending events or alerts with additional information needed for detection or investigation. Common enrichment sources include user information, asset or resource information, geoinformation, and threat intelligence.
Those are critical capabilities of a SIEM. While each specialized security tool has a partial view of the world, a SIEM can utilize its broader outreach to enrich event and alert data and centrally manage white lists and watch lists.
In this blog post, I examine implementing all those use cases in Azure Sentinel.
Lookup data
To reference the data, we first need to locate it. The variety of use cases above implies that the data may exist in many places and accessible by different means. Azure Sentinel supports two methods for accessing lookup information:
- Stored as files or tables in Azure Storage
- Stored in the Sentinel workspace as a custom table, uploaded using any custom connector technique.
Which one should I use? If the data is available as a file, Azure Storage is probably preferable. If ou need to create a script to process the data and prepare it, you might as well write it to the workspace.
Referencing an Azure Storage file using the KQL externaldata operator
To support a lookup from an external file, KQL offers the “exernaldata” operator. Unlike lookup implementation in other SIEM products, externaldata is not a lookup operator. Instead, externaldata enable using files as if they were Azure Sentinel tables, which allows pre-processing of the file before actually performing the lookup, for example filtering, parsing. I will demonstrate each in the examples below.
Creating the file
- Create an Azure storage account
- Create a blob container
- Upload to it your lookup file
In the following sections I will use the following CSV file, conveniently created in Excel:
UserName,DisplayName,Risk,Location
chris@contoso.com,Chris Green,70,”{ “”City””: “”Redmond””, “”State””: “”Washintgon””, “”Country””: “”US”” }”
ben@contoso.com,Ben Andrews,100,”{ “”City””: “”Oxford””, “”State””: “”Oxfordshare””, “”Country””: “”UK”” }”
nir@contoso.com,Nir Cohen,50,”{ “”City””: “”Tel-Aviv””, “”State””: “”””, “”Country””: “”IL”” }”
Gabriela@contoso.com,Cynthia Silva,20,”{ “”City””: “”Rio de Janeiro””, “”State””: “”Rio de Janeiro””, “”Country””: “”BR”” }”
melissa@contoso.com,Chandana  Agarwals ,100,”{ “”City””: “”Mumbai””, “”State””: “”Maharashtra””, “”Country””: “”IN”” }”
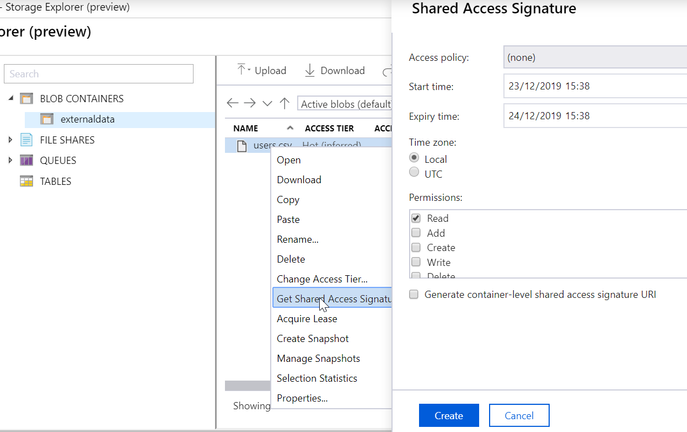
To get a secure access URL, use the “Get Shared Access Signature…” feature, which generates for you a URL similar to this one:
https://***.blob.core.windows.net/externaldata/users.csv?sp=rl&st=2019-12-23T12:49:20Z&se=2019-12-24T12:49:20Z&sv=2019-02-02&sr=b&sig=***…***
Using the reference file in KQL
Since we start with a whitelist example, we need only the first column from the lookup file and can use the following KQL command to reference the file:
externaldata (UserPrincipalName: string) [h“https://…”] with (ignoreFirstRecord=true)
Let’s examine the query.
- First, we defined the type for the first column in the CSV file. String in this case.
- Next, we provided the URL. Note the “h” added in front of the string: this ensures that we don’t log the string, which includes sensitive information, to our internal audit logs. For more information on query obfuscation read here.
- Last, we use the attribute ignoreFirstRecord=true, since the first line includes column names and is not relevant.
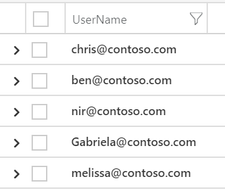
When you run this query, you get this:
Only the first column of the file is used since we defined a type only for it.
The filename extension identifies the file as CSV; however, we could have overridden the type. For example, if we force “txt” as the file type, each file line is considered a single field, and the query returns in the UserName field the entire line. Other supported formats include JSON and AVRO, as well as compressed files.
externaldata (UserPrincipalName: string) [h“https://…”] with (ignoreFirstRecord=true, format=“txt”)
For a full list of supported file types and other attributes, refer to this page.
White listing users
To implement while listing, let’s take Azure Sentinel’s rules to detect Failed login attempts to Azure Portal. The modified (and abbreviated) query is below, with the modifications marked in yellow:
let timeRange = 1d;
let whitelist = externaldata (UserPrincipalName: string) [h“https://…”] with (ignoreFirstRecord=true);
SigninLogs
| where TimeGenerated >= ago(timeRange)
…
// Exclude non-failure types
| where ResultType !in (“0”, “50125”, “50140”)
// Exclude whitelisted users
| where UserPrincipalName !in~ (whitelist)
…
The first modification defined the whitelist table using the externaldata command. Strictly speaking, you don’t have to define in advance the whitelist table, but it adds a lot to readability. The second modification checked that the UPN is not in the white list table. That’s all.
Wonder why the “~”; in the “not in” operator? It means that the comparison is case insensitive.
Using the lookup as a watch list
Let’s use the same alert rule to demonstrate a watch list. Login failures are not particularly interesting; however, there might be a few users for which we want to check each failure. Assume that those are the users for which the risk is higher in our lookup table.
Now we need additional fields in the reference table, so let’s extend the mapping of the fields. By specifying the other columns in the source file, we make them all available for our queries:
externaldata (UserPrincipalName: string, DisplayName: string, Risk: int, Location: dynamic) [h“https://…”] with (ignoreFirstRecord=true)
Now, by slightly modifying the alert rule query we implement our watch list:
let timeRange = 1d;
let watchlist = externaldata (UserPrincipalName: string , DisplayName: string, Risk: int, Location: string) [h“https://…”] with (ignoreFirstRecord=true)
| where Risk > 90;
SigninLogs
| where TimeGenerated >= ago(timeRange)
…
// Exclude non-failure types
| where ResultType !in (“0”, “50125”, “50140”)
// Include only watched users
| where UserPrincipalName in~ (watchlist)
…
The changes are:
- In green, As discussed, we now map all the fields in the reference file. Though we still don’t need the location field, it will be handy in the next exercise.
- In pink, the logic changes: first filtering the lookup table only for users with a risk higher than 90, and then changing the selection criteria in the query itself from “!in” to “in”, as now we want to match only on users in the list rather than exclude them.
- In cyan, cosmetic changes: changing the lookup table name from whitelist to watchlist and updating the comments.
You may notice that the watchlist table has 4 columns and ask yourself how is it used in an “in” clause. When a table is used with the “in” clause, the first column is used, which is what we need here. If we had liked to check against a different column, we could have appended a “project” operator after the “where Risk > 90” phrase to select the field we want to match against:
let watchlist = externaldata (UserPrincipalName: string, DisplayName: string, Risk: int, Location: string) [h“https://…”] with (ignoreFirstRecord=true)
| where Risk > 90 | project UserPrincipalName
Enrichment and field extraction
Let’s look at an additional piece of information available in the lookup file: the location of the user. Another option for making the failed login rule better is to alert only on failed login attempts by users originating not from their home country. To do that, we need to enrich the failed login event with information about the user’s home country.
This requires two significant additions to the toolbox we used for white lists and watch lists:
- The country information is a part of a field value. We need to extract it to use it.
- To look up a user and enrich the event with the country information, the “in” operator would not do. We need a more versatile method: the “join” operator.
Extract fields
Extracting the country code from the reference table is an excellent example of the versatility that externaldata provides. By making the reference file a native table, it enables further processing it.
For example, we can extract the country code from the location string using the extract function, which applies a regex to the Location field and assigns the identified part to the user_country calculated field:
externaldata (UserPrincipalName: string, DisplayName: string, Risk: int, Location: string) [h“https://…”] with (ignoreFirstRecord=true)
| extend user_country = extract (‘Country”: “(.*)”‘, 1, Location)
However, since the Location field is in JSON format, an alternative would be to use it as such. By changing the type of the Location field to “dynamic”, we can get user_country much more directly:
externaldata (UserPrincipalName: string, DisplayName: string, Risk: int, Location: dynamic) [h“https://…”] with (ignoreFirstRecord=true)
| extend user_country = Location.Country
Detection using the country value
Once the country code is available, regardless of the method, we can apply it to the events for detection purposes using the join operator:
let timeRange = 1d;
let userinfo = externaldata
…
let failed_singins = SigninLogs
…
failed_singins | join kind= inner (userinfo) on UserPrincipalName
| where Location != user_country
The join statement works as follows:
- The query assigns the label “userinfo” to the parsed reference table from the previous section.
- It then labels the original rule query as “failed_signins”.
- The “join” operator than enriches the failed_singins by matching the relevant userinfo records and appending all its fields to the failed signin event.
- Lastly, the “Location” of the original event is compared to the “user_country” which is the home country of the user and was appended in the previous step and alert only if they are different.
Hunting and investigation
To make reference tables easier to use interactively by analysts, you can sage the externaldata query as a function. This way, it can be used in any of the use cases above without needing to include the URL or the parsing clauses directly. So, for example, if the last externaldata query above is saved as the function “userinfo”, the “join” statement could have used userinfo without explicitly defining it in the query itself.
Using a workspace table as a reference table
Sometimes is it more convenient to use a custom log table in the workspace as a lookup table. Any method to ingest data to a custom table would work to populate it. A simple method is using the a PowerShell script, in this case to upload the exact same file as a custom table, facilitating the exact same use cases described above:
Import-Csv .\user_list.csv | Upload-AzMonitorLog.ps1 -WorkspaceId ‘…’ -WorkspaceKey ‘…’ -LogTypeName ‘users_lookup’
The command uploads the file to a table called user_lookup_CL (CL is always appended to custom log tables).
The one challenge with this approach is that you cannot delete data, just add to it, so if you want to update records in the table, you need to upload the records again, creating duplicates. KQL arg_max operator can help:
let whitelist = users_lookup_CL | summarize arg_max (TimeGenerated, *) by UserName_s
While each user will have multiple records, the whitelist will will include only the last record for each user based on the timestamp. This way, the whitelist table is a plug-in replacement for the externaldata implementation above.


