This post has been republished via RSS; it originally appeared at: New blog articles in Microsoft Tech Community.
From time to time, there are updates to Azure services that excite me more than others. I’m interested mainly in application and data integration, so whenever new functionality is available, I want to test it and share it with you. Today I cover something BIG! If you have ever extracted data from an SAP system, you know it can quickly become a complex process. Transactional tables often contain millions or even billions of rows, and as the extraction process resource-intensive operation, the daily processing of the entire dataset is usually impossible. SAP Table connector, one of the most frequently used by SAP customers, heavily suffered from these challenges. Therefore I’m super excited that Azure Data Factory has a new family member. The new SAP CDC connector, released a couple of months ago and currently available in Public Preview, uses the SAP Operational Data Provisioning API to extract data. It’s an actual game changer – the new connector is robust, performant and reliable. And what I like the most, it also automatically merges all delta extracts into a consistent target data store.
SAP OPERATIONAL DATA PROVISIONING
The SAP Operational Data Provisioning (SAP ODP) framework consists of function modules and reports. One of its core functionalities is simplifying the data extraction and replication processes. The improved communication layer ensures the data transfer is reliable and performant. In addition, it takes care of identifying new and changed information in the source objects. So far, if you wanted to provide such capability in your Azure Data Factory pipeline, you had to create a complex logic that uses watermarks to select relevant data. Comparing creation and changed dates was highly unreliable; moreover, some of the most frequently pulled tables did not even contain such fields.
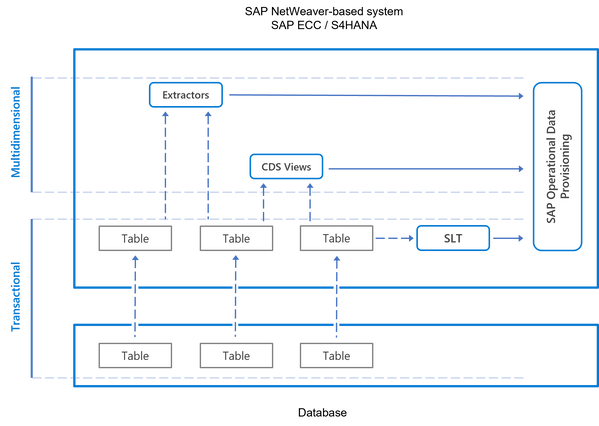
With SAP Operational Data Provisioning, you don’t have to worry about it at all. The framework works with a set of source SAP objects, including extractors, CDS Views and SLT and manage the extraction process end-to-end. The logic of correct selecting data is already built-in into these objects, so instead of re-creating it, you can focus on delivering value to your business. It’s like outsourcing complex challenges to the source system.
We can distinguish two types of data sources in transactional systems, like SAP S/4HANA or SAP ERP. Tables provide highly normalized data, but they are not so efficient when it comes to analytical scenarios. In such cases, you require additional processing to transform the schema of the data. Instead, you can use Extractors and CDS Views that already provide the data in a multidimensional format and are widely used in SAP Business Warehouse. The SAP Operational Data Provisioning supports both scenarios, but accessing information stored directly in tables requires SAP SLT that uses trigger-based replication to track changes.
The SAP Operational Data Provisioning framework is included in every modern SAP NetWeaver release, but you may need to install some notes or support packages. You can find more information in following SAP Notes:
1521883 – ODP Data Replication API 1.0
1931427 – ODP Data Replication API 2.0
ARCHITECTURE
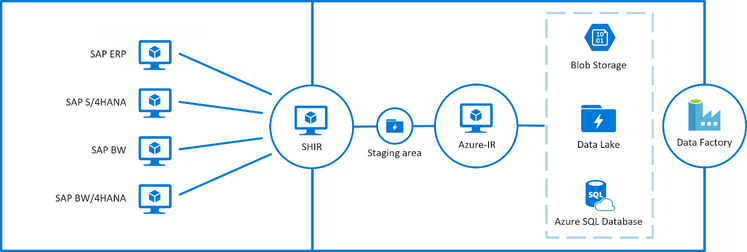
Before we dive deep into the configuration, let’s quickly walk through the solution’s architecture and all required components. Azure Data Factory is a cloud service that orchestrates the extraction process but can’t connect directly to the data source. It needs a Self-Hosted Integration Runtime (SHIR) installed on a local server, ideally close to the source SAP system, that provides compute resources to replicate data. It goes without saying that network connectivity between the Self-Hosted Integration Runtime and the SAP system is essential for data extraction to work. Such an architecture allows replicating the data no matter where your SAP system is deployed – on-premises or in any cloud.
The new SAP CDC connector uses the Mapping Data Flow functionality to automatically merge subsequent delta extractions into a consistent data store. Whenever you extract new and changed information, you must carefully analyse how to treat it in relation to the target datastore. Plain inserts are insufficient – you must take care of all CRUD operations and respectively update the target storage. Otherwise, you’ll end up with inconsistencies: duplicated rows (for records updated in SAP) or lines that should not exist any longer (for records deleted from the SAP system). This is where the Mapping Data Flow comes into place. It uses the Spark engine and a set of rules to combine all extracted records together without any additional activity from your side. This job requires Azure Integration Runtime (Azure-IR), in addition to Self-Hosted Integration Runtime, which takes care of the data extraction part of the process.
DEPLOYING INTEGRATION RUNTIMES
The Self-Hosted Integration Runtime uses the SAP proprietary RFC protocol to communicate with the Operational Data Provisioning framework. Therefore it requires the SAP .NET libraries to be installed on the same server to initiate the connection. You can download it from here:
SAP Connector for Microsoft .NET
I suggest always using the latest version available. During the installation, choose to Install Assemblies to GAC. Otherwise, the Self-Hosted Integration Runtime won’t find these libraries, and the connection to the SAP system will fail.
Once you have the .NET libraries on the server, you can download and install the Self-Hosted Integration Runtime.
Download Microsoft Integration Runtime from Official Microsoft Download Center
Similarly to the .NET libraries, the Self Hosted Integration Runtime installation is effortless and shouldn’t take more than 10 minutes. Before starting to use it, you must register it in the Azure Data Factory. Go to the Manage section in Azure Data Factory, choose Integration Runtimes and click the +New button

Go back to the server with the Self-Hosted Integration Runtime. Once the installation completes, provide the authentication key. Paste it and click Register.
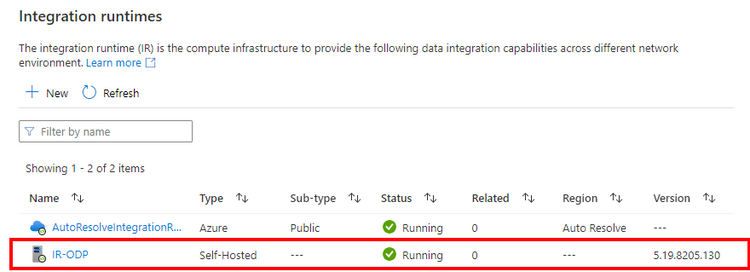
After a few minutes, you can see the newly deployed Integration Runtime in the Azure Data Factory. The status “Running” means the installation was successful, and you can start using it to copy data.
Click the +New button again to deploy the Azure Integration Runtime. Choose the Azure, Self-Hosted” option again, but in the next step, select Azure instead of Self-Hosted. Provide the name of the Integration Runtime. In the Data Flow Runtime tab, configure the compute size – my recommendation is to choose at least Medium. However, the target size depends on many factors, like the number of objects to replicate, desired concurrency or amount of data to copy. Confirm your changes by clicking Create button. After a short while, you can see both Integration Runtimes in Azure Data Factory.
Once you have Integration Runtimes ready, we can define Linked Services.
CREATE LINKED SERVICES
A linked service defines the connection to the desired resource – for example, your SAP system, data lake or SQL database. You can treat it like a connection string that stores all details required to initiate communication with an external system: the system type, its hostname or IP address, and credentials to authenticate. You define Linked Service in the Manage section of the Azure Data Factory:
Click +New button. Filter the list of available data stores and choose SAP CDC.
Provide the name of the linked service and all connection details to your SAP system, including the system number and client id. In the field “Connect via integration runtime”, choose previously deployed Self-Hosted Integration Runtime. To increase the security of the solution, consider using Azure Key Vault to store the password instead of typing it directly to ADF. In the Subscribed name, define the unique identifier you can use later to track delta extraction in SAP. Click Test Connection to verify everything works fine.
Now, create a linked service that will define the connection to the target data store. I want to keep my data in the lake, so I chose Azure Data Lake Storage Gen2. This time select the Azure Integration Runtime instead of the Self-Hosted one. Choose the data lake account you want to use and test the connection to verify everything works as expected.
Well done! You’ve defined the source and target system, so we can move to the next step – creating dataflow!
CREATE DATAFLOW
The dataflow allows you to extract and transform data. In the simplest form, it requires two actions:
- Source – that copies data from the source system and applies deduplication process (necessary in delta extraction, when there are multiple changes to the same record);
- Sink – that saves extracted data to the desired location and merges multiple delta extractions.
To fully use the designer functionality, I suggest starting the debugger. Some actions, like importing data schema, are only possible when the debugger runs.
In the Author section of the Azure Data Factory create a new dataflow. Choose Add Source in the designer:
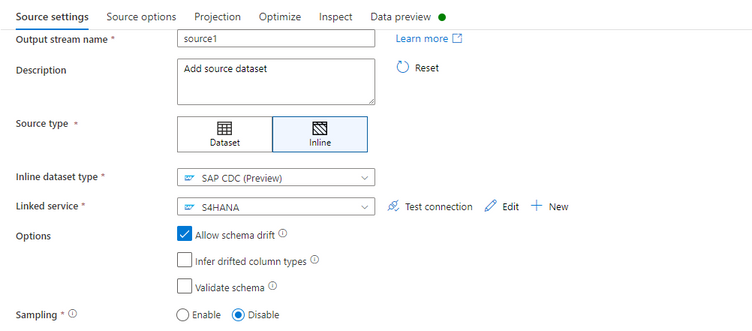
There are six tabs that you can use to configure the extraction process. In the Source Settings, change the Source type to Inline, choose SAP CDC as the inline dataset and select the Linked Service pointing to the SAP system.
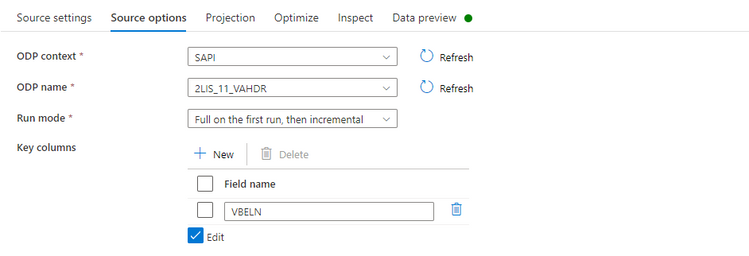
When you move to the Source Options tab, you can configure the extraction process. The ODP Context field describes the type of object you want to process. Multiple object types are available, including Extractors, CDS Views or SLT. I will extract Sales Document Header Data using an extractor, so I chose SAPI as the ODP Context and provided the name 2LIS_11_VAHDR in the ODP Name field. To enable delta extraction set the Run mode to “Full on the first run, then incremental” and choose the Key Columns – in many cases, Azure Data Factory automatically fetches key columns. For extractors, however, SAP doesn’t expose information about key columns, so you have to provide them manually.
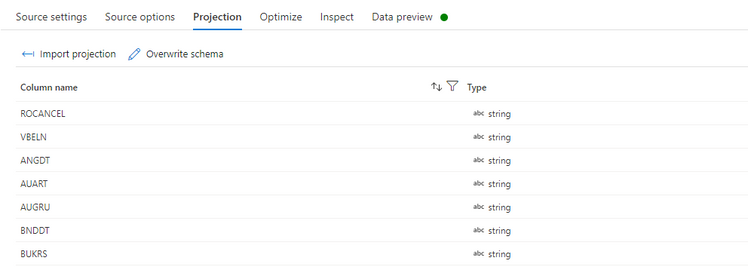
In the Projection tab, you can import the data schema, which allows you to change the default type mappings and simplifies working with the dataset if you want to add any transformations. The debugger must be running to import Projections.
The Optimize tab allows you to define partitions and selection criteria if you want to filter data based on column value, for example, fetching only records for a single company code. As I work with a small dataset, I don’t make any changes here.
Now, let’s take care of the target datastore. In the designer window, add a new action by clicking the small + button. Choose Sink to provide the target location for extracted data.
Similarly to the source, a couple of tabs are available that let you configure the target datastore. Change the Sink type to Inline and choose Delta as the dataset type.
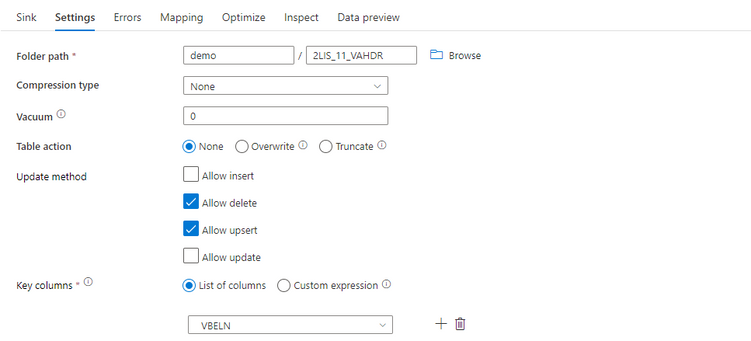
Move to the Settings tab. Provide the target file path. Change the Update Method to allow deletes and upserts. Provide a list of Key Columns used in the data merge process. In most cases, unless you defined some additional actions to change the schema, they are the same as defined in the Source.
That’s it. You created a simple dataflow that extracts data from a selected SAP object. The last thing left to do is create the pipeline that triggers the dataflow execution.
CREATE PIPELINE
Create a new Pipeline in the Author section of the Azure Data Factory. From the list of available actions, expand the Move and Transform section. Choose Data Flow and drag it to the designer.
In the Settings tab, choose the previously created data flow. Choose the Azure Integration Runtime created at the beginning of the process. Expand the Staging property and choose Linked Service and the file path used as a staging area.
That’s it! You’ve finished the configuration of all required components to extract data from the SAP system. If you haven’t already, click the Publish button to save all settings.
EXECUTION AND MONITORING
It’s time to verify that the whole configuration is correct. To run the extraction, choose the Add Trigger in the pipeline view and select Trigger Now.
Depending on the source table size, it takes a couple of minutes to extract data. Once the extraction finishes, the Pipeline status changes to Succeeded. You can monitor the process in the Monitor section.
You can drill down and see detailed information for any step within the data flow. There are 105 sales orders in my SAP system, and Azure Data Factory successfully copied all of them.
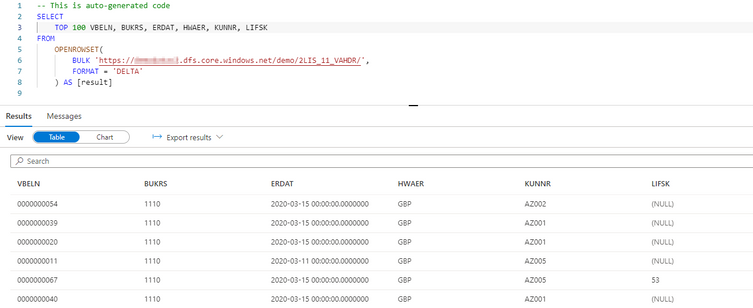
You can display extracted data in Synapse:
Now, to verify the delta extraction and data merge work fine, I make a couple of changes to sales order 11 – I modify the customer and the delivery block. Then, I trigger the extraction again.
You can use the ODQMON transaction in the SAP system lets you monitor the extraction process on the source side. You can display detailed information about processed data, including a data preview!
My three changes caused six entries in the delta queue. How’s that possible? After making each change, I saved the document, triggering three updates. I modified the Delivery Block from 07 to 05, which you can see in the fields LIFSK. Then I changed the customer from AZ001 to AZ002. Finally, I set the Delivery Block to 06. As the extractor sends before- and after-images for each update, we have in total six entries in the delta queue.
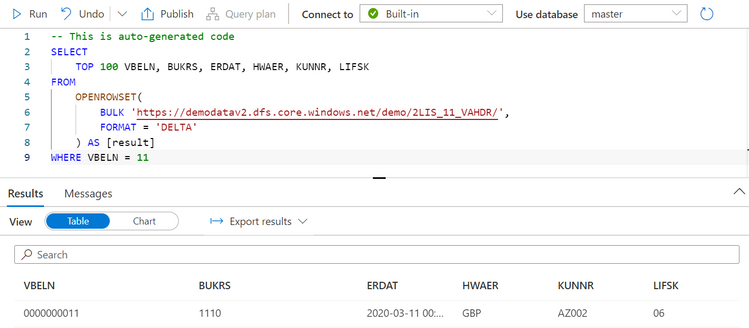
Let’s take a look at how it looks in the target store. I run the same query as before, only adding a WHERE clause to show a single document.
It works fine! The customer and delivery block contain the latest updates! The dataflow took care of deduplication and eliminating intermediate changes, then applied an update to the affected record.
Combining the world of SAP data and Azure has never been easier! The new SAP ODP connector available in Azure Data Factory solves the most common challenges with data extraction. It supports various objects in the SAP system, takes care of delta extraction, and provides a consistent data store that you can use for further processing and analytics.


