This post has been republished via RSS; it originally appeared at: Microsoft Tech Community - Latest Blogs - .
Prerequisites
Before you begin this tutorial:
- Install Visual Studio 2019 and install the Azure development and ASP.NET and web development workloads.
- Install the Service Fabric SDK
- Create a Windows Service Fabric cluster on Azure, for example by following this tutorial
- Create an Azure DevOps organization. This allows you to create a project in Azure DevOps and use Azure Pipelines.
Configure the Application on the Visual Studio 2019
1. Clone the Voting Application from the link- https://learn.microsoft.com/en-us/azure/service-fabric/service-fabric-tutorial-deploy-app-with-cicd-vsts#download-the-voting-sample-application
2. After that we can enter link to clone the voting application
3. After clicking on the Clone button, we can see that application is ready to open on Solution Explorer.
4. After that we have to build the solution so that all the dependency DLL will be downloaded on the package folder from Nuget store.
5. We need to cross check the Nuget package solution to find if any DLL is deprecated. If so, then we need to update all older version of DLL
6. After correcting the DLL version, we have to check the application folder a 'voting.sfproj'
Note – For Visual studio 2022 tool version will be 16.0 and we have to update the MS build version everywhere in the file 'voting.sfproj' file.
7. From where we can get the MS build version
8. We must cross check the dotnet version in 'Package.config' of the application and also at the service level.
9. Like in 'Package.config' is having the net40 but in service dotnet version net472.
10. We have to manually add the reference of MS build in service project file.
Eg -
11. Expected error based on above changes –
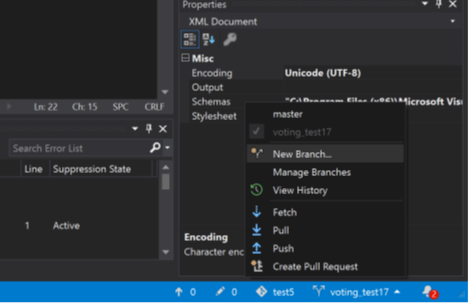
12. We must push our changes to our repo. Before that we must take care that we should not push our changes on master. We must create a new branch and push our changes to that branch.
13. In Visual Studio we can go to Team explorer.
14. After that sync the same repo on DevOps repo.
15. Now we have to create a Pipeline – click on New Pipeline
16. Then click in Use Classic Editor --> select the repos
17. Select the template – search for service fabric template-
18. After that all the Task will be generated.
19. In Agent Specification we must select the same version as Visual Studio version. Like we have selected the 2019 because we have built the project on VS 2019.
20. Use NuGet latest stable version. At time of this blog creation NuGet version is 5.5.1. Also uncheck the checkbox “Always download the latest matching version”.
21. In Build solution we must select 2019 as my visual studio version is 2019.
22. In “Update Service Fabric Manifest” task we can directly change the version in manifest.
23. In Copy files – we can gather the data from application manifest and application parameters file.
Please refer below image for above points (19-23)
24. Enable continuous integration checkbox, so that whenever we do any commit on the repo Automatically the build pipeline is triggered.
25. We can add some static variables while executing the pipeline by putting the value in variable.
Build Success mail –
Build failed mail-
Release Pipeline-
- Release pipeline is the final step where application is deployed to the cluster.
- Click on New Release Pipeline. Then again select the template for Service Fabric.
- Then add the Artifact by selecting the correct build pipeline.
- Click on 1 job,1 task
- Click on stages --> then we have to select the cluster connection. If no cluster creation is created, then click on new
- Create a service Connection as given in below image-
Note: - For Azure Active Directory credentials, add the Server certificate thumbprint of the server certificate used to create the cluster and the credentials you want to use to connect to the cluster in the Username and Password fields.
- How to generate the Client certificate value –
- Open to PowerShell ISE with Admin access.
- Paste the command- [System.Convert]::ToBase64String([System.IO.File]::ReadAllBytes("C:\Users\pritamsinha\Downloads\certi\certestuskv.pfx").
- Paste the output in the same PowerShell workspace area and remove all the space from beginning and end.
8. In case of some error with base 64 value then deployment will fail-
9. Enable Grant access permission to all pipelines.
Note – incase when cluster certificate is expired, and we have updated the cluster certificate then we need to update the thumbprint and client certificate value.
10. Then come to Deploy Service fabric application section –
- In Application Parameter – we must set the target location of the file where the application parameter file is placed.
- Enable compressed package so that application package will be converted to zip file.
- CopyPackageTimeoutSec-Timeout in seconds for copying application package to image store. If specified, this will override the value in the published profile.
- RegisterPackageTimeoutSec -Timeout in seconds for registering or un-registering application package.
- Enable the Skip upgrade for same Type and Version (Indicates whether an upgrade will be skipped if the same application type and version already exists in the cluster, otherwise the upgrade fails during validation. If enabled, re-deployments are idempotent.)
- Enable the Unregister Unused Versions (Indicates whether all unused versions of the application type will be removed after an upgrade.)
11. Configure the Continuous deployment trigger –
Then Save the config. And run the release pipeline.
12. Expected output-
References-
Azure pipeline reference link -https://learn.microsoft.com/en-us/azure/devops/pipelines/get-started/what-is-azure-pipelines?view=azure-devops
Service Fabric Azure CICD pipeline doc- https://learn.microsoft.com/en-us/azure/service-fabric/service-fabric-tutorial-deploy-app-with-cicd-vsts


