This post has been republished via RSS; it originally appeared at: New blog articles in Microsoft Community Hub.
Introduction
For any database created via Azure Portal, SSMS, ADS or via some automated scripting as a part of company's business requirements, it is frequently seen in large enterprises that there is a need to have a custom LTR (Long-Term Retention) and PITR (Point-in time Restore) policies to be enforced.
This is an operational overhead to implement and maintain the business requirements for each and every database creation, which is currently missing as part of Azure SQL Managed instance database creation.
Though, Azure SQL PaaS allows these LTR/PITR to be applied as per choice, however, we have seen customers looking for some sort of automated or built-in capabilities when it comes to have a custom LTR/PITR policy on creation of a database in Azure SQL Managed Instance.
In this blog post, we have provided the detailed steps on how to implement the automation using Azure Monitor, Log Analytics Workspace, and Azure runbook.
We'll use SQL Server Audit Groups to build alerts, and those alerts will then launch an automation runbook with PowerShell commands to implement the policy.
Step 1: The first step is to add "DATABASE CHANGE GROUP" to the audit policy you create (create an audit policy) for your Azure SQL MI Instance with "External Monitor." This will make sure that every database creation, modification, and deletion is logged.
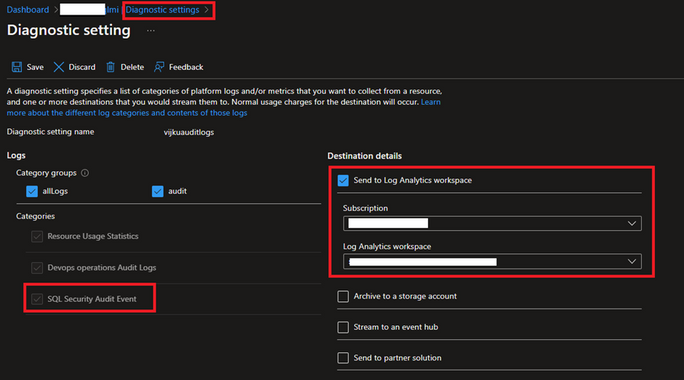
Step 2: Make that your Azure SQL MI instance has diagnostics enabled (diagnostics settings) so that all "SQLSecurityAuditEvents" are logged to your Log Space Analytics Workspace. Upon activation, all the logs will be captured in the Log Space Analytics Workspace.
Go to your Azure SQL MI instance in the Azure Portal, find Diagnostics Settings in the left pane, click on Add Diagnostic Settings, choose "SQL Security Audit Event," then provide your Log Analytics Workspace Subscription and Name before clicking Save. This makes it possible to record diagnostics events, send them to your Log Analytics workspace for KQL queries, and automate alerts.
Note: We advise using the Azure PowerShell module to automate the above processes if you have more than one Azure SQL MI instance. Please see below for details:
Configure streaming export of Azure SQL Database and SQL Managed Instance diagnostic telemetry
Step 3: Go to Logs in your Azure Log Analytics Workspace and make the relevant selections to enable the logs as described below.
- With all or chosen subscriptions, resource types, and resource groups (s)
Note: Depending on your decision and activity on the overall process, enabling it for many resources may have a detrimental impact on performance.
If you want to query many instances of Azure SQL MI, we recommend the scope to a Subscription or a resource. Then, construct a new query as shown below (can modify as per your requirements). Here, we're searching the SQL Audit Events category of Azure Diagnostics for any create database statements. When your query is ready, choose "Create alert rule."
Please see the sample KQL code below, which, that can be used to query searches for create database statements in security audit events:
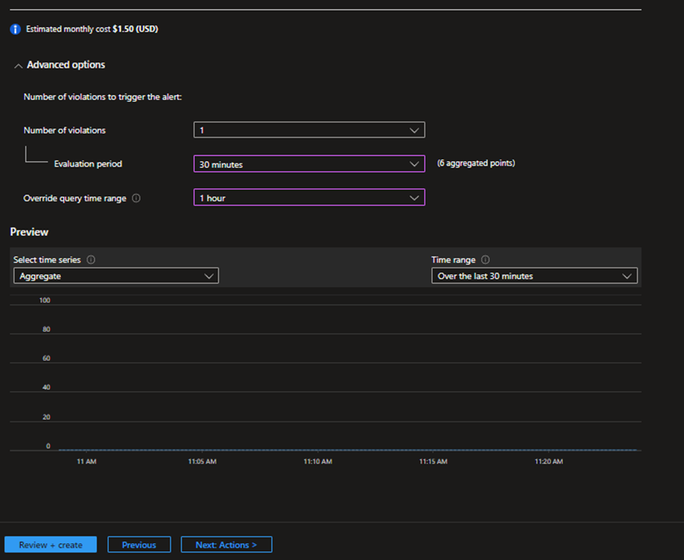
Step 4: Configure the Measurement Section below to summarize the results.
Step 5: Select the Action group name to trigger an action and, Configure the Actions by Selecting the Action Type and Name in the below screen.
Step 6: The PowerShell commands to set the LTR and PITR policies on a new SQL Managed Instance DB are listed below.
Note:
- The code example above shows how to establish your LTR policy to have weekly retention set to "P12W" and annual retention set to "P5Y."
- Provide the PowerShell runbook code above the parameter values from your alert rule.
Please click on the links below for further details about the various PowerShell options for creating the policies:
- Manage Azure SQL Database long-term backup retention
- Restore a database in Azure SQL Managed Instance to a previous point in time
Feedback and Suggestions:
If you have feedback or suggestions on this post or scripts, please contact the Azure Databases SQL Customer Success Engineering Team. Thanks for your support!


