
This post has been republished via RSS; it originally appeared at: New blog articles in Microsoft Tech Community.
First published on TECHNET on Aug 01, 2016Authored by Cameron Cox
Before we get started a huge thank you to Meghan Stewart (Support Escalation Engineer) and Mike Johnson (Senior Support Escalation Engineer) for their knowledge and assistance with this blog.
I have several customers who have been interested in Network Load Balancing for Configuration Manager Software Update Points (SUP). Reasons vary from wanting to avoid costly network catalog resyncs, to needing a more fluid resilient solution, responsible for patching their large scale environment. A few of considerations should be taken prior to deploying in production.
Considerations
- All or some clients will have to download a new catalog. Depending on how you implement, either by using one of the existing WSUS servers or standing up all new WSUS servers, your clients will need to download the entire catalog from its new WSUS source. You should plan to remove existing SUPs one at a time to slowly cutover clients. (Good news: TP 1604 will allow you to force clients to a new SUP via Client Notification. This will eventually allow you to cut over clients in a surgical manner vs shotgun style, once it reaches production builds.)
- Depending on your Configuration Manager infrastructure setup, it is currently only recommended to share WSUS infrastructure at the CAS or Primary infrastructure. If you have Secondary Site SUP, it will still need to remain as an independent WSUS/SUP endpoint. Additionally, you can only have a maximum 4 SUPs at a primary site. See best practice references here and here .
- DOCUMENT THIS CHANGE IN YOUR ENVIRONMENT! This is not a standard WSUS/SUP configuration. Even worse, there is nothing in the consoles to identify the WSUS/SUPs are load balanced and utilizing shared infrastructure. It would be easy to assume the SUP roles and WSUS endpoints can be reinstalled without proper configuration, potentially causing network outages due to clients downloading the catalog every time the load balancer would point them to a different WSUS/SUP server.
- Update your Windows Update Agent (WUA), especially for Windows 7 / Server 2008 R2. Over the past year, the Windows Product Group has made several updates to the WUA. This has been for various reasons, but performance has been one of the main reasons it has been updated. If you are in an environment where they only patch Critical and Security, you probably have not been updating WUA through your normal patching process. WUA is categorized as an “Update”, and in most cases only gets updated when your OSD/MDT gold image gets updated. Create a query in SCCM showing the versions of WUA and the OS in your environment. If they are not up to date, put together a process to update them prior to implementing this change in production.
The 50,000-foot view
At a high level, a minimum configuration requires 2 WSUS servers, 1 database server and some sort of load balancing method. Below is a diagram of this configuration.

Traffic comes in through the load balancer, to the IIS servers. If content is needed, IE: Eula download, the content is directed to the share to be downloaded. The DFS role is optional but recommended, especially for HA considerations. If the content is only stored on one of the servers, that server becomes a single point of failure. I will cover this in detail, but when you install WSUS, you point both installs to the same database server and content location. This is called a shared database and shared content configuration. The WSUS servers will be identical which is what allows us to load balance between them without clients having to download the entire catalog every time it hits a different WSUS server.
How To
Now that we have covered some of the considerations and a high-level overview of the end result, let’s get started.
-
Identify where the database is going to be installed. Your account should have sysadmin rights over that instance otherwise, the install will not work. In my lab, I am using a multipurpose SQL server in my lab, which uses the default instance name.
-
Identify where the content location for WSUS is going to be stored. I am going to setup a DFS share in my lab between the 2 WSUS servers as shown in the diagram above. I am not going to cover how to setup DFS, but if you need assistance in this, you can find an easy how to
here
.
- \\Contoso.Local\WSUS\WSUSContent$
-
Both WSUS frontend computer objects will need to have FULL CONTROL over this folder. In this example, my 2 frontend servers are the following
- CM12R2.contoso.local
- WSUS02.contoso.local
-
Identify your NLB VIP/Hostname, in my lab, the following is my NLB Hostname.
- WSUS.Contoso.local
-
Now that we have our database location and shared folder, we can install WSUS on the first server (CM12R2).
-
Open Service Manager and click on Add Roles and Features
-
Once you are at the Role selection, scroll to the bottom and select Windows Server Update Services.
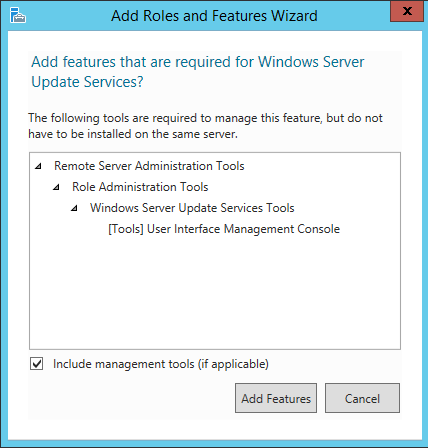
-
Accept the Add Features Prompt
-
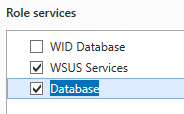
Once you are at the WSUS Configuration, Uncheck WID and Check Database.
-
Enter the share location for the WSUS content.
-
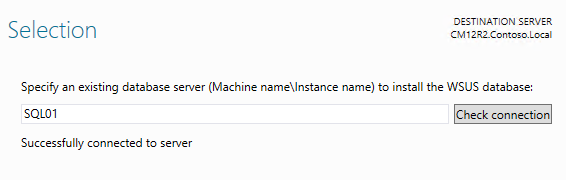
Type in the SQL Server name and click Check Connection
- Click next if successfully connected.
- Now Click Install.
-
Open Service Manager and click on Add Roles and Features
- Once the install is complete you will need to reboot your server.
-
Now WSUS is successfully installed om CM12R2, I can proceed with installing WSUS on my second server (WSUS02).
-
Open Service Manager and click on Add Roles and Features
-
Once you are at the Role selection, scroll to the bottom and select Windows Server Update Services.
-
Accept the Add Features Prompt
-
Once you are at the WSUS Configuration, Uncheck WID and Check Database
-
Enter the share location for the WSUS content.
-
Type in the SQL Server name and click Check Connection
- Click next if successfully connected.
- Now Click Install.
-
Open Service Manager and click on Add Roles and Features
-
Now we need to run the post install process via WSUSUtil.exe on BOTH servers.
- Open Administrative Command Prompt
- cd “c:\Program files\update services\tools”
-
wsusutil postinstall SQL_INSTANCE_NAME=SQL01.Contoso.Local CONTENT_DIR=\\Contoso.Local\WSUS\WSUSContent$
-
Once Post Install has completed successfully on both servers, we need to verify the following settings are correct.
-
Open Regedit on both servers.
-
HKLM\SOFTWARE\Microsoft\Update Services\Server\Setup
-
Verify the “SQLServerName” and “ContentDir” match their respective values.
-
Verify the “SQLServerName” and “ContentDir” match their respective values.
-
HKLM\SOFTWARE\Microsoft\Update Services\Server\Setup
-
Open IIS on both servers.
-
Navigate to Sites\WSUS Administration\Content
-
Right Click on Content Select “Manage Virtual Directory > Advanced Settings”
-
We need to verify the Physical Path is correct
-
Notice the first “\\” are not in front of my network location, I will need to add “\\” to ensure the Physical Path will work when clients are requesting files from the Content Virtual Directory.
-
Now my Physical Path is correct.
-
Notice the first “\\” are not in front of my network location, I will need to add “\\” to ensure the Physical Path will work when clients are requesting files from the Content Virtual Directory.
-
Now to verify the Physical Path Credentials are set to Application User (Pass-Through Authentication)
-
Select the line and click the ellipses on the right side.
-
Select the line and click the ellipses on the right side.
-
Now verify you can Explore from the Content Virtual Directory.
-
Right Click on Content and Click Explore
-
Explorer opens to the correct location
-
Right Click on Content and Click Explore
-
We need to verify the Physical Path is correct
-
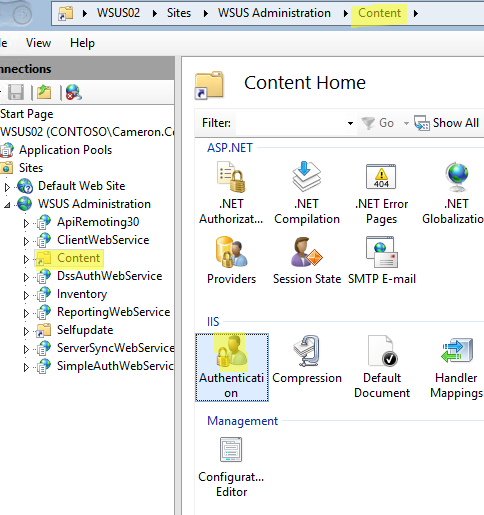
We need to verify the Authentication method on the Content Virtual Directory.
- Click on Content
-
Open Authentication
-
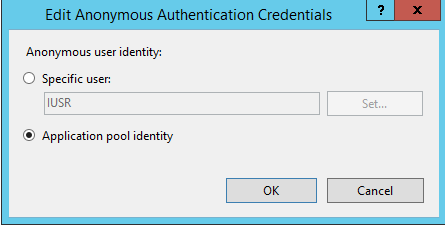
Right Click on Anonymous Authentication and click Edit
-
Change the User Identity to Application pool identity and click OK.
-
Navigate to Sites\WSUS Administration\Content
-
Now to verify ACL permissions on the content folder
- Go to the root of the WSUS Content directory. In my lab, I have navigated to \\Contoso.local\WSUS\WSUSContent$\WsusContent .
-
Create a text file in this directory called
ContentFolderAclsCheck.txt
-
Stop and Start the WSUS Service
-
Via PowerShell
- Stop-Service -Name WsusService
- Start-Start -Name WsusService
-
Via PowerShell
- If you return to the root of the WSUS Content directory, the ContentFolderAclsCheck.txt file should be gone. If not, ensure both server computer objects have Full Control over this share/directory.
-
Final Check is to run a health check from WSUSUtil
- Open an Administrator command prompt.
- Navigate to C:\Program Files\Update Services\Tools
- Run WSUSUtil.exe checkhealth
-
Open Event Viewer and verify there are no Event Errors from Windows Server Update Service.
-
If you have Event ID 10012, see
this
article.
-
If you have Event ID 10012, see
this
article.
-
Open Regedit on both servers.
- Next, we need to configure the WSUS Pool on both WSUS Servers based on the guidance from the Configuration Manager documentation here .
- Increase the WsusPool Queue Length to 2000
-
Increase the
WsusPool Private Memory Limit times 4 or set to 0
(unlimited).
- This should be based on the other Configuration Manager roles installed/not installed on the server and the amount of available RAM.
- To change these values, open IIS on both servers
-
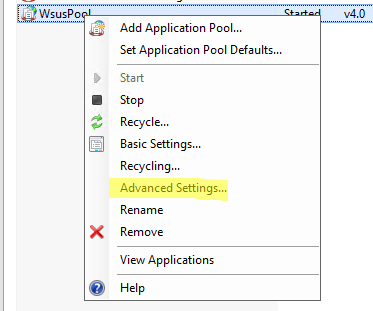
Expand the Server and click on Application Pools
-
Right click on WsusPool and choose advanced settings.
-
Change Queue Length to 2000
-
Set the Private Virtual Memory. I am changing my lab to 4 times the default.
-
Right click on WsusPool and choose advanced settings.
-
Now that both servers are setup and configured correctly we need to install the Software Update Points on both Servers.
- Open the Configuration Manager Console.
- Navigate to Administration\Overview\Site Configuration\Servers and Site System Roles
-
To install the first SUP role on a pre-existing Site System, CM12R2.
-
Right Click on the Site System and Click Add Site System Roles.
-
Verify information on the first page and Click Next
- Configure Proxy settings IF needed, Click Next.
-
Select Software Update Point Click Next.
-
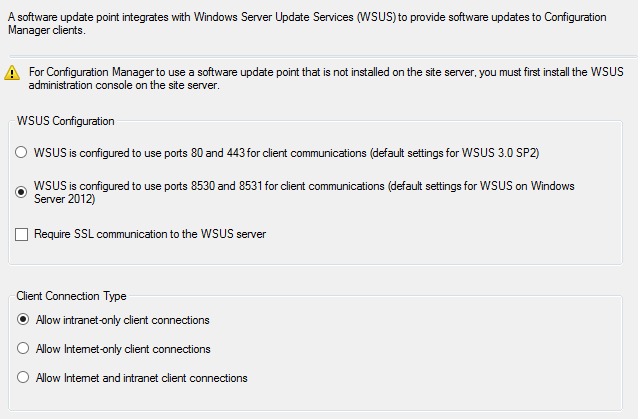
Select to use Ports 8530/853, Click Next.
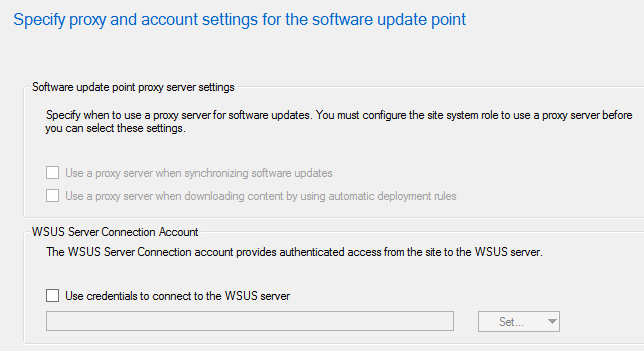
- If you use a Proxy, check the top 2 boxes.
-
If you are deploying a SUP into an untrusted forest, Check Use credentials to connect to the WSUS server and set the credentials. Click Next.
-
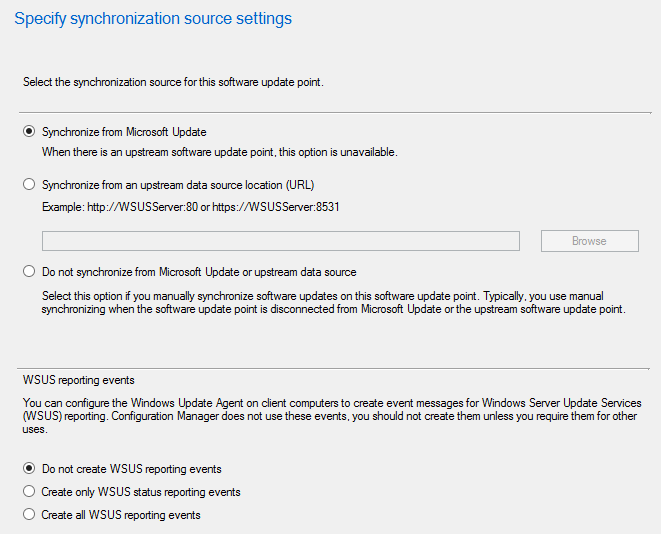
Set the synchronization point for your environment. In my lab, I am choosing to synchronize from Windows Update directly. Click Next. -Note: The following steps will only show up if you no longer have any SUPs in your environment.
-
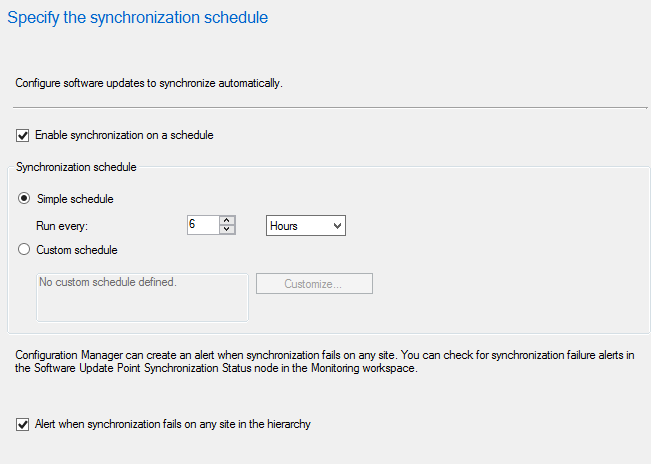
Set your synchronization schedule. In my lab, I set it fairly frequently, for testing purposes.
-
Set the superseded behavior for your environment.
- If you are on Configuration Manager Current Branch, Check the box to run WSUS Cleanup Wizard, this will perform WSUS maintenance for you.
- On the next 2 pages, select the classifications and products necessary for your environment.
- Choose your relevant languages.
- Once you have reached the Summary page, click install.
-
Check the relative Log folder for the SUPInstall.log
-
Right Click on the Site System and Click Add Site System Roles.
- Install SUP role on second WSUS Server, (WSUS02).
- Add the Primary Site Server to the Local Administrators group on the new server.
-
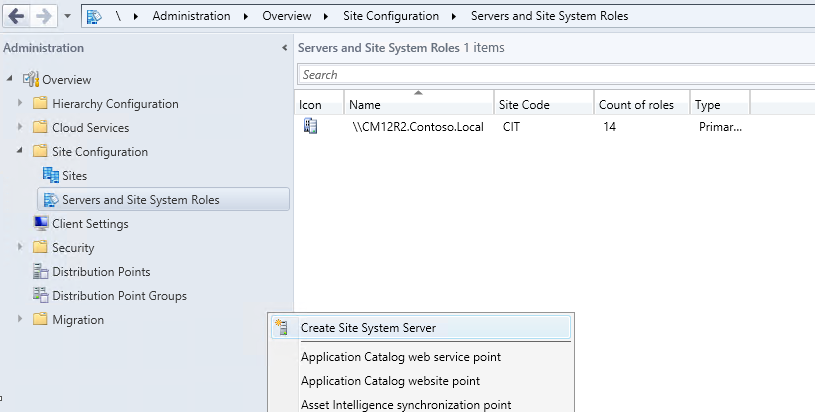
From the console, navigate to Administration\Overview\Site Configuration\Servers and Site System Roles.
-
Right Click Create Site System Server
-
Add the Server Name, Select the correct Site Code and Click Next.
- Configure Proxy settings IF needed, Click Next.
-
Select Software Update Point Click Next.
-
Select to use Ports 8530/853, Click Next.
- If you use a Proxy, check the top 2 boxes.
-
If you are deploying a SUP into an untrusted forest, Check Use credentials to connect to the WSUS server and set the credentials. Click Next.
- Once you have reached the Summary page, click install.
-
Check the relative Log folder for the SUPInstall.log
-
Right Click Create Site System Server
-
Now that both servers have WSUS installed, the SUP role installed the last configuration steps is to set the NLB address on both SUPs via PowerShell.
-
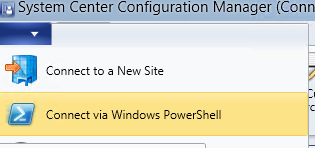
Launch PowerShell from the Console.
-
Run the following Cmdlets for both Software Update Points.
- Set-CMSoftwareUpdatePoint -Name CM12R2.Contoso.Local -NlbVirtualIP WSUS.Contoso.Local
-
Set-CMSoftwareUpdatePoint -Name WSUS02.Contoso.Local -NlbVirtualIP WSUS.Contoso.Local
- These commands will tell the clients to use the NLB address instead of the individual SUP host names. In my lab, I have a Round Robin DNS record for WSUS.Contoso.Local, which I would not recommend for production use. The -NlbVirtualIP will accept the hostname or IP address. You can check to see if clients are using the new address by looking at the registry. HKLM\SOFTWARE\Policies\Microsoft\Windows\WindowsUpdate.
-
Launch PowerShell from the Console.
-
Start a manual Synchronization
- From the Console, navigate to Software Library\Overview\Software Updates\Software Update Groups.
-
In the top right of the ribbon, click Synchronize Software Updates and say Yes to the prompt.
- Navigate to the Site Server Logs and open the wsyncmgr.log to ensure the first sync is successful.


Troubleshooting
-
If the first sync is not successful open the WCM.log and look for errors like the following.
-
If you have a 503 error, like the one above, ensure the WSUS pool is started at all the WSUS servers
-
If you have a 503 error, like the one above, ensure the WSUS pool is started at all the WSUS servers


-
If you have a 401 Unauthorized, like the one above, this typically means you have some type of authentication issue with either the WSUS Administration website or one of its subsites.
- In past experiences, this typically has to do with the Anonymous Authentication user not set to the Application Pool Identity. You can use the instructions above, Step 8, Section b, Part iii, to change other users to the Application Pool Identity. Only do so if something is not working correctly.
Reference Links
- Configure WSUS for Network Load Balancing
- How to Configure a Software Update Point to Use Network Load Balancing (NLB) Cluster
- Configuring WSUS 6.x for Network Load Balancing (NLB)
- Best Practices for Software Updates in Configuration Manager
- Software Update Point Configured to Use an NLB
- Event ID: 10012
Disclaimer: The information on this site is provided “AS IS” with no warranties, confers no rights, and is not supported by the authors or Microsoft Corporation. Use of any included script samples are subject to the terms specified in the Terms of Use