Azure Container Apps Dapr Binding Example

This post has been republished via RSS; it originally appeared at: New blog articles in Microsoft Tech Community.

We are happy to introduce this Preview feature which enables you to run microservices and containerized applications on a serverless platform.


Considering the distributed nature of microservices, you need to account for failures, retries, and timeouts in a system composed of microservices. While Container Apps features the building blocks for running microservices, use of Dapr (Distributed Application Runtime) provides an even richer microservices programming model.


Azure Container Apps offers a fully managed version of the Dapr APIs when building microservices. When you use Dapr in Azure Container Apps, you can enable sidecars to run next to your microservices that provide a rich set of capabilities. Available Dapr APIs include Service to Service calls, Pub/Sub, Event Bindings, State Stores, and Actors.


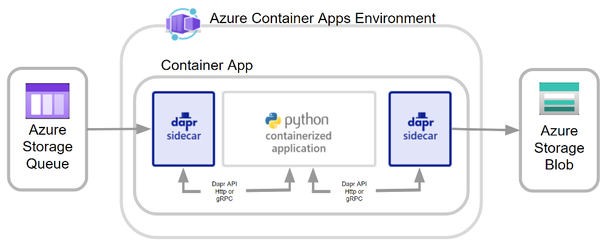
In this blog, we demonstrate a sample Dapr application deployed in Azure Container Apps, which can:

  • Read input message from Azure Storage Queue using Dapr Input Binding feature
  • Process the message using a Python application running inside a Docker Container
  • Output the result into Azure Storage Blob using Dapr Output Binding feature

Hanli_Ren_0-1640506258845.png

Prerequisites

  • Azure account with an active subscription
  • Azure CLI
    Ensure you're running the latest version of the CLI via the upgrade command.
    az upgrade​
  • Docker Hub account to store your Docker image


Deployment Steps Overview

The complete deployment can be separated into 3 steps:

  1. Create required Azure resources
  2. Build a Docker image contains the Python application and Dapr components
  3. Deploy Azure Container App with the Docker image and enable Dapr sidecar
  4. Run test to confirm your Container App can read message from Storage Queue and push the process result to Storage Blob


Create required Azure resources

Create Powershell script CreateAzureResourece.ps1 with the following Az CLI commands:

This script will:
Install Azure CLI Container App Extension

  • Create a Resource Group
  • Create a Log Analytics workspace
  • Create Container App Environment
  • Create Storage Account
  • Create Storage Queue (Dapr input binding source)
  • Create Storage Container (Dapr outbound binding target)

Note: Define your own values for the following variables in the first 7 lines of the script

For $LOCATION, in Preview stage, we can only use northeurope and canadacentral

$RESOURCE_GROUP
$LOCATION
$CONTAINERAPPS_ENVIRONMENT
$LOG_ANALYTICS_WORKSPACE
$AZURE_STORAGE_ACCOUNT
$STORAGE_ACCOUNT_QUEUE
$STORAGE_ACCOUNT_CONTAINER 


$RESOURCE_GROUP="" $LOCATION="" $CONTAINERAPPS_ENVIRONMENT="" $LOG_ANALYTICS_WORKSPACE="" $AZURE_STORAGE_ACCOUNT="" $STORAGE_ACCOUNT_QUEUE="" $STORAGE_ACCOUNT_CONTAINER="" az login Write-Host "====Install Extension====" az extension add ` --source https://workerappscliextension.blob.core.windows.net/azure-cli-extension/containerapp-0.2.0-py2.py3-none-any.whl az provider register --namespace Microsoft.Web Write-Host "====Create Resource Group====" az group create ` --name $RESOURCE_GROUP ` --location "$LOCATION" Write-Host "====Create Log Analytics workspace====" az monitor log-analytics workspace create ` --resource-group $RESOURCE_GROUP ` --workspace-name $LOG_ANALYTICS_WORKSPACE $LOG_ANALYTICS_WORKSPACE_CLIENT_ID=(az monitor log-analytics workspace show --query customerId -g $RESOURCE_GROUP -n $LOG_ANALYTICS_WORKSPACE --out tsv) $LOG_ANALYTICS_WORKSPACE_CLIENT_SECRET=(az monitor log-analytics workspace get-shared-keys --query primarySharedKey -g $RESOURCE_GROUP -n $LOG_ANALYTICS_WORKSPACE --out tsv) Write-Host "====Create Container App ENV====" az containerapp env create ` --name $CONTAINERAPPS_ENVIRONMENT ` --resource-group $RESOURCE_GROUP ` --logs-workspace-id $LOG_ANALYTICS_WORKSPACE_CLIENT_ID ` --logs-workspace-key $LOG_ANALYTICS_WORKSPACE_CLIENT_SECRET ` --location "$LOCATION" Write-Host "====Create Storage Account====" az storage account create ` --name $AZURE_STORAGE_ACCOUNT ` --resource-group $RESOURCE_GROUP ` --location "$LOCATION" ` --sku Standard_RAGRS ` --kind StorageV2 $AZURE_STORAGE_KEY=(az storage account keys list --resource-group $RESOURCE_GROUP --account-name $AZURE_STORAGE_ACCOUNT --query '[0].value' --out tsv) echo $AZURE_STORAGE_KEY Write-Host "====Create Storage Container====" az storage queue create -n $STORAGE_ACCOUNT_QUEUE --fail-on-exist --account-name $AZURE_STORAGE_ACCOUNT --account-key $AZURE_STORAGE_KEY Write-Host "====Create Stroge Queue====" az storage container create -n $STORAGE_ACCOUNT_CONTAINER --fail-on-exist --account-name $AZURE_STORAGE_ACCOUNT --account-key $AZURE_STORAGE_KEY


Run the Powershell script


PS C:\> Set-ExecutionPolicy RemoteSigned -Scope CurrentUser PS C:\> .\CreateAzureResourece.ps1


Build a Docker image contains the Python application and Dapr components

All the source code are saved in the following structure:
|-Base Floder
   |- Dockerfile
   |- startup.sh

   |- daprcomponents.yaml

   |- requirements.txt
   |- app.py

Dockerfile


FROM python:3.9-slim-buster WORKDIR /app RUN apt-get update && apt-get -y install gcc g++ RUN pip3 install --upgrade pip COPY . . RUN pip3 install -r requirements.txt ENTRYPOINT ["/app/startup.sh"]


startup.sh


#!/bin/bash echo "======starting Docker container======" cd /app python -u /app/app.py


daprcomponents.yaml

<AZURE_STORAGE_ACCOUNT>, <STORAGE_ACCOUNT_CONTAINER>, <STORAGE_ACCOUNT_QUEUE> values can be found in your CreateAzureResourece.ps1 script 

<AZURE_STORAGE_KEY> value can be retrieved by:

$AZURE_STORAGE_KEY=(az storage account keys list --resource-group $RESOURCE_GROUP --account-name $AZURE_STORAGE_ACCOUNT --query '[0].value' --out tsv)


- name: bloboutput type: bindings.azure.blobstorage version: v1 metadata: - name: storageAccount value: <AZURE_STORAGE_ACCOUNT> - name: storageAccessKey value: <AZURE_STORAGE_KEY> - name: container value: <STORAGE_ACCOUNT_CONTAINER> - name: decodeBase64 value: "true" - name: queueinput type: bindings.azure.storagequeues version: v1 metadata: - name: storageAccount value: <AZURE_STORAGE_ACCOUNT> - name: storageAccessKey value: <AZURE_STORAGE_KEY> - name: queue value: <STORAGE_ACCOUNT_QUEUE> - name: ttlInSeconds value: 60 - name: decodeBase64 value: "true"


requirements.txt


dapr-dev dapr-ext-grpc-dev dapr-ext-fastapi-dev gTTS requests Flask


app.py

It use the following code to take input from Dapr queueinput binding.

@app.route("/queueinput", methods=['POST'])
def incoming():
incomingtext = request.get_data().decode()

It use the following code to write output to Dapr bloboutput binding.

url = 'http://localhost:'+daprPort+'/v1.0/bindings/bloboutput'
uploadcontents = '{ "operation": "create", "data": "'+ base64_message+ '", "metadata": { "blobName": "'+ outputfile+'" } }'
requests.post(url, data = uploadcontents)


import os import datetime import base64 import requests from gtts import gTTS from io import BytesIO from flask import Flask,request app = Flask(__name__) #code daprPort = os.getenv('DAPR_HTTP_PORT') daprGRPCPort = os.environ.get('DAPR_GRPC_PORT') print('>>>>>>>>DAPR_HTTP_PORT : '+ daprPort ) print('>>>>>>>>DAPR_GRPC_PORT : '+ daprGRPCPort ) @app.route("/queueinput", methods=['POST']) def incoming(): incomingtext = request.get_data().decode() print(">>>>>>>Message Received: "+ incomingtext,flush="true") outputfile = "Msg_"+datetime.datetime.now().strftime("%Y%m%d-%H%M%S-%f")+".mp3" base64_message = process_message(incomingtext,outputfile) url = 'http://localhost:'+daprPort+'/v1.0/bindings/bloboutput' uploadcontents = '{ "operation": "create", "data": "'+ base64_message+ '", "metadata": { "blobName": "'+ outputfile+'" } }' #print(uploadcontents) requests.post(url, data = uploadcontents) print('>>>>>>Audio uploaded to storage.',flush="true") return "Incoming message successfully processed!" def process_message(incomingtext,outputfile): tts = gTTS(text=incomingtext, lang='en', slow=False) tts.save(outputfile) print('>>>>>>>Audio saved to ' + outputfile,flush="true") fin = open(outputfile, "rb") binary_data = fin.read() fin.close() base64_encoded_data = base64.b64encode(binary_data) base64_message = base64_encoded_data.decode('utf-8') return base64_message if __name__ == '__main__': app.run(host="localhost", port=6000, debug=False)


Using the following Docker command to create Docker image and push it to Docker hub.


cd "<the folder where you save your Dockerfile>" $Dockerhubaccount="<your docker hub account name>" docker build -t $Dockerhubaccount/daprbindingtest:v1 . docker push $Dockerhubaccount/daprbindingtest:v1


Deploy Azure Container App with the Docker image and enable Dapr sidecar

Use "az containerapp create" command to create an App in your container app environment.


az containerapp create ` --name bindingtest ` --resource-group $RESOURCE_GROUP ` --environment $CONTAINERAPPS_ENVIRONMENT ` --image $Dockerhubaccount/daprbindingtest:v1 ` --target-port 6000 ` --ingress external ` --min-replicas 1 ` --max-replicas 1 ` --enable-dapr ` --dapr-app-port 6000 ` --dapr-app-id bindingtest ` --dapr-components .\daprcomponents.yaml


 After you successfully run the containerapp create command, you should be able to see a new App Revision being provisioned.

Hanli_Ren_1-1640504426772.png

Go to Container App --> Logs Portal, run the following query command:

ContainerAppConsoleLogs_CL
| where RevisionName_s == "<your app revision name>"
| project TimeGenerated,RevisionName_s,Log_s

Hanli_Ren_2-1640504476550.png

In the log, we should be able to see:
- Successful init for output binding bloboutput (the name is defined in the daprcomponents.yaml)
- Successful inti for input binding queueinput (the name is defined in the daprcomponents.yaml)
- Application discovered on port 6000 (as we defined in Python application code)
- Also Dapr should be able to send OPTIONS request to /queueinput, and get Http 200 response. That means the application can take message from input Storage Queue.

Hanli_Ren_3-1640504520504.png

Hanli_Ren_4-1640504532368.png


Run test to confirm your Container App can read message from Storage Queue and push the process result to Storage Blob

Now, let's add a new message in the Storage Queue.

Hanli_Ren_5-1640504557842.png

Hanli_Ren_6-1640504576129.png

After the application being successfully executed, we can find any output audio file in the output Storage Blob.

Hanli_Ren_8-1640504652390.png

To check the application log, you can use Container App --> Logs Portal, run the following query command:

ContainerAppConsoleLogs_CL
| where RevisionName_s == "<your app revision name>"
| project TimeGenerated,RevisionName_s,Log_s

Hanli_Ren_9-1640504702231.png


Leave a Reply

Your email address will not be published. Required fields are marked *

*

This site uses Akismet to reduce spam. Learn how your comment data is processed.